Tag

DIY

Where We’ve Been: Sentimental Art

TGIF! As I write this, I’m baking a birthday cake and gluten free brownies to get ready for a weekend of celebrations. I will share more on Monday about birthdays, Sunday dinners, and best of all, some fall decorating ideas.

To conclude anniversary week, I wanted to share a fun and easy sentimental art project.

Before Brian and I were married and had children, other than going to concerts (which I talk about here and here) we did a little bit of traveling. The best part of traveling with Brian is he likes to see everything, and get around like the locals. When we went to NYC, we traveled all over on the subway, and pretty much walked all over Manhattan. Unlike most people who gain weight on vacation from eating rich food and relaxing on the beach, we usually come home with loose jeans from walking EVERYWHERE.


With three little ones, and with us finally finding a house, and me FINALLY not being pregnant, we are hoping to maybe take a few small trips in the future.

For right now though, I would like to mark all the places we’ve been so far. I found these adorable free printables. Lately, I have kind of embraced all the free art printables that are available online. I find them so cute and simple, and an easy way to spruce up an empty wall.

Here are some free printables in our kitchen:


And this one in our Dining Room:

So, I printed out the entire USA, and used a Sharpie Pen (I love these pens, they don’t bleed or run and I literally use them for everything) to mark all the places we have been so far. I put it in a black frame to match the rest of the art work hanging in our bedroom.


Ta Da. For the cost of a frame (which if you know anything about me you know I already have a few black frames on hand), you too can have adorable prints in your home. Also, you can make any additions that make them personal to you (like marking all the places you have been together).

Linking up at Serenity Now. Check out some other great recipes and ideas!

Flashback Friday: Family Room

Welcome to another installment of Flashback Friday. If you would like to read more about all the sprucing up we did upon purchasing this home you can check out our kitchen progress, the bathroom spruce up, the living room/dining room updates, and the upstairs bedrooms.

The family room needed very little work when we moved in. The floors, crown molding, paint, and fire place mantel had all just been replaced right before we purchased this house. The bathroom on this level was also recently remodeled. The only change that was made is the wall behind the bar was painted from blood red, to the same sage green that we used in the upstairs bathroom.

Here are a few before pictures.


This room is where we spend most of our time. The kids toys are here, the TV is here, and the comfier couches are here. Because this room is usually a mess of toys and Brian and I’s projects stacked up on the bar, we are just happy that it happens to be sort of clean right now (just keeping it real). Here is what our family room looks like now.


Remember I said sort of clean. This is the toy area, the kids got to it right before I took photos (oh well, just keeping it real).


Getting Down to Business: Front Hall Closet Organization

This project has been a long time coming. With three little kids who are pretty active, and who are now about to start pre-school, I was starting to stress about an area for them to put backpacks, lunch pails, shoes, coats, not to mention soccer cleats, shin guards, swim goggles, and all the other crap stuff that kids come home with. This is what our dumping ground looked like last week.


Martha Stewart would be appalled. I’m appalled, and honestly cannot believe I’m sharing this photo.

Anyway, the first step was to find a place for mail, keys, and papers. I painted an old dresser for all of those things, which you can read about here.

Then, I decided we should have a place for everything else that comes in the door. Since my kids are too little to do the hanger thing, I decided on hooks for coats and backpacks, and plenty of baskets for shoes, hats, and other gear. I also thought it would be nice to have a place to sit and put on shoes or set things down. So, I made our closet into a mini mudroom.

I bought three Ikea Lack tables for $8 each, and put them in the closet to create a bench with a place for baskets and boots. Then, I added some shelving which I turned sideways to create cubbies for more storage. Next, I removed the hanger bar, and added lots of hooks.


Now, the kids are ready for school. We all have places for our things, and we have extra hooks and space for guests.


I think I would like to make some cushions for the top of the bench, but I am just happy we are organized.

I am so happy to be linking up with Honey We’re Home. There is a home organization link up party going on there now. This is one of my favorite places for ideas!


I am also linking up with I Heart Organzing. Today is a link party sharing everyone’s back to school organizing ideas. I think I’m going to be on a Pin frenzy today!


Flashback Friday: Upstairs

When we purchased this house, we knew that the upstairs would need a huge overhaul. The reason for this being, the previous owners had 3 dogs, and carpet. For people with allergies, this is a HORRIBLE combination. We all suffer from allergies, so Brian and I asked my Mom if we could bunk up with her a little longer, and do some projects to get the house livable for the kids.

So, in all three bedrooms, we removed carpeting, baseboards, and doors. We also painted all the trim around the doors and windows as well as painted all the bedrooms, ceilings, closets, and hallway. We also switched out all the light fixtures as well as all the HVAC registers and returns (we had replaced the HVAC system, and had the ducts cleaned so we decided to replace all the registers and returns because they were all gunked up with dust and fur…ew). We had help with all of these jobs. Friends and family pitched in, and since this was before Brian was handy with a miter saw, we asked a contractor to install the flooring for us.

Keep in mind, I didn’t know we would have a blog about our home, so I don’t have too many before shots. The upstairs had different color bur bur carpeting in every room, dark walnut trim and doors (except for my daughter’s room) and muddy colored walls.

Without further ado.


Here are what the bedrooms look like now. There are still some things we would like to do, like hang some art.
Check out our other updates: kitchen, upstairs bathroom, living room/dining room
P.S. Today I am linking up at Serenity Now. You can check out all the amazing projects people are up to, and even get some Ideas for your own home.

Shazam: Painting Nightstands

Brian and I desperately need bedside tables. Right now we are using an old night table that is very small, and a TV Tray. They serve their purpose, but aren’t really doing anything to make our room look pretty. They are blah.

A few months ago, my Mom gave me these two tables. I know what you are thinking, these tables are pretty blah too. Wait for it.


The first one is a printer table. The idea was to put your printer on the table and your paper in the little shelf underneath. The second table, was a table that has been around for a long time. I think it belonged to my grandmother at one time, and then was in my sister’s bedroom when we were growing up. The top of this table is actually leather.
I decided to make these our nightstands. I know they look nothing alike, and from totally  different eras (as in one was made for a computer and the other was around before computers even existed). Brian, however, thought they were perfect as they are both the perfect height for the bed, and they wouldn’t cover the vents on either side of our beds (Brian tends to be a little finicky about that).
So this is what I had to work with. It was ok that they didn’t match perfectly, and I was eager to paint them. Once they are the same color they will be more unified. Especially after I put some cute matching lamps on top of them too.
They both have some pretty intricate detail to them, so I was hesitant to use a brush to paint them, so the logical step was to spray them. I do have an electric paint sprayer, but I figured to dirty that thing up and to buy a gallon of paint would be more of a pain and a little expensive for two small tables. So I went to Home Depot, and found this.
Rust-oleum’s Universal Paint and Primer in one in a nice Glossy White was the perfect solution to the problem of these tables. I roughed both of the tables up a little bit with some fine grit sandpaper. Both tables already had some kind of glossy finish to them already and I wanted to be sure that the paint would adhere to the tables. Then, I taped the leather top of the dark wood table. I’m thinking I will recover it with some cute fabric or something.
Outside in the driveway with a drop cloth down, I sprayed the tables with fast, long, and even strokes. This is what the tables looked like after one coat.


This is what they look like after the second coat.
When Brian saw them, he said, “SHAZAM.” Which is a good thing. I hope.
Now, I’m almost done. I have to let them sit outside for a bit and make sure they don’t smell too bad before bringing them in the house. Also, I still need to find some fabric.
Stay tuned for the finished product.

Flashback Friday: Living Room/Dining Room

This week’s installment of Flashback Friday covers the Living Room and Dining Room. These rooms required a coat of paint for move in purposes, but there are some plans that we have for the future of these rooms.

I think our eventual goal would be to make the Living Room more family friendly. One of the projects that is coming soon is a desk that Brian will be building (we already have the lumber).

I have one before picture, but this level consisted of more mustard yellow. You cannot tell from this picture but we are talking French’s Mustard. Also, all the walls and some of the trim had marks and dings from the previous owners.

Then with a little help, I chose the perfect shade of blue and started painting. These rooms flow into each other so I knew I would have to choose a color that I really liked as it would be everywhere. I didn’t want to go the neutral route as a lot of the furniture we had planned for the room, was pretty neutral. Also, I wanted to play off all the light these rooms get. I wanted something clean and bright so we chose Behr Aqua Breeze (I apologize for the iPhone photos. I didn’t know I’d be writing a blog when I took these).


So here is our entrance, living room, and dining room after our personal touches. We added a picture gallery, a dining room table that Brian built and I stained, and lots of  other furniture that we already had on hand. Here is our progress thus far.


New Kitchen Light Fixture: Bye Bye UFO

Ugh, I could not stand this light fixture above our kitchen table.


It always seemed too small for the space, and to me it resembled a UFO. I was starting to wonder when E.T. was going to come back for it.
Brian and I did a little shopping last week, and saw something that I immediately liked. It was classic and a little vintage, and even better it was on sale for $30! They only had the floor model left, but that was ok with us. No scratches no dents.
Brian has updated a lot of light fixtures in the past (mostly because I we have always switched light fixtures in every place we live), so he is an old pro.
This is what it looks like now.


So much better. I think it goes with our old church pew.

Flashback Friday: Bathroom Spruce Up

Welcome to the second installment of Friday Flashback. The first Friday Flashback was last week where I talked about our kitchen progress.

This is our upstairs bathroom. Just like last week, this is a primo example of where some paint and a few small changes can make a big difference. So in true HGTV fashion you will see a quick before and after transformation.

We will begin with dark floral border and sponge paint.


Gold mirror, beige painted vanity, and dated hardware.
Old almond toilet, and white tile with yellow triangle pattern.
And this…
First, Brian ripped up all the tile, and we had some help with installing some leftover porcelain tile that the previous owner had leftover from the downstairs bathroom remodel (we only had to get thin set and grout).


Then, on another late night, my mom and I scored and steamed the border and removed it. Sanded down the drywall to remove the sponge paint finish and repainted the bathroom a pale green.


Brian removed the almond toilet, and with a little research and the help of his brother installed a new Kohler toilet in white.
Next, I sanded, primed and painted the vanity in black semi gloss and added brushed nickel hardware and a matching black mirror to freshen it up.
Then we added a few finishing touches.
Like some extra storage with this great cabinet from Target.
And this adorable Amy Butler shower curtain I got a Bed Bath and Beyond on clearance and with a 20% off coupon (Ca-ching).

Finally, a nice new shower head.

So there you have it. Our upstairs bathroom spruce up. Thank goodness for paint and clearance shower curtains!


Rock On: What I did with our ticket stubs

Brian and I love music. Pretty much any kind of music. When we were dating, we went to concerts all the time. Our first “real” date was at Ravinia to see the BoDeans. Which speaking of music, is there anyone out there who is digging Mayer Hawthorne or JD McPherson lately? I love their old school sound! Anyway, I digress.

I have all these ticket stubs…


…and until today, I kept them in a file folder.
I am pretty sentimental. I scrapbook, take tons of photos, save things like ticket stubs. So, I decided I wanted to display them.
This is what the look like now.
I found this idea on Pinterest. All it took was a shadow box, and some things I had on hand, and about 30 minutes during nap time (which left plenty of time for me to take a little snooze too). Since this project was so short, I linked up with Hi Sugarplum for the “In About an Hour” project link party.
I printed some cute font on some scrapbook paper, cut out the letters in little circles using a Creative Memories Punch, and using some double stick tape, taped them to a larger patterned piece of paper.


Then, I just slipped the paper and the tickets in the shadow box I got at JoAnn Fabrics on sale and with a coupon (BOOYA).
Voila! A perfect and sentimental way to display all the cool concerts we’ve seen.


Wouldn’t it be cute to make these for kids too? I’ll get on that.
Right after I take a nap.

The Icing on the Cake: Staining Unfinished Wood

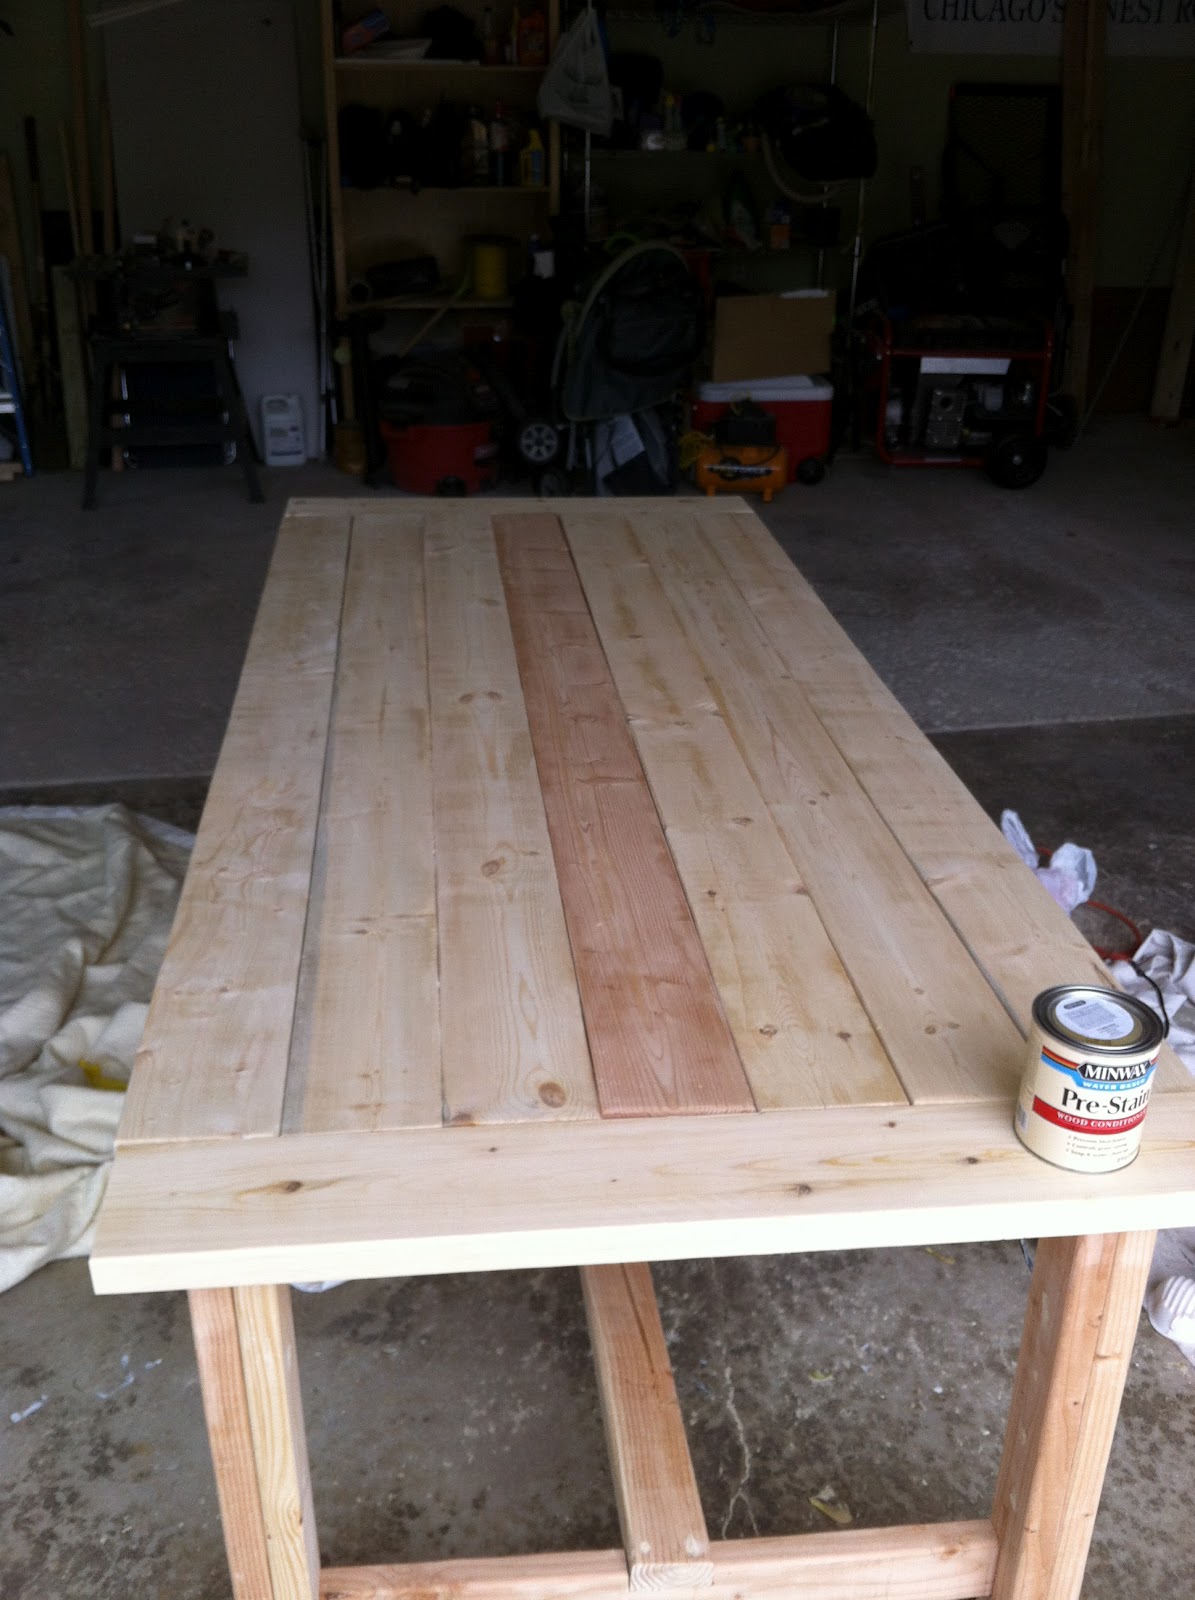
After Brian built me this beautiful farm style plank table, it was time to stain it. I spent an afternoon at Home Depot, learning everything I could about stain, application, drying time, and polycrylic finishes. I also, spent some time picking out the perfect medium toned color as well as assuring I picked out a matte finish so the table would look old and not too shiny. I wanted to learn as much as I could because half of the look of this table was not only the style, but the color and finish.

Here is the finished product:

And this is how I got there.

Supplies
Synthetic Bristle Paint brushes
Lint free rags (I used some of Brian’s old holey white undershirts)
Sandpaper (both course and fine grit)
Electric Sander
Sponge
Bucket of water
Minwax Water Based Pre-Stain Wood Conditioner (1 quart)
Minwax Water Based Wood Stain in Colonial Pine (1 quart)
Minwax Water Based Polycrylic Protective Finishe in Satin (1 quart)
Latex (or non-latex) tight fitting gloves
Safety glasses

Smooth to the Touch: I started this project by sanding the entire table with my electric sander with a course grit sandpaper and then followed up with a find grit sandpaper. I just wanted the table to be smooth to the touch. I figured there was going to be a lot of people eating at this table over the years, and I really didn’t want anyone having their roast chicken with a side of splinter. I was extra careful to do underneath the table as well.

Clean up, clean up, everybody clean up: This part was crucial. The “expert” (I say expert, because she knew an awful lot about staining) at Home Depot said to wipe off the table with damp sponge a few times to try and remove any residual dust from sanding. She said that the more I did it the smoother my staining application would be. I made sure that the table was completely dry and free from any water spots before I started the next step.

Conditioner IS better: This step is one that some people told me to skip ahead of time, but after talking to my new best friend at Home Depot, she assured me that this step is important and not very time consuming. Since this was the first time I was staining something, she said I would get much better and more even coverage if I used a wood conditioner. Using a synthetic bristle brush, I applied the wood conditioner. It only took about five minutes to dry, and was very easy to apply. I am so glad I didn’t skip this step, because it was the least time consuming step, and the color went on perfectly even.

The Scary Part: Applying stain isn’t rocket science, but it does take a light hand and a bit of patience. The key I found, is to not do too big of an area at once. So using a synthetic bristle paint brush, I applied a light layer of stain to a small area of the table (one leg, one plank at a time etc.) and then using a rag, LIGHTLY wiping off any excess stain. You don’t want to have to much stain sitting on the surface for too long of a time as that increases the intensity of the color and then the color becomes uneven. Also, using a light hand to wipe the excess stain, allows for more even color as you are not wiping off too much stain that you have just applied. The first coat of stain was not dark enough for me, so once the first coat was completely dry (I waited until it was dry to the touch, about 5 hours), I applied another coat just like the first coat.
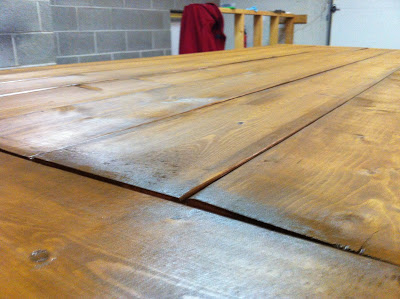
First coat of stain


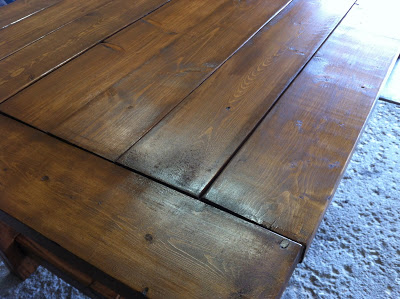
Second coat of stain

Gettin’ Poly With It: This step is again, not hard, just requires a bit of patience (which, I’m not going to lie I was starting to run out of because I just wanted to eat dinner on our beautiful new table). Using my trusty synthetic bristle brush, I brushed a thin layer of Minwax Water Based Polycrylic on the table. I was very careful to make sure that the layer was thin as to reduce any kind of dripping. Once it was dry (minimum of 2 hours), I lightly sanded the table by hand with a find grit sand paper. Then, using a dry cloth wiped any dust, and applied the next coat. Minwax suggests five (yes, five) coats of the polycrylic for maximum protection. I did do the suggested five coats on the top of the table where there would be more of a chance of drinks spilling and food stains, but on the legs and other exposed areas underneath, I only applied three coats.

This process was much more time consuming than I ever could have thought. But I must admit it was completely worth it.

Just a few things that I think are worth mentioning:
1. Since I decided to go with a water based stain, everything else I used had to be water based as well. Water based wood conditioner and water based polycrylic. If I had chosen an oil based stain, I would have had to use all other oil based products as well.
2. If I could do it over again, I might have stained all the planks on the top of the table BEFORE Brian had put them together. I did a pretty good job of getting in all the cracks of the table, but it would be even better had I been able to reach all sides of each plank with a paint brush.
3. I was extra careful to make sure I did this whole process in a well ventilated area.

Here is a couple more after shots.


As you can see Brian and I do pretty good work, which was first evidenced by our three kids.