Month

February 2014

Thirsty Thursday: Perfect Sweet Tea

I love tea. Hot or cold, day or night, out and about in my bed, well or sick. It is my ultimate drink. I’ve been drinking tea since I was very young, and have always had some on hand. When I drink tea hot, I typically drink it black, unless I am sick, I have it with the teeniest bit of honey. In the summer, I like a big tall glass of sweet tea or an Arnold Palmer.

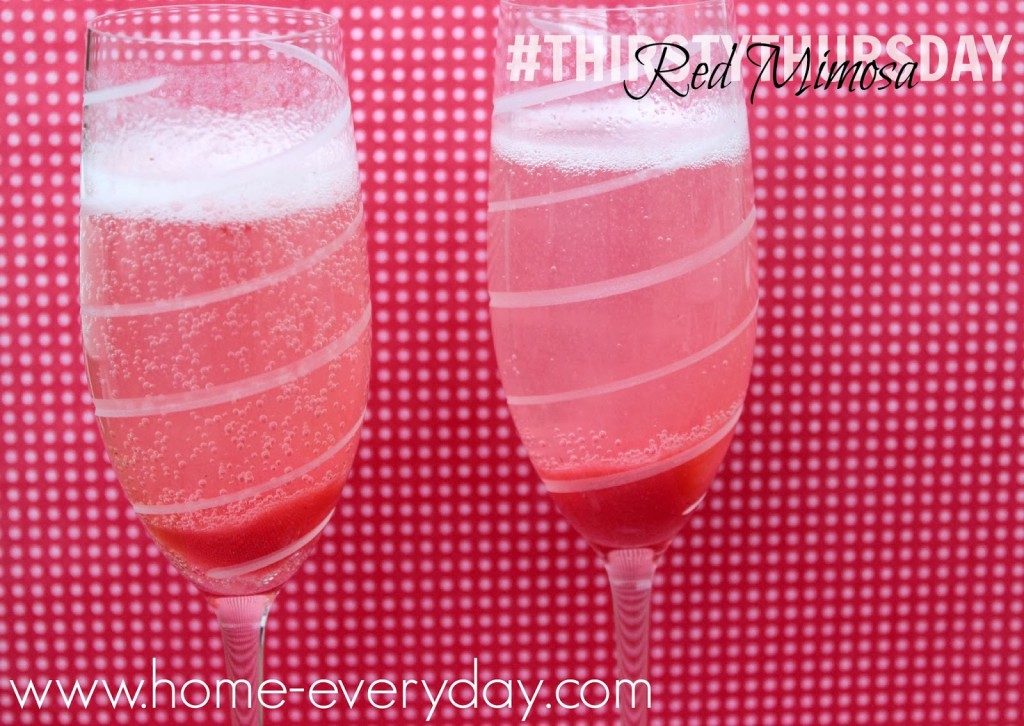
This week’s Thirsty Thursday, I am going to show you how to make a perfectly sweetened, undiluted sweet tea that tastes like tea and not sugar water. There is nothing worse than when you got to a restaurant and the tea doesn’t taste like tea, or it is too sweet. I also don’t like recipes for sweet tea that dilute the tea with simple syrup or add lots of water.

I know, we are months away from summer, but if you are like me you are craving summer. Personally, I’m craving a day above 10 degrees. The #PolarVortex is back, or should I call her The #PolarWHOREtex. She is drunk on attention and power, and is apparently bringing snow with her this weekend.

No worries, I’m going to lock myself in the house, have a Harold Ramis (one of my all time favorite comedy heroes) movie marathon starting with my summertime favorite Caddyshack and drink gallon upon gallon of this Perfect Sweet Tea, and just pretend it is Summertime. Who’s with me?
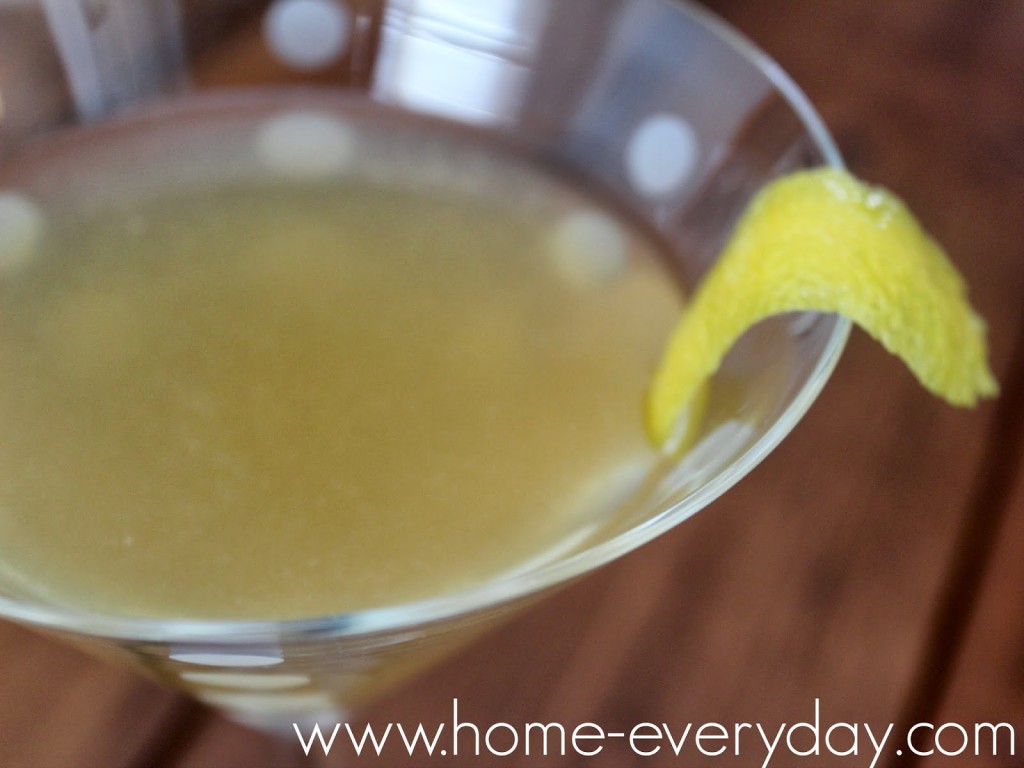
Perfect Sweet Tea
12 Cups Boiling Water
4 Black Tea Bags
1/2 cup to 3/4 cups granulated sugar (depending on desired sweetness)
Lots of ice
Lemon for garnish (optional)

In a large heat safe pitcher steep tea bags in hot water for 5-7 minutes. While, tea steeps, fill glasses with ice. Carefully remove bags. To the pitcher add sugar and stir until dissolved. The sugar should stir in pretty easily as water is still very warm. Pour mixture over ice in glasses, garnish with lemon and serve immediately. Store the extra tea in the refrigerator.

If you like this recipe, check out other ThirstyThursday recipes HERE!  And if you would like to read more about DIY, gardening, cooking, baking or all other things domestic, become a Home Everyday follower! For blog updates or to see other places I write follow Home Everyday on Facebook here.

Follow on Bloglovin

Cruciferous Green Remedy: Roasting

Believe it or not, I didn’t always have the refined palette that I do today. In fact, I would say that it was fairly recently that I even started to be able to like cruciferous greens. Cruciferous greens are greens that I used to refer to as the “yucky greens.” They include but are not limited to: kale, cabbage, brussels sprouts, broccoli, and bok choy. They are loaded with all kinds of healthy nutrients, and to be honest I really wanted to like them, but I couldn’t get past some of their more unpalatable characteristics. Cruciferous greens tend to be extremely fibrous and can be a bit stinky.


Turns out, all these years I was preparing them the wrong way! All you have to do is ROAST THEM! Roasting has always been a go to cooking method for me as it always seems so inviting. I love how the whole house heats up and smells delicious when something is roasting in the oven, but to be honest, I really never thought to roast “yucky greens.” Now, it is the only way I prepare them.


When it comes to roasting these veggies it is more of a method and less of a recipe, so I am just going to share to examples of how I roast cruciferous vegetables, and then you can try them at home.

For brussels sprouts, I cleaned them and cut them in half. I preheated the oven to 375 degrees, and then on a clean jelly roll pan, I put the sprouts and drizzled them with a little bit of olive oil and a little bit of good balsamic vinegar. Then, I sprinkle them with some salt and pepper. Next, using my hands I just toss the mixture around a bit. Then, I roast the sprouts for about 15 – 20 minutes until they are caramelized and tender. I serve immediately. This is a great side to go with roast chicken or meat loaf since the oven is on anyway.


For kale, the method is very similar. I clean and dry the kale. I remove the fibrous stems and put the kale on a jelly roll pan. I drizzle with just a tiny bit of olive oil and salt. I toss with my hands, while the oven preheats to 375 degrees. I roast the kale for 10 – 12 minutes. When I remove the kale, I sprinkle it with parmesan cheese and then let it cool. The kale is best served at room temperature. Some people eat this like kale chips, but we eat it as an almost a side dish to lemon chicken breast or grilled flank steak.


Now, that you have an idea of how to make these healthy and nutritious greens more tasty, what will you be roasting up? I think next, I’m going to try Broccoli.

If you like this post and would like to read more about DIY, gardening, cooking, baking or all other things domestic, become a Home Everyday follower! For blog updates or to see other places I write follow Home Everyday on Facebook here.

Follow on Bloglovin

Homemade is the Name of the Game for Leona’s New Menu

While I was compensated for this post by Leona’s Pizzeria the thoughts and opinions are my own. WARNING: For those not from Chicagoland, I’m sorry this post will make your mouth water and want to hop a flight here immediately. 


When my middle son was born, we had his Baptism party at Leona’s. We had always thought the food, atmosphere and service, were great, but we didn’t know it could get better. Last week, Leona’s released their new menu, and it is outstanding. It was one of those moments where I realized that just when I thought something could not get any better, it did.

Leona’s has been in Chicago since 1950, but recently is under new ownership and has reinvented the menu with all things homemade. If you’re looking for fresh, traditional Italian with a modern flare Leona’s Pizzeria is where its at. Also, with locations all over Chicagoland, take out, and delivery, you really don’t have any excuse not to try this awesomeness.


I had the pleasure of trying some of the new menu last week, and I was amazed. They have a lot of Leona’s old favorites (like the Romano Chicken) but this time it is all homemade in house. I may never cook again! That’s not true, but I do have a new place to enjoy dinner out on those nights when I’m not in the mood for eating out.


Antipasto Salad

My favorite thing on the menu is the Kick A$$ Garlic Bread. I know what you’re thinking, “C’mon, Erin, it’s just garlic bread.” NO! It’s just garlic bread.


It is HOMEMADE foccacia bread with homemade compound garlic butter. It is like when I make it myself in my kitchen. Also, some of there sandwiches like the Italian beef are served right on this awesome bread, and it is delicious. Next time I go back, it is will be an Italian Beef with extra giardiniera please!


I cannot wait to bring Brian here too! He is the ravioli man, and he will love all the varieties and homemade sauces to accompany them. I have tried making homemade ravioli for Brian, just like his grandmother used to make, and I ended up sweating and in tears. Now, I will just take him to Leona’s. I have a feeling he will like all of them from the asparagus and grana padano cheese topped with marinara sauce to the veal and portabello mushroom ravioli topped with meat sauce. I take that all back. Brian make just want the tiramisu. I cannot say I would blame him.


When I’m not cooking in my kitchen, you know where I will be from now on.

To check out Leona’s new menu CLICK HERE!

If you like this post and would like to read more about DIY, gardening, cooking, baking or all other things domestic, become a Home Everyday follower! For blog updates or to see other places I write follow Home Everyday on Facebook here.

Follow on Bloglovin

Home Everyday Is A Blog To Watch in 2014

In the past few weeks, I have been in a slump. The post holiday dull drums always get to me, but I was trying to keep the glass half full hoping I could “think Spring” and it would pull me out of this rut. This Midwestern Winter has been an interesting one though. Between the record snowfall and the Polar Vortex, I just kept saying, “Well, this is why I live here. Season changes are awesome.” So, I pushed on through. Then, life took another swing at me and I had some health issues to deal with, and as if that wasn’t bad enough I was getting test after test done, I think being in all those healthcare facilities did me in. I got a bad cold and was laid up in bed with a cough. Needless to say. I just wanted good news.

Last week, I got AWESOME news. Home Everyday was named by Center City a DIY Blog to Watch in 2014. Needless to say that was the best news ever. I hopped out of bed, and dug through my paint box, looked on amazon.com for some seeds for the garden, and started snipping up some fabric. Sometimes all you need is a little motivation to get you out of a slump and this announcement was just what I needed to get the ball rolling on some projects I had been meaning to do.


I couldn’t be more honored to be named with some of the other DIY blogs on this list. Some of those listed (Bower Power gasp) are those that I have been reading for a long time, and honestly are my blogger idols. I am so excited to be a part of such an amazing list of people.

Also, I just wanted to thank YOU, my wonderful supportive readers and fans. Without you, Home Everyday would not nearly be as wonderful or creative and honestly I get a lot of my inspiration from many of you. Sometimes, when I am in the middle of a project or baking or cooking I am happy to be doing it, but I am often hoping you like it too. It turns out you do, so Thank You! Thank you so very much!


So, if you’re wondering why there is paint on my clothes, dirt under my fingernails, cookies in the oven, a cocktail in my hand, and Play Doh on my kitchen floor it just means that I am back to my old self.

Take that winter!

If you like this post and would like to read more about DIY, gardening, cooking, baking or all other things domestic, become a Home Everyday follower! For blog updates or to see other places I write follow Home Everyday on Facebook here.

Follow on Bloglovin


Spring is Coming?

Outside, there is no sign of warm weather making its way here. Sure the sun is out, but I’m still not impressed. Cooking on the grill is still near impossible as it is covered by feet of snow, and flip flops are out of the question right now. However, when I head to the store, it is like a small escape from reality.

The aisles are lined with spring clothes, decor, and most of all color! Here are some things that have me thinking Spring.

1. When I start to feel a little blue about the winter, I turn to a glass of Iced Tea. Sometimes, I even treat myself to a glass of Passion Iced Tea from Startbucks. The color says warm weather, and it tastes like spring cannot be that far away can it?


Photo courtesy of Starbucks

2. This entire outfit from Land’s End is perfect! When Spring hits, I’m not quite ready for sleeveless, so the cardigan, cropped pants, and colorful tee are awesome for the weather and offer the right amount of color.


Photo courtesy of Land’s End

3. These Rain Boots are practical for sloshing around in all the melting snow, but are are looking ahead to impending spring in a bright and cheery coral. I’m wondering if I can get a coupon on my Cartwheel for these cute boots at Target.


Photo courtesy of Target

4. It is time to start thinking Veggie Garden, so I’ve been shopping seeds. This year, I’m thinking of trying a few new varieties and colors of vegetables. Amazon.com has an awesome selection and great prices for the beginner gardener.


Photo courtesy of Amazon

5. Springtime means mud, so rather than spend a lot of time cleaning up shoes, we try and spend a lot of time on the driveway. The means one of my favorite activities! SIDEWALK CHALK! Look at all those colors!


Photo courtesy of Staples

6. Spring also means wind! I cannot wait to spend afternoons flying these awesome and colorful kites from Premier Kites.


7. Spring is the time of year that I start scrubbing and cleaning up around here, so I will of course need plenty of cleaning supplies. Next to my Magic Erasers, I love Mrs. Meyers MultiPurpose Cleaner in Honeysuckle Scent.


Photo courtesy of Mrs. Meyers

What are some things that get you thinking Spring?

If you like this post and would like to read more about DIY, gardening, cooking, baking or all other things domestic, become a Home Everyday follower! For blog updates or to see other places I write follow Home Everyday on Facebook here.

Follow on Bloglovin

Thirsty Thursday: Red Mimosas

Earlier this week, I made a Red Berry Sauce that is so versatile, you can even use it for cocktails. This week’s Thirsty Thursday is doing just that. Using just two ingredients, these Red Mimosas are a perfect Valentine’s surprise for your honey.


You can also make these Red Mimosas with Sprite, Sierra Mist, or 7Up for a non-alchoholic version. Both versions are delicious, and oh so easy. These drinks would also be fun for the holidays or refreshing in the summertime when berries are plentiful.

Red Mimosas (makes 2)

4 tsp Red Berry Sauce (for recipe CLICK HERE)
8 oz chilled Sparkling Wine or chilled Lemon Lime Soda


In a champagne glass, spoon 2 tsp of berry sauce. Pour 4 oz sparkling wine or lemon lime soda over sauce and stir gently. Serve immediately.


Happy Valentine’s Day!

Pssst To read about what Valentine’s Day was like for me as a kid CLICK HERE or check out my Valentine’s Day post for Chicago Parent HERE!

If you like this recipe, check out other ThirstyThursday recipes HERE!  And if you would like to read more about DIY, gardening, cooking, baking or all other things domestic, become a Home Everyday follower! For blog updates or to see other places I write follow Home Everyday on Facebook here.

Follow on Bloglovin

Versatile Valentine’s Treat: Red Berry Sauce

I love when I can make one recipe, but use it for a bunch of different things. My favorite example of this kind of recipe is a roasted chicken. You can use it for so many different things: eat it right out of the oven, put on top of a garden salad, make chicken salad, make tacos, have a sandwich, stir it into soup. The possibilities are endless. It’s a wonder we all don’t keep one in our refrigerator at all times.

I am starting to think Red Berry Sauce is going to be ranking right up there with a roast chicken as a pretty versatile recipe.


This wonderful smooth sauce could be used to top pound cake, ice cream, pancakes, french toast, or even be used to make a neat cocktail (come back for ThirstyThursday to see that recipe). So far it has been a nice alternative to chocolate, and is a gorgeous shade of red which is perfect for the upcoming Valentine’s Day.

Red Berry Sauce

1 pint fresh strawberries hulled and sliced
6 oz fresh raspberries
1/2 cup granulated sugar
1/2 cup water
1 tsp fresh lemon zest


In a sauce pan over medium heat add sugar and water and stir until sugar is completely dissolved. This should take about 1-2 minutes. Stir in berries and lemon zest. Bring to a slight simmer. Lower heat, and cover pan with a tight fitting lid. Cook on low for 3 – 5 minutes. Remove mixture from heat and let cool for 10-15 minutes.


When mixture is cooled, pour into a blender. Blend on medium speed for about 1 minute until berries until berries are completely broken down. Finally, pour mixture through a fine strainer.


You can eat right away or store in an airtight container and refrigerate for 3 or 4 days.


I poured ours with homemade pound cake with whipped cream.


Later this week I will be sharing a cocktail made with this treat!

If you like this post and would like to read more about DIY, gardening, cooking, baking or all other things domestic, become a Home Everyday follower! For blog updates or to see other places I write follow Home Everyday on Facebook here.

Follow on Bloglovin

Thirsty Thursday: Gold Medal

The Winter Olympics are here! I cannot wait to tune into hours of hockey, skiing, figure skating, snowboarding and curling. Yes curling! We will be cheering the USA on to Gold!


Speaking of Gold, for this week’s Olympic Themed Thirsty Thursday I concocted a cocktail that is a beautiful shade of gold. I call it the Gold Medal.


This cocktail is the perfect combination of sweet and sour. It also has just the right amount of kick. Because it only takes a few minutes to make, you will be toasting to the athletes in no time at all.

Gold Medal (makes 1 cocktail)
1 1/2 oz very hot water
2 1/2 oz clover honey
2 oz whiskey (I used Jameson)
Juice of 1/2 a lemon
Lemon peel for garnish


In a small heat safe mug, mix together hot water and honey until honey dissolves.

In a cocktail shaker with lots of ice, add honey mixture, whiskey, and lemon juice. Shake for 1 or 2 minutes. Strain into a chilled martini glass and garnish with lemon peel.


Enjoy responsibly. Now, off to see if there are any curling clubs in my neck of the woods.

If you like this recipe, check out other ThirstyThursday recipes HERE!  And if you would like to read more about DIY, gardening, cooking, baking or all other things domestic, become a Home Everyday follower! For blog updates or to see other places I write follow Home Everyday on Facebook here.

Follow on Bloglovin

The HerStories Project

Last week, as I was pulling into the garage after an afternoon of chauffeuring the children, I saw a box on my doorstep. Assuming it was another computer part for my husband’s work, I realized that it was addressed to me. Upon opening the box, there was a note from my friend of 15 years and a gorgeous bouquet of tulips and irises. As I was tearfully putting the flowers in water and immediately texting her to thank her, I was overcome with gratitude for all of the wonderful women in my life. Every woman has a story about her bestie. The Her Stories Project is filled with them.


When my friend Shannan of Tween Us fame announced that a story she had written was going to be a part of The Her Stories Project, I was thrilled for her. I couldn’t wait to read what she had written. Little did I know that I was in for so much more.

The Her Stories Project is a series of essays written by women all over the country. The essays explore and reveal the wonder that is the female friendship. This collection runs the gamut of everything related to girlfriends. There are stories of love and pain, joy and tragedy, loyalty and hilarity. And I devoured it.

The last few weeks, I have been in and out of doctor’s offices and everywhere I have gone, I have toted my Her Stories with me and its as if it has magical powers. There is no colder, more sterile or lonely place that a waiting room. However,this book instantly made the waiting room warmer and friendlier. The Her Stories Project is filled with stories that are so diverse and relatable that with every turn of the page, I was making mental notes to call my gal pals and set up a time to get together.

It was filled with those “me too” moments that make you feel as if you have gained another friend who shares and understands your story.


With Valentine’s Day coming up, this is the perfect token to show your gal pals how you care. I think I will definitely be buying a few copies for my sister and all of my wonderful girlfriends.

To buy a copy of this book, CLICK HERE. You can read about The HerStories Project on the website www.herstoriesproject.com or like them on Facebook.

(I was given a copy of The HerStories Project, however the thoughts and opinions of this book are my own.)

If you like this post and would like to read more about DIY, gardening, cooking, baking or all other things domestic, become a Home Everyday follower! For blog updates or to see other places I write follow Home Everyday on Facebook here.

Follow on Bloglovin


Heaven in a Jar: Homemade (Nut Free) Chocolate Spread

Ahhh Nutella. Everyone who can have it loves it. However, there is a huge portion of the population that cannot have this delicious treat because of the hazelnuts in it. I was feeling bad that my littles were being denied such a wonderful and versatile treat and was trying to find something that would be similar. Unfortunately, many of these spreads have nuts or are processed in the same facilities as nuts or other allergens.

I had to take matters into my own hands. I scoured the internet, and to my delight I found ONE recipe sans nuts.

Thank you so much, SugarHero! My kids now know the joys of spreading chocolate on toast. They know how glorious pretzels and chocolate taste together. And they will never look at graham crackers the same way again.

The only change I made to the original recipe was I did add a bit more sugar and vanilla, but it is truly Heaven in a Jar.

Heaven in a Jar
1/2 cup of water
3/4 cup granulated sugar
1 Tbs unsweetened cocoa powder
2 tsp pure vanilla extract
4 squares of Baker’s unsweetened chocolate finely chopped
1 stick of unsalted butter cold and cut into small chunks
pinch of salt

In a small sauce pan, over medium heat add water, sugar and cocoa powder. Stirring constantly, cook until sugar is completely dissolved. Then, bring to a slight simmer. This should take about 2 – 3 minutes.

Remove from heat, and stir in the vanilla, chocolate, butter, and salt until a smooth texture is formed and all the ingredients are melted and incorporated.

Pour the mixture into a jar or airtight container. Cover with plastic wrap so the wrap is touching the top of the chocolate (so a skin doesn’t form), and then cover with lid.

Refrigerate overnight, and enjoy. (According to SugarHero! the spread will last for 2 weeks in the refrigerator.)

There’s only one thing I can say about this recipe. You’re welcome!

For a Printable Version of this recipe CLICK HERE!

If you like this recipe and would like to read more about DIY, gardening, cooking, baking or all other things domestic, become a Home Everyday follower! For blog updates or to see other places I write follow Home Everyday on Facebook here.

Follow on Bloglovin