Month

January 2014

Thirsty Thursday: Oreo Shake

Whether it be hot vanilla, salted caramel hot cocoa, or even a windy whiskey mac, it is still frigid here in the midwest. So, this week I kind of took on a “if you can’t beat ’em, join ’em” mentality. I am never going to be able to beat this cold no matter how many pairs of cuddle duds I wear to the bus stop.

This week’s Thirsty Thursday is one of my favorite milkshakes, and they are so easy to make. The first time I had an Oreo Milkshake was about 15 years ago. My niece and I were trying to make Oreo Blizzards just like Dairy Queen. Our attempt at a blizzard was a fail, but we added a little milk and made the most delicious milkshakes we had ever had. Since then, they have become a favorite treat.
Oreo Milkshakes (makes 2 small milkshakes)
4 oreo cookies
4 scoops vanilla ice cream
1/2 cup of milk
In a blender, add ingredients and blend until smooth. (NOTE: If milkshake is too thick add another splash of milk). Pour into a glass and enjoy!
You can even add a crumbled Oreo cookie to the top for a bit of garnish.
What are your coping mechanisms for this cold?


For more #ThirstyThursday recipes CLICK HERE! For more about DIY, gardening, cooking, baking, #ThirstyThursdays or all other things domestic, become a Home Everyday follower! For blog updates or to see other places I write follow Home Everyday on FacebookTwitter, or Pinterest.

10 Little Things that Help This Mom with Preschoolers

When I go to classes at Second City, there are times when I know I am the only person there with a Mom purse filled to the gills with more things for the kids than myself, however, I also know that there are just some things that make life a bit easier living in a house full of preschoolers.

Here is my list of TOP TEN little things that help me survive parenting three little ones.
1. Spill Proof Cups and Water Bottles: A few months ago my son was mortified that I called his water bottle a “sippy cup” as in, “Mom, c’mon, I’m not a baby anymore. It is spill proof!” Apparently, my little one likes to exert independence when it comes to hydration. However, let’s face it, I know grown adults who spill (cough cough me), so we always have spill proof cups and water bottles on hand for both the kids and adults in the house. 

Look at these cute cups from Target!


2. Large Inexpensive Purse or Tote: We are no longer in need of a diaper bag! WOOHOO! However, there are a few things that we need to keep on hand at all times such as water bottles, medications, and some things to keep the kids occupied. Because of this, I have had to upgrade the size of my purse a bit to accommodate what we need while we are out. Instead of investing a lot of money in a fancy purse or tote (sigh, someday I will have a Kate Spade), I found an inexpensive and stylish large bag that I don’t mind carrying around. Since this is a bag that houses sticky medicines and often times snacks and water bottles, I won’t be heartbroken if there happens to be a spill. 

No one will know its from Target or filled with markers and juice boxes .


3. Keyboard Protectors: Life with little ones can be sticky. Literally. Between the jelly, play doh, and new found love of glue, kids just have sticky fingers. I found these keyboard protectors for my laptop, and I love them. Now, when someone climbs on my lap to play, I’m not so worried about jelly on my keys. 

These are a lot cheaper than replacing a laptop.


4. Easy to Make Trail Mix: (or Goldfish Crackers) Snacks at home or away are necessary for growing preschoolers. For this Trail Mix, I mix together Quaker Oatmeal Squares, Craisins, Raisins, Pretzels, and chocolate chips for a little treat to tide the little ones over until our next meal. Also, when this runs out, Goldfish crackers work just as well.
5. Board Games and Decks of Cards: My kids love playing games. It has become one of our favorite family activities. Games are educational, fun, and are an awesome way to foster family time. We keep both regular and travel size games on hand. 

Our current favorite GUESS WHO?


6. Mesh Laundry Bags: These have become a life saver. While my little ones are growing by leaps and bounds every day, their socks are still so teeny tiny and often get caught in the washer. Also, these little bags help keep pairs together. 

These would also be a cheap solution to storing bath toys.


7. Library Card: Most people have a Library Card. However, with all kinds of media so readily at our fingertips, many do not keep their Library Cards up to day. Libraries have amazing toddler and preschool programs, story times, crafts, sing-alongs, and all kinds of activities to keep my little ones happy. The programs are free as long as I tote my Library Card. 


8. Crayola Color Wonder Markers and Paper: My kids love to color and draw, but again, sometimes the mess is more than I can handle. Color Wonder Markers will only color on Color Wonder Paper. I cannot tell you how many messes these avoid! 

Color Wonder? More like Color Miracle!
9. Good Concealer: Having preschoolers is a whole different kind of exhaustion! My kids sleep through the night and gone are the days of middle of the night feedings and diaper changes, but keeping up with these little ones and making sure they aren’t getting into trouble has me sometimes looking a little worse for wear. With a little dab of some consealer under my eyes, I look fresh as a daisy.
My favorite concealer!
10. Anytime TV: Whether it be Netflix, a DVR, and Apple TV, or an old fashioned VCR, having your kids favorite shows accessible is perfect for those moments when it is time for a show, but their favorite show isn’t on at the moment. Sometimes, you just need 30 minutes to get dinner on the table, fold a load of laundry, or hide in the closet and eat a piece of dark chocolate. 

Apple TV


What are your go to items for surviving life with toddlers and preschoolers?


For more tips, organization, DIY, gardening, cooking, baking or all other things domestic, become a Home Everyday follower! For blog updates or to see other places I write follow Home Everyday on FacebookTwitter, or Pinterest.

Thirsty Thursday: Windy Whiskey Mac

Today’s Thirsty Thursday is is a guest post by the creative mastermind behind No Bags to Check, Alisa Jordan. Alisa’s blog is full of about her adventures both near and far, and her travel tips put The Travel Channel to shame. Alisa has lived all over the country and abroad, but now makes Chicago her home. It is apparent that when Alisa is not traveling and sharing her tips with readers, she can make a mean cocktail. If you would like to read more about Alisa Jordan, check out her blog No Bags to Check or follow her on Facebook or Twitter.


This is my third winter in Chicago, and by far the coldest
and snowiest since I moved here. It’s been pretty brutal even by my previous
home of Boston’s standards. For these cold winter nights, sometimes it’s nice
to have a hot cocktail after braving the elements or spending an arduous day
staying indoors and catching up on your Netflix queue.
One of my favorite hot cocktails is the Whiskey Mac, which I
first had when I lived in London and my family came to visit for Christmas.
While London winters are nothing compared to the sub-zero and snow here, they
do tend to be pretty grey and gloomy. If I remember correctly, it was my mother
who discovered the drink after talking to the bartender about the Hot Toddy,
the Whiskey Mac’s more well known relative.
The story (at least the Wikipedia version) is the Whiskey
Mac was invented by a Colonel Macdonald in the British forces back in the day
(late 1800s or so). The traditional version consists of combining equal parts
Scotch and ginger wine and adding hot water. If you want to go this route, you
will probably need to order ginger wine on-line; I’ve found it difficult to
locate on this side of the Atlantic.
Here’s my Chicago adaptation.
The Windy Whiskey Mac:
1.5 oz. (1 shot) of Irish Whiskey (I used Jameson)
1.5 oz. (1 shot) of Ginger Liqueur (I used locally distilled
Koval)
Hot water
Lemon slices (optional)


Combine the whiskey and ginger liqueur in a mug and fill
with as much hot water as you’d like depending on how strong you like your
drink. Garnish with a lemon slice if you like and enjoy!


For more #ThirstyThursday recipes CLICK HEREFor more about DIY, gardening, cooking, baking, #ThirstyThursdays or all other things domestic, become a Home Everyday follower! For blog updates or to see other places I write follow Home Everyday on FacebookTwitter, or Pinterest.


Thirsty Thursday: Lemon Strawberry Daiquiris

I am kind of missing the days where I can go out and water my garden in the morning, go for a walk outside without freezing, or sit on the patio and watch the sunset with a cocktail. When I start longing for the warm weather, it helps to make warm weather food like light salads to help me feel in the moment. It also helps to make warm weather cocktails in my new Ninja!

This week’s #THIRSTYTHURSDAY are lemon strawberry daiquiris. These babies aren’t made from a mix, these are fresh with lots of lemon, fresh (or frozen) strawberries to brighten them up, and make you feel like it is 85 and sunny and the grill is fired up and the kids are playing in the sprinkler. Anything that can transform you to warm weather, even for a moment is perfect this time of year.


Lemon Strawberry Daiquiris (makes 2)
2 cups of ice
2 Tbs superfine sugar
1 cup fresh or frozen strawberries
1 tsp lemon zest
2 Tbs fresh lemon juice
1-1 1/2 shots of lemon run (I used Bacardi Limon)
1/4 cup lemon lime soda
Combine all the ingredients in a blender. Pulse the blender to gently crush ice, then turn on medium speed for about one minute or until desired consistency.
Pour in pretty glasses and garnish with strawberries or lemon zest.
You can turn on an old HOT movie like Rear Window, and drink these daiquiris and pretend the weather is just a little bit warmer outside!

For more #ThirstyThursday recipes CLICK HEREFor more about DIY, gardening, cooking, baking, #ThirstyThursdays or all other things domestic, become a Home Everyday follower! For blog updates or to see other places I write follow Home Everyday on FacebookTwitter, or Pinterest.

Smart Cookies: Scratch Brownies

This month’s Smart Cookies recipe was inspired by a craving for some good old fashioned brownies. Usually, I will buy a store bought mix for brownies, and dress them up a bit like these Salted Caramel Brownies of yore. However, with last week’s deep freeze, I was out of brownie mix, and really not wanting to leave the comfort of my house for brownie mix, when I am pretty sure I had everything I needed in the house to make them from scratch.

Also, I really really couldn’t wait to use the new glass spout bowl for my KitchenAid mixer.

After a bit of research, I found a few recipes that I thought were doable, and created  my own version. So, for this  recipe, I used dark chocolate chips instead of baker’s chocolate as the base. Because of this, I didn’t need as much sugar as the chocolate chips have a bit of sweetness added. Also, I added some white chocolate chips to the batter, and they were twice as chocolatey.
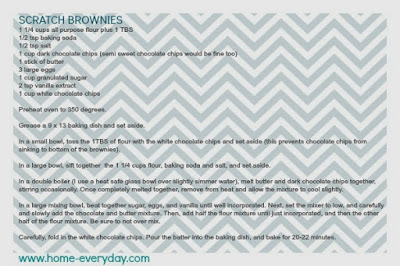
Scratch Brownies
1 1/4 cups all purpose flour plus 1 TBS
1/2 tsp baking soda
1/2 tsp salt
1 cup dark chocolate chips (semi sweet chocolate chips would be fine too)
1 stick of butter
3 large eggs
1 cup granulated sugar
2 tsp vanilla extract
1 cup white chocolate chips

Preheat oven to 350 degrees.

Grease a 9 x 13 baking dish and set aside.

In a small bowl, toss the 1TBS of flour with the white chocolate chips and set aside (this prevents chocolate chips from sinking to bottom of the brownies).

In a large bowl, sift together  the 1 1/4 cups flour, baking soda and salt, and set aside.

In a double boiler (I use a heat safe glass bowl over slightly simmer water), melt butter and dark chocolate chips together, stirring occasionally. Once completely melted together, remove from heat and allow the mixture to cool slightly.

In a large mixing bowl, beat together sugar, eggs, and vanilla until well incorporated. Next, set the mixer to low, and carefully and slowly add the chocolate and butter mixture. Then, add half the flour mixture until just incorporated, and then the other half of the flour mixture. Be sure to not over mix.

Carefully, fold in the white chocolate chips. Pour the batter into the baking dish, and bake for 20-22 minutes.

These brownies would be great served warm with some vanilla ice cream, but we dug right in after dinner with tall glasses of milk.

To get a printable version of this recipe CLICK HERE!

For more information about Smart Cookies, click here. You can also try these other Smart Cookie Recipes.

For past Smart Cookie recipes, check out the links below:
Oatmeal Dark Chocolate and Dried Cherry CookiesLucy CookiesWhite Chocolate and Cranberry BlondiesChocolate Dipped Vanilla Biscotti Italian Butter Cookies with Lemon Glaze, and Salted Carmel and Dark Chocolate TrufflesIrish Creme DelightsErin’s Light Lemon SquaresSalted Caramel BrowniesCran Apple Cookies, Pumpkin Cookies with Cinnamon Glaze

If you like this recipe and would like to read more about DIY, gardening, cooking, baking or all other things domestic, become a Home Everyday follower! For blog updates or to see other places I write follow Home Everyday on Facebook here.

Follow on Bloglovin

Friday Pizza Night: A Family Tradition

When I was a kid, almost every Friday night was Pizza Night (even during Lent we would order veggie)!! In the Chicagoland area, pizza places are everywhere, and when I was a kid we alternated between two of my favorite local places. Some of my favorite childhood memories revolve around Friday Pizza Nights.

It didn’t matter if it was after basketball practice, or watching a football game, or renting a movie and picking up a pizza on the way home, I remember those nights like they were yesterday. I loved that it was a time that my family and sometimes our friends were all together, Mom didn’t have to cook (which now as a parent I completely appreciate), and the conversation always flowed a little easier with a pizza to share.

In this new year, I have vowed to help create memories like that for our little ones with some new routines. The kids are now old enough to appreciate Chicago pizza (unlike some people I know) and all of the fun that goes a long with it, we are thinking of starting our own pizza night and making it our own family tradition.

While, I love all kinds of pizza, I have to say that my favorite treat is a deep dish style pizza. I often request it for my birthday dinner, and to be honest there is nothing like it anywhere else but Chicago. If you are making a visit to the area or if you already live here, I am sure your mouth is watering.

To give a little background about one of my most favorite meals, Marriot has put together is awesome info graphic about Chicago Style Deep Dish Pizza and where you can get the best and most popular pizzas in town.


For more information or to see this photo in greater detail CLICK HERE!

This info graphic is Powered by Marriott. Special thanks to them for sharing it with me. Since it is Friday, you know what I will be doing tonight! I hope you can start a new tradition in your family too.

Now, to decide what kind of pizza for tonight.

For more about organization, DIY, gardening, cooking, baking or all other things domestic, become a Home Everyday follower! For blog updates or to see other places I write follow Home Everyday on FacebookTwitter, or Pinterest.


Thirsty Thursday: Green (New) Machine Smoothie

Here we are, the beginning of another year. I am sure we are all trying to make eating healthy a resolution (or routine check out this post I did over at Chicago Parent). I know I am. I have started to get a little more active, and I am trying to make small changes to my eating habits.

I can tell you that this year I really am trying to make more sensible choices I can live with. Little changes, one at a time that I can do every day. Let’s face it, I’m never going to stop baking treats, it is part of what I do, however, I can eat healthy the rest of the day so that I can enjoy those treats in moderation.

So this week for #ThirstyThursday I decided to show off the Ninja Mr. Home Everyday bought me for Christmas this year (no not a real Ninja). Now my morning routine consists of a healthy smoothie!

I call this smoothie the Green New Machine smoothie because it is green and I used my new machine.

Green New Machine Smoothie
1/2 a ripe avocado
2 cups raw baby spinach
1- 1 1/2 cups pineapple (chopped)
1 cup filtered water or coconut water
Ice to create desired consistency (optional)

In a blender add ingredients, put on lid, and pulse until ice is chopped. Then blend on medium for about 1 minute or until desired consistency.

Turns out, I’m not the only one who likes it. Mr. Home Everyday took one with him to work today, and this little guy snuck a few sips before he walked out the door!

If you are looking to get healthy, try this small simple change for breakfast everyday. For another smoothie recipe check out this awesome Peachberry one I made this summer.

Also, if you are looking for a little more inspiration, check out my friend Samantha over at The Peanuts Gang is working hard doing Treadmill Tuesday updates, and today is talking about the progress she has made in just one month. I’m out the door to the gym today because of her!

For more #ThirstyThursday recipes CLICK HEREFor more about DIY, gardening, cooking, baking, #ThirstyThursdays or all other things domestic, become a Home Everyday follower! For blog updates or to see other places I write follow Home Everyday on FacebookTwitter, or Pinterest.


Still Stranded: Turkey, Corn and Three Bean Chili

When it is as cold as it had been around here lately, I make chili. It is one pot meal, you can change it up with toppings, it is great leftover, and it warm up even an -14 degree day (You read that right. I told you it was cold).

Here is a recipe for a very hearty chili, but is healthy as it is made with ground turkey. Perfect for those who are looking to eat a little more healthy in the New Year.


Turkey, Corn, and Three Bean Chili
1 lb ground turkey
1 Tbs extra virgin olive oil
1 medium onion chopped
2 or 3 ribs celery chopped
3 cloves garlic minced
2 Tbs ground chili powder
1 Tbs ground cumin
2 tsp ground coriander
1/4 tsp ground cayenne pepper
1 tsp dried Thyme
1/2 bottle of your favorite beer
1 14 oz can white cannellini beans drained and rinsed
1 14 oz can black beans drained and rinsed
1 14 oz can red kidney beans drained and rinsed
1 cup frozen whole kernel corn
1 28 oz can crushed tomatoes
Salt and Pepper to taste
Avocado for garnish


In a large pot over medium heat add olive oil. When the oil is glistening, add ground turkey, breaking with a spoon. Add onion, celery, garlic, salt, and pepper and cook for about 5 – 7 minutes until onions are soft and turkey is cooked through. Stir occasionally. Next stir in chili powder, cumin, coriander, cayenne pepper, and thyme. Stir until well incorporated and then add beer. Bring this to a simmer (about 3 minutes) and then add all the beans, the corn, and the crushed tomatoes. Stir, lower heat, and cover with a tight fitting lid for about 10 minutes or until chili is just bubbling. Serve with sliced avocado.


This was the perfect dinner for being snowed in the past few days. Also, the leftover held us over until I could get to the grocery store.


For another great chili recipe, check out THIS ONE I made awhile ago.

For more about organization, DIY, gardening, cooking, baking or all other things domestic, become a Home Everyday follower! For blog updates or to see other places I write follow Home Everyday on FacebookTwitter, or Pinterest.


Cabin Fever Means Cabinet Organization

HAPPY NEW YEAR!! I don’t know if you heard, but the midwest is in the middle of a big freeze. Road are treacherous and in some cases impassable, schools are not in session, and it is recommended people stay indoors. There are only so many books you can read, TV shows you can watch, and games you can play with three little ones before we start getting a little stir crazy.

So, since we are beginning a new year, and I wanted to get some organizing done anyway, I thought it best to have the little ones help. I thought that helping me do a few projects around the house would help alleviate any cabin fever we were experiencing.

This cabinet is the bane of my existence. The plastic storage container cabinet. This is also where I keep all the “kid dishes” in the house so that the kids are able to help set the table. It is a corner cabinet with a Lazy Susan.


This cabinet was jammed with crap. So much crap that I could no longer turn the Lazy Susan, meaning I only had access to about 1/8 of the things I needed.

The first step to organizing this awful space was to just remove everything. This is where the kids were exceptionally helpful, they were so happy to make a mess and pull everything out of the cabinet.


The next step was to sort all of this stuff. I asked the kids to get all the lids and gather them up. Then, the gathered up all the containers. I sat at the kitchen table and tried to find matches of lids and containers (even princesses need to help sort the Tupperware cabinet sometimes).


I was so happy to sort all this stuff, and get rid of everything we didn’t need anymore. I also used some of the larger containers without matching lids to help house little things like lids and sippy cup straws.


Now, that this cabinet is organized, I wonder what other organizational mischief I will get into with this cold weather.

For more about organization, DIY, gardening, cooking, baking or all other things domestic, become a Home Everyday follower! For blog updates or to see other places I write follow Home Everyday on FacebookTwitter, or Pinterest.