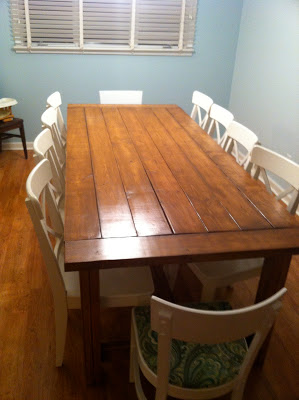
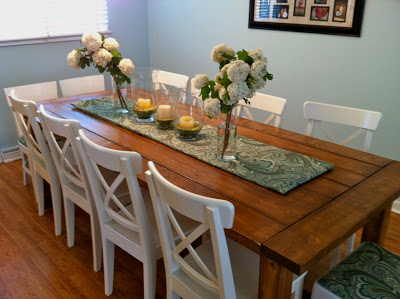
After Brian built me this beautiful farm style plank table, it was time to stain it. I spent an afternoon at Home Depot, learning everything I could about stain, application, drying time, and polycrylic finishes. I also, spent some time picking out the perfect medium toned color as well as assuring I picked out a matte finish so the table would look old and not too shiny. I wanted to learn as much as I could because half of the look of this table was not only the style, but the color and finish.
Here is the finished product:
And this is how I got there.
Supplies
Synthetic Bristle Paint brushes
Lint free rags (I used some of Brian’s old holey white undershirts)
Sandpaper (both course and fine grit)
Electric Sander
Sponge
Bucket of water
Minwax Water Based Pre-Stain Wood Conditioner (1 quart)
Minwax Water Based Wood Stain in Colonial Pine (1 quart)
Minwax Water Based Polycrylic Protective Finishe in Satin (1 quart)
Latex (or non-latex) tight fitting gloves
Safety glasses
Smooth to the Touch: I started this project by sanding the entire table with my electric sander with a course grit sandpaper and then followed up with a find grit sandpaper. I just wanted the table to be smooth to the touch. I figured there was going to be a lot of people eating at this table over the years, and I really didn’t want anyone having their roast chicken with a side of splinter. I was extra careful to do underneath the table as well.
Clean up, clean up, everybody clean up: This part was crucial. The “expert” (I say expert, because she knew an awful lot about staining) at Home Depot said to wipe off the table with damp sponge a few times to try and remove any residual dust from sanding. She said that the more I did it the smoother my staining application would be. I made sure that the table was completely dry and free from any water spots before I started the next step.
Conditioner IS better: This step is one that some people told me to skip ahead of time, but after talking to my new best friend at Home Depot, she assured me that this step is important and not very time consuming. Since this was the first time I was staining something, she said I would get much better and more even coverage if I used a wood conditioner. Using a synthetic bristle brush, I applied the wood conditioner. It only took about five minutes to dry, and was very easy to apply. I am so glad I didn’t skip this step, because it was the least time consuming step, and the color went on perfectly even.
The Scary Part: Applying stain isn’t rocket science, but it does take a light hand and a bit of patience. The key I found, is to not do too big of an area at once. So using a synthetic bristle paint brush, I applied a light layer of stain to a small area of the table (one leg, one plank at a time etc.) and then using a rag, LIGHTLY wiping off any excess stain. You don’t want to have to much stain sitting on the surface for too long of a time as that increases the intensity of the color and then the color becomes uneven. Also, using a light hand to wipe the excess stain, allows for more even color as you are not wiping off too much stain that you have just applied. The first coat of stain was not dark enough for me, so once the first coat was completely dry (I waited until it was dry to the touch, about 5 hours), I applied another coat just like the first coat.
 |
| First coat of stain |
 |
| Second coat of stain |
Gettin’ Poly With It: This step is again, not hard, just requires a bit of patience (which, I’m not going to lie I was starting to run out of because I just wanted to eat dinner on our beautiful new table). Using my trusty synthetic bristle brush, I brushed a thin layer of Minwax Water Based Polycrylic on the table. I was very careful to make sure that the layer was thin as to reduce any kind of dripping. Once it was dry (minimum of 2 hours), I lightly sanded the table by hand with a find grit sand paper. Then, using a dry cloth wiped any dust, and applied the next coat. Minwax suggests five (yes, five) coats of the polycrylic for maximum protection. I did do the suggested five coats on the top of the table where there would be more of a chance of drinks spilling and food stains, but on the legs and other exposed areas underneath, I only applied three coats.
This process was much more time consuming than I ever could have thought. But I must admit it was completely worth it.
Just a few things that I think are worth mentioning:
1. Since I decided to go with a water based stain, everything else I used had to be water based as well. Water based wood conditioner and water based polycrylic. If I had chosen an oil based stain, I would have had to use all other oil based products as well.
2. If I could do it over again, I might have stained all the planks on the top of the table BEFORE Brian had put them together. I did a pretty good job of getting in all the cracks of the table, but it would be even better had I been able to reach all sides of each plank with a paint brush.
3. I was extra careful to make sure I did this whole process in a well ventilated area.
Here is a couple more after shots.
As you can see Brian and I do pretty good work, which was first evidenced by our three kids.


2 comments
Nothing I have ever stained has come out looking that amazing! I also have never stained anything that meant enough for me to REALLY want to be patient with it and do the right way 🙂 Great job!
Thanks! I must admit as nice as it turned out, it might be awhile before I do it again. Simply because of my sheer lack of patience.
Take care.