Tag

DIY

Walkin’ the Plank: Our DIY Farm House Table

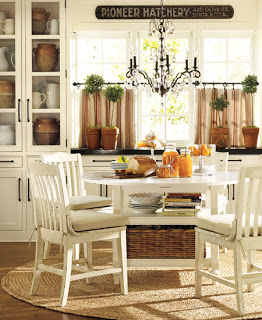
For years, I have wanted an old farm plank style table. I like the rustic look, and I really love how like wine (or a good Wisconsin cheddar) it would just get better with age. Also, since I’ve been hosting these Sunday dinners with my family once a month (mentioned here) I needed something that could seat 10-12 people. That way, I could at least have all the adults in the dining room together.

So, I started some research, and WOWSERS, old looking tables are expensive. Also, the size I was looking for added some serious coinage to the price tag. These are some of the tables I had my eye on (waiting, hoping for them to go on sale, and by sale I mean 99% off).

http://darvin.com/Item.aspx?ItemID=-2001460134&ItemNum=5397-42%2b2x84b%2b3x85b%2b96


http://www.potterybarn.com/products/solomon-rectangular-extension-dining-table/?pkey=csquare-rectangular-tables


http://www.restorationhardware.com/catalog/product/product.jsp?productId=prod1606015&categoryId=cat1537023
After seeing how much these tables were, I then, started looking at GoodWill, garage sales, craigslist, and came up with nada. I was starting to feel a bit of a time crunch too as Sunday Dinners were getting crowded, and I was sick and tired of setting up my portable banquet table every month.
Cue Pinterest! After seeing how many people have built their own tables, I convinced Brian to build us one. It didn’t really take much convincing because Brian was excited at the prospect of buying and using power tools.
So, we went from an old kitchen table with a six foot plastic banquet table covered with table cloths…
… to Brian becoming the next Norm Abram.
We found the plans for this table on www.ana-white.com After reading a bunch of other DIY blogs, and doing a little bit of research on measurements and ease of building, we went with these plans because a.) we’ve never heard anyone complain about anything Ana White builds and b.) it was the perfect size and look we were going for.
Off to Home Depot we went. Ana White makes a very easy buy list to follow, and with the help of some people at Home Depot, we picked out the best pine pieces we could find. I liked the idea of a soft wood like pine so that it could get dinged up and look aged over time.
Brian with the help of a friend were able to build the table in about five hours on a Saturday, which isn’t too bad for a first time build. Here are some pictures of building day.


Then came time for staining (another first time project). I’ll share more about that next week.
Now that I know Brian can build things, and use power tools, his “Honey Do List” is getting quite long. In fact, my friends have seen the table, and are giving Brian orders for their own tables too.

Math Club Masterpiece: How to Hang Your Children’s Artwork

When I was in high school, yes, I was a member of the Math Club. Yes, I went to Math Competitions (my specialty was Algebra II, Geometry, and Trigonometry), and yes, I know you’re jealous.

I also know what you are thinking, “how can someone so obviously cool, have been a part of the Math Club?” Well, I will tell you, there were cool kids in the Math Club too (ok, maybe not, but in my case there were some pretty cute nerdy boys that I thought would be impressed with my mad Math skills).

Anyway, those math skills came in pretty handy for this project: 

I spent more time measuring out where the clips should be and measuring to make sure it was exactly centered on the wall, than I did putting it together. It was a very simple and inexpensive project, and it has come in very handy to hold all the kids’ beautiful masterpieces. I only had to buy the wooden board, clips, and letters. Everything else I had on hand.

I started out at Home Depot and purchased a piece of pre-primed board (this could easily be done with scrap wood), and had the nice people at Home Depot cut it in half (in case you didn’t know Home Depot will cut wood for you). Then, I bought some letters to spell out ART at JoAnne Fabric, and got some heavy duty metal clips at Staples.

After all the shopping, I was ready for a little bit of painting and assembly. I painted the planks and letters with some leftover Behr Decorator White Paint that I had just used on some other projects like the chairs and bookcase I had just painted. I let all this dry for about 24 hours.


Then, the next day during naps, I started to assemble. I first measured the back of the planks of wood and the letters, and attached a hanging hook on each end of the plank and one on the back of each letter. I made sure to measure the exactly equidistant from each end of the plank so they would be easier to hang.

Then, I flipped the boards over and measured where I wanted to put the clips. This was hard because I wanted them to be evenly spaced, but I also wanted to leave enough room so that I could hang different sized papers or projects. Once I decided where I wanted the clips, I hot glued them to the planks.


Hanging time = more measuring. I first measured and hung the boards then measured and hung the letters. My tape measure got quite the workout with this project, but it was totally worth it.

Look at all the awesome artwork the kids hang from the wall.


It is in the kitchen right above where we eat breakfast and lunch so it makes for a great discussion piece as well as a great way to show the kids we are proud of the work they are doing.

And Oldie but a Goodie: Refinishing a Painted Bookshelf

This bookshelf is an Oldie but a Goodie. My Dad built this bookshelf for my oldest brother’s bedroom when he was a little kid, then it got passed around to all of the siblings and even a few of the grandchildren. Growing up, I can remember my Dad building a few sets of bookshelves as well as other furniture and tackling a lot of DIY home improvement projects.

Anyway, his love for doing projects has been handed down to me, and when my sister said I could have one of the bookcases Dad built, I of course said yes. This particular bookcase has been passed around and repainted so many times it looked pretty
shabby (as in it needed some serious TLC).
The original paint color was red, then yellow, then pink,
then white. I decided to bring it into the boys room for their toys, money
banks, and books, and paint it a fresh coat of white with a different color on
the back part of the shelves. Similar to this photo I found in my favorite magazine, Real Simple.

I loved the orange, and thought it would be ok to tie that
into the boys room because their room has become hodge podge of a bunch of
different colors to accommodate their likes.

So here’s how I freshened up this old bookcase, built by my
Dad probably 40 or more years ago.
Supplies:
Paint Stripper (Citristrip)
Putty knife
Mineral Spirits
Steel Wool
Electric Sander (Black and Decker)
Sand Paper (course and fine grit)
Primer (Behr)
Painter’s Tape (Froggy Green Tape)
Behr Decorator White in Semi-Gloss (leftover gallon)
Behr Orange Peel in Semi-Gloss (I bought 1 quart)
Gloves
Face Mask
Safety Glasses
Shop Vac
Sponge
Bucket of Water
Paint Brushes
Small Roller
Painter’s Trays.
Strip, Ooo la la: I decided to strip the bookcase simply because of the
number of layers of paint it had. I used a very gentle paint stripper I
found at Home Depot called Citristrip (I’m starting to see an orange citrisy theme here), and followed the directions to a T. Which, I know is so
un-Erin like, but since I’ve never used paint stripper before, I figured this
was the best way to go. Depending on the kind of paint stripper you use, you
may or may not need the steel wool and mineral spirits. I liked this step as it
removed any paint stripper residue and got rid of all the yucky leftover layers
of paint. I made sure I wore gloves and my face mask for this step. 


Getting Sandy: I put
on my mask and safety goggles, and got sandy. Using my electric sander, I first used the course grit
sand paper to try and remove any paint that the stripper couldn’t get. I also
tried to sand away as many knicks in the surface as possible. Then, I used the
finer grit sandpaper and sanded until the surface was smooth to the touch.
There was still some paint on the surface but if I closed my eyes and ran my
hand over the surface I couldn’t even tell. Also, to get in the corners I couldn’t use the electric sander, so I just used some pieces of sandpaper.So fresh and so clean: For this step, I used my shop vac to suck up all the dust from
stripping and sanding. Then, I used a damp sponge to wipe away all excess dirt
and dust from the surface and in the corners to get it ready for priming. After all this prep work
I’m finally ready to break out some paint brushes.

Prime: This step
was very easy. I used Behr Primer. I find it easy to use, and it goes on and
dries quickly. To get in all the corners I used my favorite paint brush, and
then on all the flat surfaces I rolled using a small roller. The picture below is after a coat of primer. 


Sticky Situation:
I went back and forth on where I wanted to tape off the bookcase to do the two
colors. I finally settled on only painting the back the bright orange color.
Once, the primer had time to cure, I taped off the the back of the bookshelf
and painted the back portion using the same mehod as the primer. I used a paint
brush to paint in the corners and then used a roller for the flat surface. This
required two coats. Before the second coat was too dry,  I peeled of the tape and was
ready for the last step.
Last but not least: The
last step was to paint the outside of the bookcase as well as the shelves a
good clean white. Once the orange paint was dry (about 24 hours), I taped the orange corners to
help prevent any white paint getting on the orange back. Then using the same
method with a paintbrush and roller, I painted the bookshelf white.
Here is the finished product: The boys love it and enjoy
putting their book, toys, and money banks on it.

Captain Vegetable Part Deux: Planting a Vegetable Garden

As I said in this post, planning the vegetable garden took
a little bit of preparation. After building the raised beds, putting them in the
right part of the yard, and filling them with the right material (in our case peat moss and mushroom compost as suggested by the Home Depot gardening expert), it was time to plant.
This garden, I knew would be a trial and error process as I am not known for my green thumb. I looked around the internet, Pinterest, and talked to family and friends about what vegetables work well for them, and decided to do a large variety of vegetables. My thinking was that if I tried a little of everything, I would have a better idea of what works in our yard, and only plant the successful plants next year.
After doing more research, and talking to a few more people, I decided to buy my seeds on Amazon. I bought this seed kit. For $12.41 plus free
shipping, I couldn’t beat the price. These are all vegetables that we like, so if they were all successful, nothing would go to waste.
To plant the seeds, all I did was follow the directions on
the back of each seed packet. On the back it gives suggestions for when, where,
and how to plant the seeds. Once planted, this is how the garden progressed.
Planting Day!
 Week 1
Week 2


Week 3


Week 4
Week 5


Week 6
So far, I have been amazed at how it has been growing. My expectations weren’t too high, as I have killed many house plants in the past, and we have not had much rain here. Take it from me (former black thumb), with a lot planning, regular watering, and weeding, this isn’t impossible.
We have already been reaping the benefits of this garden with some salad and a few recipes that I will be sharing soon.

Just Call me Captain Vegetable: Building a Raised Garden Bed


Remember this? Anyway, for years, I have always
had a fascination with people who grow their own food. To me it is amazing,
plant seeds… wait… pick food… bring to kitchen. I have always been so envious
of people like Martha Stewart and Ina Garten, walking out their patio door
and cutting veggies and herbs, and bringing them in to use in their recipes.
Brian and I come from a long line of vegetable growers, so we thought that if
we ran into trouble we have plenty of family members to ask. So, we started
with a plan back in February. And now the dream has come to fruition. Check
this out!

How did we go from two boxes in the ground to a full vegetable garden?

Well at the risk of this
being a million word post, I’ve decided to break this up in sections for you.
Today we are going to talk about building a raised bed. This was a very simple project with the help of a little planning and some internet research. Brian was very excited to be using power tools!

Back in February, I
started to pin some raised bed ideas on Pinterest, as well as try and scope out
some sunny places in our yard.

http://www.verduragardens.com
http://www.sunset.com/garden/backyard-projects/ultimate-raised-bed-how-to-00400000011938/page3.html


After some debating we used the plan from www.sunset.com. It seemed simple and versatile. We did, however, make a few minor changes. First,
we used pressure treated lumber instead of cedar to save some money. Also, we
did not buy the wire mesh to line the beds. We talked to our landscaper, and
after years of growing vegetables, he has never had any animals dig from
underneath to swipe vegetables.Here are some pictures of the building process. (Sorry about the iPhone pictures)


Here are the finished raised beds waiting to be transported
to their designated location.
And here they are just before planting filled with lots of
peet moss and mushroom compost.


Anyone else have a vegetable garden? What vegetables are you growing?

MAIL CALL!

Remember that show? I remember any guy friend I had in college thinking that show was awesome. You know what isn’t so awesome? This:

This was our mailbox. WAS, thank goodness! I don’t even know what to say about this mailbox, except that I bet that it hasn’t been touched since 1975. It is straight up Jenky, with a capital J. Anyway, it bothered the hubby and I. It bothered us a lot. We felt like it was such a bad representation of what our house is like, and we kind of felt like it showed we didn’t even care that we could paint the post and put up a $10 mailbox from this century.


It was a project that we figured could handle with some things we already had on hand, and a pretty inexpensive mailbox from Home Depot. Our goal was to spend as little money as possible. We used primer and black exterior paint we had on hand from painting the front door a few days earlier and painters caulk is something that we always like to have around. The only real money spent was on the new numbers and the actual mail box. So, on a cold Saturday, while Meema and Peepa watched the kids, we scraped, sanded, filled in some gaps with painters caulk, primed and painted, and attached some new numbers (have been removed in the pictures for privacy), and screwed in the new mailbox. Brian is not one for painting, but we were determined to finish this project in one day so we tag teamed it.

Here’s the after:


It’s nothing fancy, but it is so much better than before! Anyone else tackle a small weekend project that was just driving them crazy?

Finally… a headboard.

NOTE: Ok, so when I first started this Headboard project a month ago, I though hey no sweat, this will be done in an afternoon. When I thought that I obviously had brain damage, as I forgot that I have three children who are three and under, and that it might take me longer than that.

Brian and I inherited his grandfather’s bedroom set which consists of two dressers, a nightstand, and a headboard for a double bed. After about two weeks of being married and me getting elbowed in the face, we decided that if we wanted to be married for more than two weeks, we should get a queen sized bed. Since the headboard would not work with the bigger bed, we just went without one at the condo. Now that we are at the new place and I’m “decorating” I decided our bed needed a little presence in our room so I ventured to find an upholstered headboard. I went searching for inspiration and while shopping for couches I saw this headboard at Darvin Furniture for $1200… Ummmm, yeah no. I want my kids to go to college. After watching a ton of HGTV over the years I figured, hey I can do that myself.Do the math! First, I did some measuring to decide how big I wanted this baby. I measured the width of the bed, and I also decided how tall I wanted the headboard to be. I figured I wanted it to be tall enough for resting, so since Brian is taller than me I had him sit on the bed and lean against the wall and measured from the bottom of the mattress to about 3 inches above his head (scientific right?). This headboard will not touch the ground, but I wanted it to look like it does so I measured to the bottom of the mattress not the box spring so the headboard will sit behind the bed a bit.Shop til you drop! Secondly, I ran to a few different stores gathering up what I needed. This took some time, as I had to wait for some white foam to come in stock at my local JoAnn Fabrics. Looking back, this was my favorite part of the process. I bought the following supplies:- ½ inch plywood cut to size (if you don’t have a table saw or want to use it for fear of losing an appendage Lowe’s and Home Depot will cut it for you free of charge)- Fabric (enough yardage to cover the plywood, with about 6 to 10 inches extra on each side to wrap around the back.)- 2 inch thick foam that is the same exact size of the plywood. Just a couple of notes about the foam. It will be almost impossible to cover the plywood with one piece of foam because it only comes so wide, so just butt a couple of pieces up until you get it to fit. Also, if you are using a light colored fabric, try to find white foam instead of the green stuff that you might see underneath- Cotton batting cut to the same size as the fabric- Staple gun and staples- Buttons if you plan on tufting- Upholstery thread if you plan on tufting- Drill with a 5/32 bit if you plan on tufting – Upholstery needle if you plan on tuftingPlan ahead! If you plan on tufting with buttons, follow this step, otherwise skip ahead. The first thing I did was mark where I wanted to put the buttons on the headboard. So I drew lines along the width of the headboard eight inches apart. I did the same thing along the height of the plywood. Where the lines intersected I marked an X. Once this was done I took the drill and drilled a hole at each X. This way I can thread needle and thread to tuft the headboard later. Layer it up! Find nice clean spot on your floor and lay in this order: pre-cut fabric, pre-cut batting, then in the center lay your foam and lay the plywood on top. (remember you should have 3 – 6 inches of fabric and batting extra on all sides of plywood and foam.STOP, Staple time! Now it is time to staple. From all the suggestions that I read online, the rule of thumb is to start in the middle of one of the sides then staple to the right until you reach about six inches from the end then staple the other side leaving until you reach the other end of the ply wood with six inches remaining. I left my staples about 2 to 3 inches apart. Repeat this step on all four sides. You should have everything stapled except the corners.Wrap it up! For the corners I tucked and wrapped like a present and then stapled in place. VOILA! Untufted headboard. Cute right?Tuft Time! If you don’t want to tuft, go ahead and skip this part, but you’ll be missing a funny story. So, my original plan was to tuft my headboard with fabric covered buttons, but that didn’t work out so well as my fabric was too thick to make buttons with. Also, the tortoise shell ones that I thought would look pretty were five bucks each and I needed fifteen of them. Since, I’m cheap (which is why we started this project to begin with) I wasn’t about to spend $75 on buttons. So, I sacrificed a bit and went without the tufting. However, to tuft all you need to do, is thread your buttons and secure tightly in the back with your pre-drilled holes.Hang it up! I don’t have any pictures of this step, and I apologize. However, there are several ways to hang the headboard. Candice Olson from HGTV is a big Velcro lover, and all of her upholstered headboards are hung this way. Some people use a rail system. Others just screw it right into the wall. We did the rail system. We cut two pieces of 1 x 2 to the width of the headboard. Attached one to the wall in the studs, and the other to the back of the headboard and hung it like a picture with one rail on top of the other. So there you go, all finished. Finally!

I’m a Creative Genius

The window above the sink in the kitchen originally had no window treatment. I didn’t want to do anything right away, because I thought I should live here and shop around for some options before doing something I don’t like. I’m in the kitchen for 80% of the day preparing three meals a day as well as cleaning up said three meals a day. Not to mention, the countless sippy cup refills. The kitchen is pretty much my domain, and I didn’t want to do something that two months from now I would regret. I love all the natural light that comes in the kitchen window, and after a few weeks of living in the new place, I decided I would do cafe curtains. They let a TON of light in and still offer privacy. This is the part that Brian was the most thrilled about. With the lack of trees in the back yard, he was afraid that everyone was watching him load the dishwasher or get a glass of water. Also, cafe curtains would give me that modern/cottage look I’m going for throughout the house. Now that I knew what I wanted to do, the shopping began. I figured I would see what was out there or recruit the help of my dear Mom, who happens to be the designated custom curtain maker of the family. She also gets every catalogue known to man and as I was perusing her Pottery Barn catalogue I saw the following:

I love the oil rubbed bronze rod with matching clip rings. I also love the subtle pattern to the curtains. So the quest began to find something just as cute, but on the cheap. Cue the napkins. Yes, napkins. Not paper napkins, but the most adorable cloth napkins from Target. Yep, that’s right, TARGET!I went there scrounging around for some ideas. I first found the rod and clips. I figured I am going to need them anyway, and the oil rubbed bronze rods were $4.83 a piece. Also, the clips they had to match were about five bucks for a pack of seven. As I am walking around, I am thinking what a pain it is going to be to take a trip after the kids go to bed to a fabric store or try and cart all of them with me to find some fabric that I like. THEN, (cue “Alleluia” song) I walk past the table linen aisle. Miracle of miracles I saw these adorable napkins that compliment the shades of bright white, sculptor clay grey, and rain washed blue already existing in my freshly painted kitchen. I thought 20” x 20” napkins are large enough to make some small curtains, and they are already pre-hemmed. No need for my Mom to help me sew some fabric or do iron on tape a la Young House Love. Although, a phone call to Nana was still made to help me out.So I got home, and with a little help from Mom, hung the rod brackets, clipped the rings to the napkins and hung everything just as things were getting dark and my husband was putting the kids to bed. Ta Da cafe curtains. Total I used four napkins to accommodate the width of my window and to have the wavy ruffly look to them. What about you? Anyone out there every DIY their own curtains? Perhaps out of sheets, table clothes or any other pre-hemmed fabric? Note: Thanks to Pottery Barn’s winter catalogue for the above picture and inspiration.