This bookshelf is an Oldie but a Goodie. My Dad built this bookshelf for my oldest brother’s bedroom when he was a little kid, then it got passed around to all of the siblings and even a few of the grandchildren. Growing up, I can remember my Dad building a few sets of bookshelves as well as other furniture and tackling a lot of DIY home improvement projects.
Anyway, his love for doing projects has been handed down to me, and when my sister said I could have one of the bookcases Dad built, I of course said yes. This particular bookcase has been passed around and repainted so many times it looked pretty
shabby (as in it needed some serious TLC).
shabby (as in it needed some serious TLC).
The original paint color was red, then yellow, then pink,
then white. I decided to bring it into the boys room for their toys, money
banks, and books, and paint it a fresh coat of white with a different color on
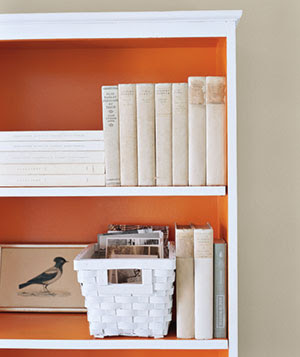
the back part of the shelves. Similar to this photo I found in my favorite magazine, Real Simple.
then white. I decided to bring it into the boys room for their toys, money
banks, and books, and paint it a fresh coat of white with a different color on
the back part of the shelves. Similar to this photo I found in my favorite magazine, Real Simple.
I loved the orange, and thought it would be ok to tie that
into the boys room because their room has become hodge podge of a bunch of
different colors to accommodate their likes.
So here’s how I freshened up this old bookcase, built by my
Dad probably 40 or more years ago.
Dad probably 40 or more years ago.
Supplies:
Paint Stripper (Citristrip)
Putty knife
Mineral Spirits
Steel Wool
Electric Sander (Black and Decker)
Sand Paper (course and fine grit)
Primer (Behr)
Painter’s Tape (Froggy Green Tape)
Behr Decorator White in Semi-Gloss (leftover gallon)
Behr Orange Peel in Semi-Gloss (I bought 1 quart)
Gloves
Face Mask
Safety Glasses
Shop Vac
Sponge
Bucket of Water
Paint Brushes
Small Roller
Painter’s Trays.
Strip, Ooo la la: I decided to strip the bookcase simply because of the
number of layers of paint it had. I used a very gentle paint stripper I
found at Home Depot called Citristrip (I’m starting to see an orange citrisy theme here), and followed the directions to a T. Which, I know is so
un-Erin like, but since I’ve never used paint stripper before, I figured this
was the best way to go. Depending on the kind of paint stripper you use, you
may or may not need the steel wool and mineral spirits. I liked this step as it
removed any paint stripper residue and got rid of all the yucky leftover layers
of paint. I made sure I wore gloves and my face mask for this step.
Getting Sandy: I put
on my mask and safety goggles, and got sandy. Using my electric sander, I first used the course grit
sand paper to try and remove any paint that the stripper couldn’t get. I also
tried to sand away as many knicks in the surface as possible. Then, I used the
finer grit sandpaper and sanded until the surface was smooth to the touch.
There was still some paint on the surface but if I closed my eyes and ran my
hand over the surface I couldn’t even tell. Also, to get in the corners I couldn’t use the electric sander, so I just used some pieces of sandpaper.So fresh and so clean: For this step, I used my shop vac to suck up all the dust from
stripping and sanding. Then, I used a damp sponge to wipe away all excess dirt
and dust from the surface and in the corners to get it ready for priming. After all this prep work
I’m finally ready to break out some paint brushes.
Prime: This step
was very easy. I used Behr Primer. I find it easy to use, and it goes on and
dries quickly. To get in all the corners I used my favorite paint brush, and
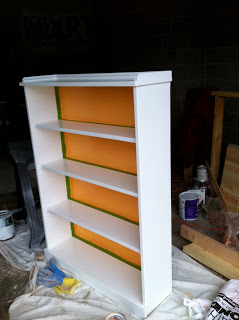
then on all the flat surfaces I rolled using a small roller. The picture below is after a coat of primer.
was very easy. I used Behr Primer. I find it easy to use, and it goes on and
dries quickly. To get in all the corners I used my favorite paint brush, and
then on all the flat surfaces I rolled using a small roller. The picture below is after a coat of primer.
Sticky Situation:
I went back and forth on where I wanted to tape off the bookcase to do the two
colors. I finally settled on only painting the back the bright orange color.
Once, the primer had time to cure, I taped off the the back of the bookshelf
and painted the back portion using the same mehod as the primer. I used a paint
brush to paint in the corners and then used a roller for the flat surface. This
required two coats. Before the second coat was too dry, I peeled of the tape and was
ready for the last step.
Last but not least: The
last step was to paint the outside of the bookcase as well as the shelves a
good clean white. Once the orange paint was dry (about 24 hours), I taped the orange corners to
help prevent any white paint getting on the orange back. Then using the same
method with a paintbrush and roller, I painted the bookshelf white.
Here is the finished product: The boys love it and enjoy
putting their book, toys, and money banks on it.
putting their book, toys, and money banks on it.


