Category

Food

Breaking Some Rules: Lemon Blueberry Layer Cake

There are two rules that I break all of the time.

1.) Don’t head to the supermarket when hungry.
2.) Don’t be pinning things and surfing for recipes when hungry.

The other day I broke rule number two, when I saw an awesome recipe from Sally’s Baking Addiction for Lemon Blueberry Layer Cake. For those that don’t know I LOVE the combination of lemon and berries you can tell by my recipes for lemon blueberry cookies and fresh pink lemonade. Looking at recipes while hungry, led to me breaking rule number one.

However, if being wrong creates this delicious cake, I don’t want to be right.

There are two other rules that I break all of the time too.

3.) Don’t adapt baking recipes as it is a delicate balance.
4.) Give a cake ample time to cool before frosting.

Ok, I’m a rebel, what can I say. I adapted the recipe and I waited as long as I could, but we just couldn’t wait anymore!!

Lemon Blueberry Layer Cake (adapted from Sally’s Baking Addiction)

CAKE
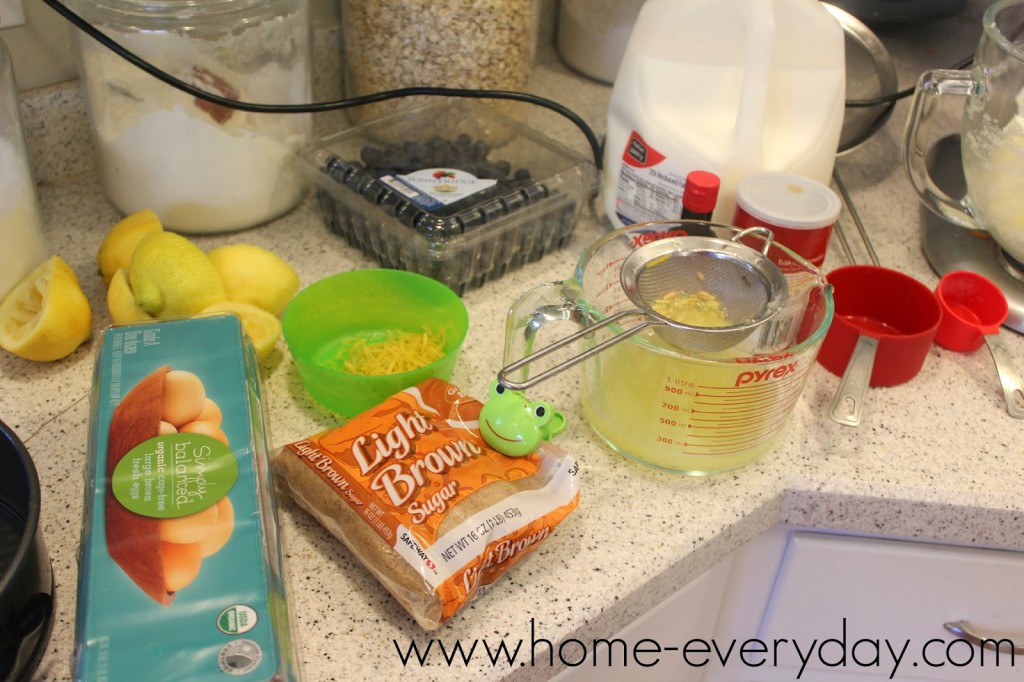
3 cups all purpose flour + 1 Tbs reserved
1 Tbs baking powder
1/2 tsp salt
1 cup unsalted butter room temperature
1 1/4 cups granulated sugar
1/2 cup light brown sugar packed
4 eggs
1 Tbs (yes a tablespoon) of pure vanilla extract
1 cup buttermilk
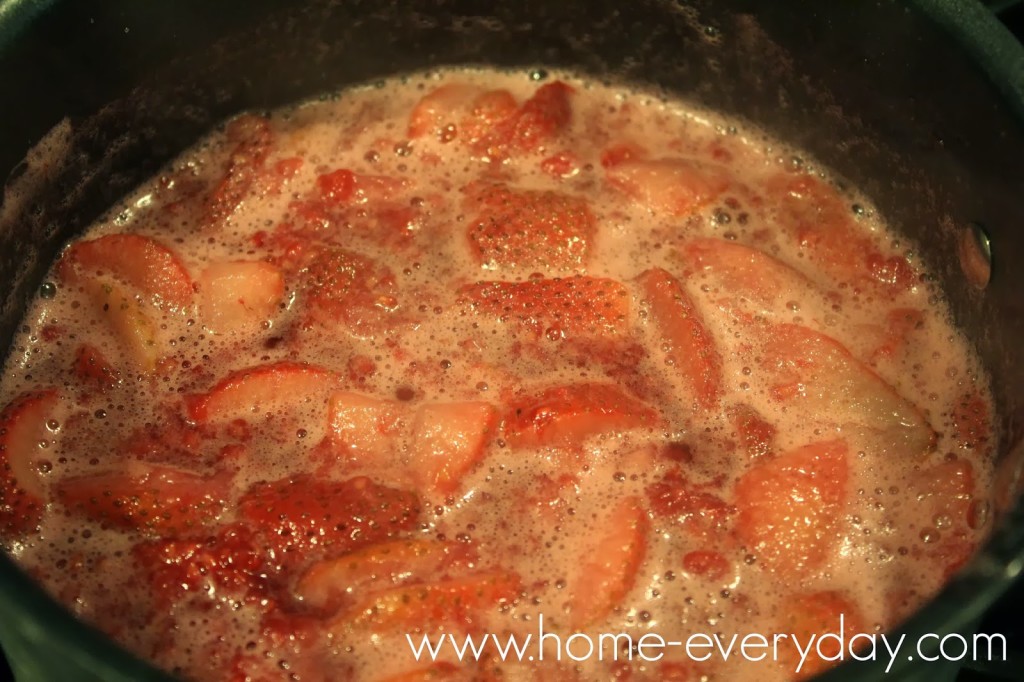
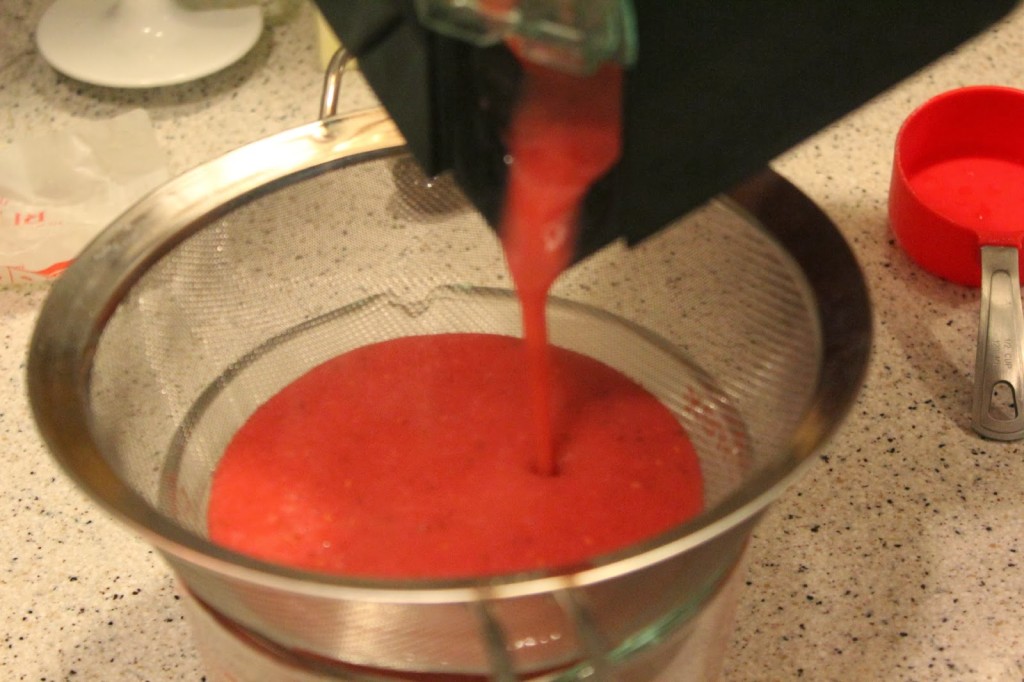
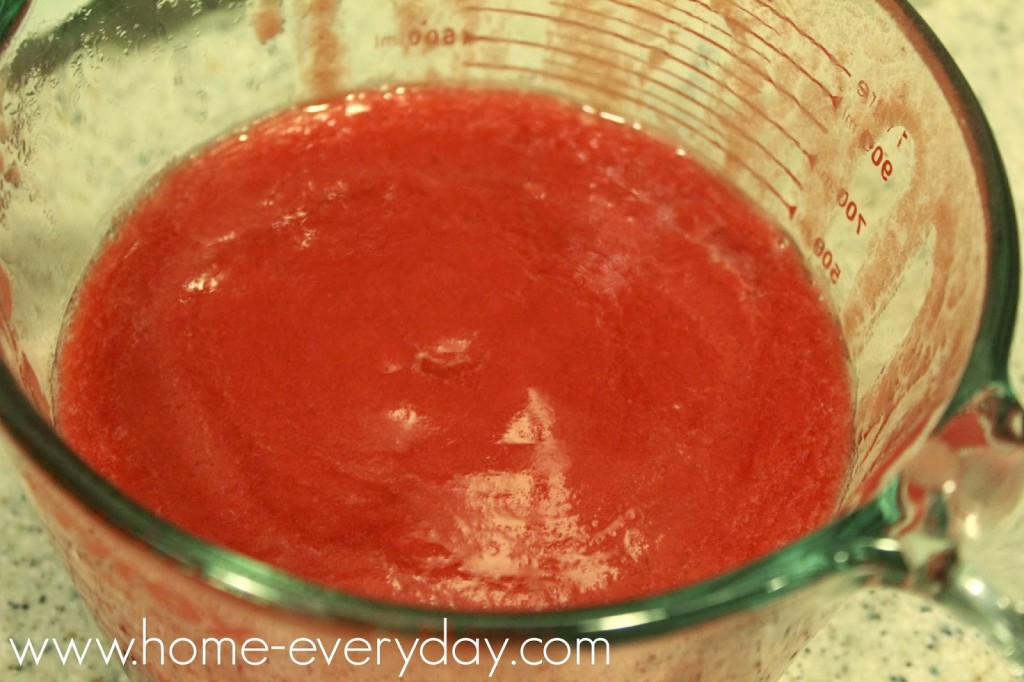
3 or 4 lemons zested and juiced (should yield about 1/2 – 3/4 cup of juice)
2 cups fresh blueberries

Preheat oven to 350 degrees.

Grease and flour two 9 inch round cake pans set aside.

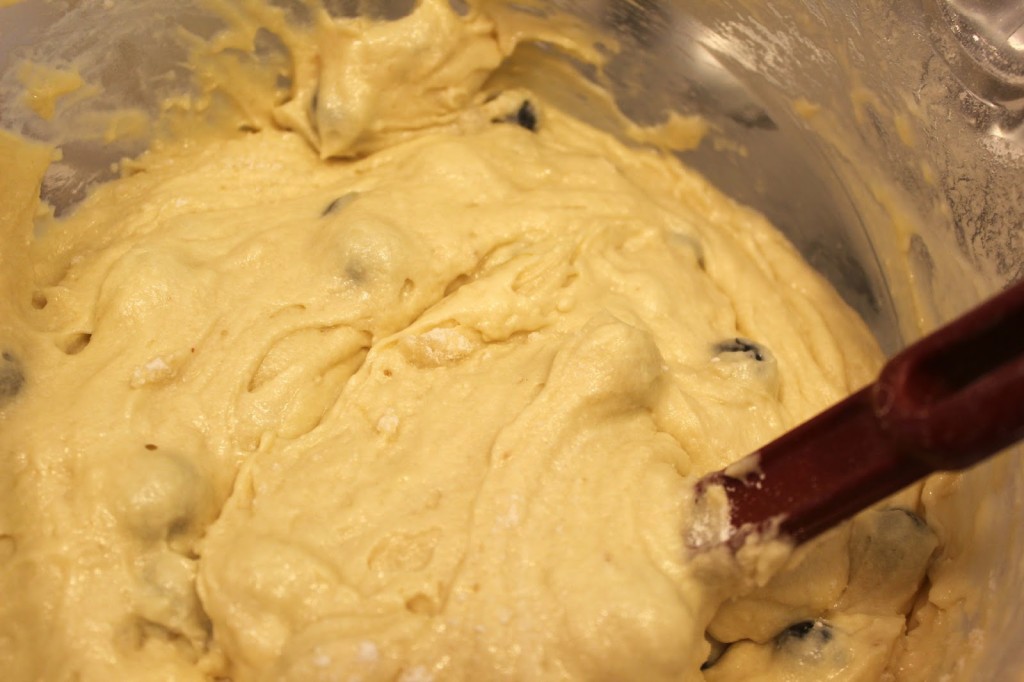
In a large bowl, sift together 3 cups flour, baking powder and salt and set aside. In another bowl, toss together blueberries and reserved flour and set aside. (NOTE: this will keep the blueberries from sinking into the bottom of a cake, my mom taught me this trick and it can be done with raisins and chocolate chips in breads and cakes too.)

With a stand mixer or large mixing bowl with hand beaters, cream together butter and sugars until well blended. Then, add eggs, vanilla, and mix until incorporated.

Next, add slowly add the flour mixture and mix until just combine. (NOTE: don’t over mix it is ok if you can still see some flour in the mixture.)

Then, add buttermilk, zest, and lemon juice and mix until incorporated.

Next, using a spatula carefully fold in blueberries.

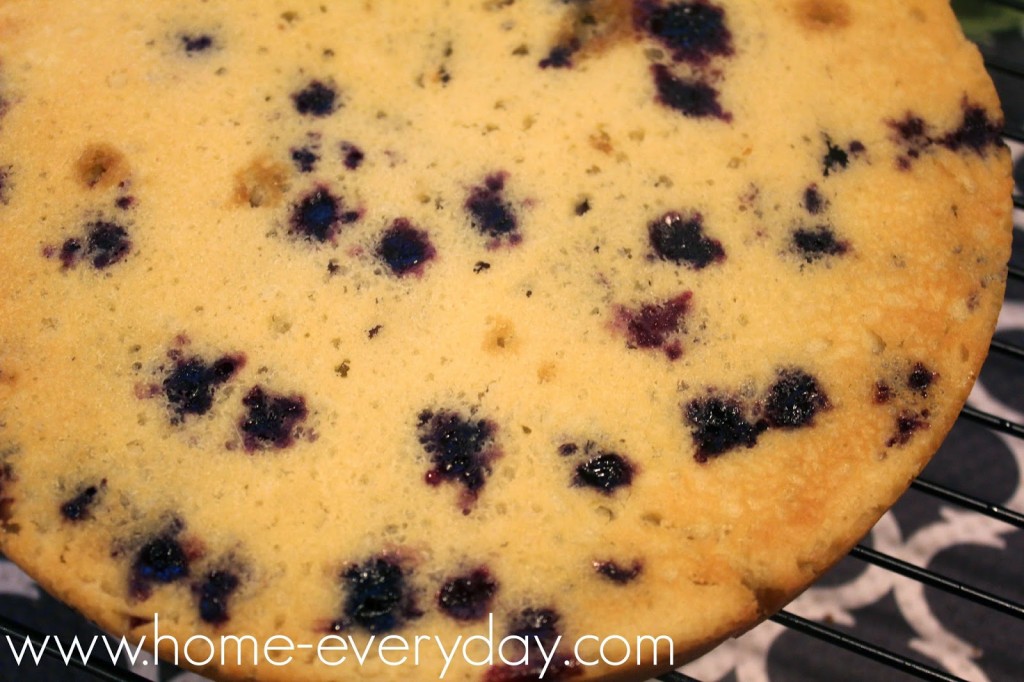
Finally, pour mixture dividing evenly between two cake pans and bake 26 – 30 minutes or until a toothpick inserted comes out clean.

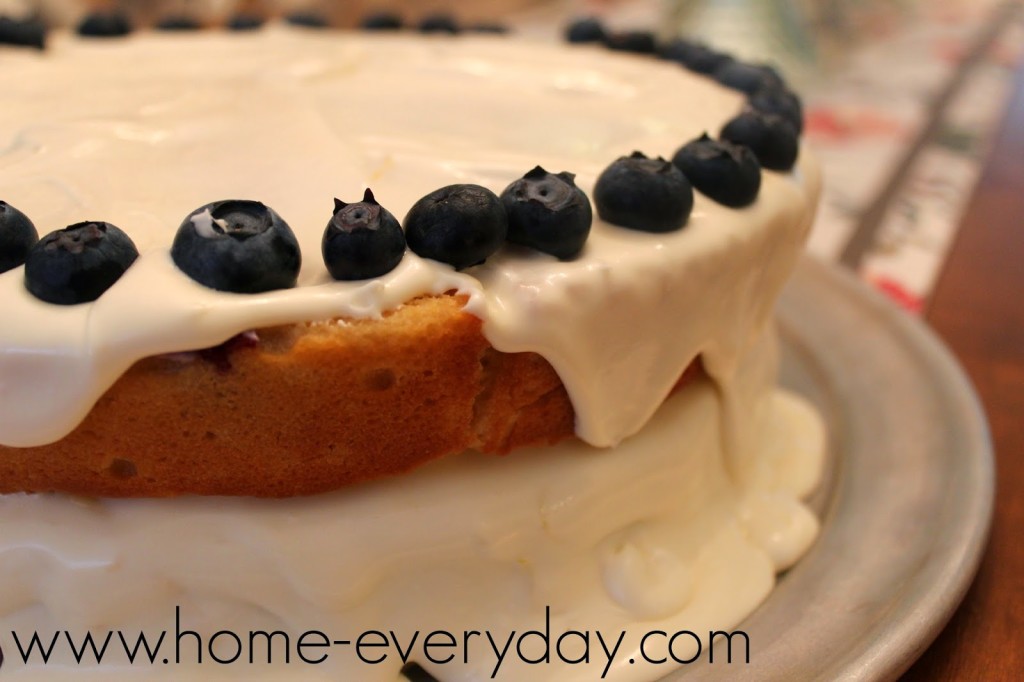
Remove cake from oven, and cool slightly for about 7 minutes in the pan. Then remove from pan let cake cool on a cooling rack about 1 hour. (NOTE: The cake should be cool to the touch before frosting, but if it is still a little warm because you cannot wait anymore that is fine too).

FROSTING
1 16 oz can Betty Crocker Vanilla frosting
2 tsp pure vanilla extract
1 lemon zested and juiced.

In a small bowl, whisk together ingredients.

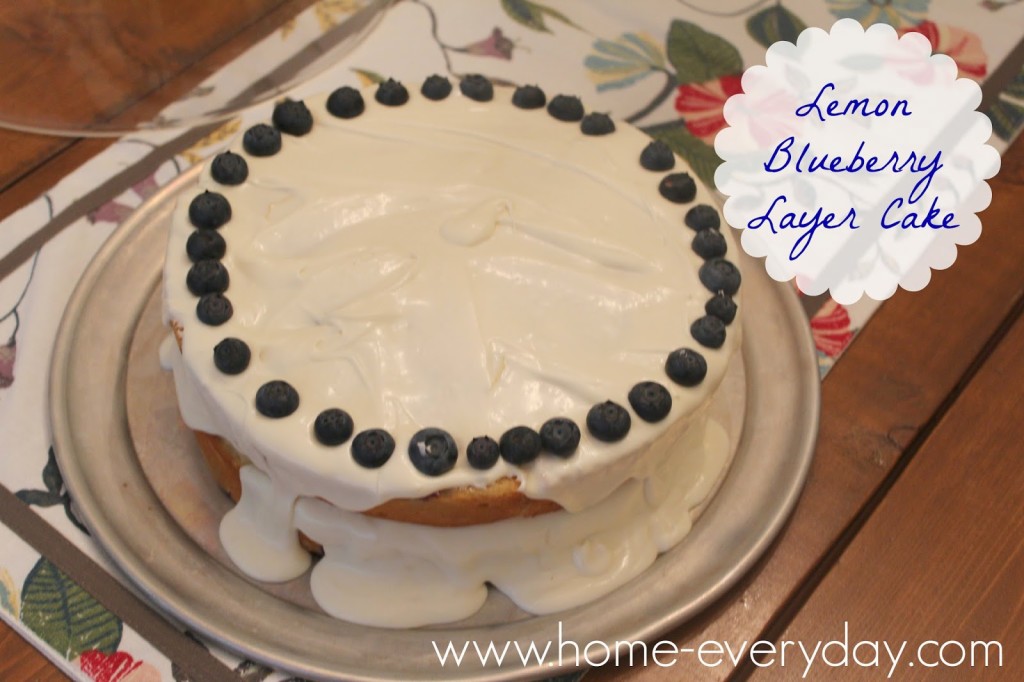
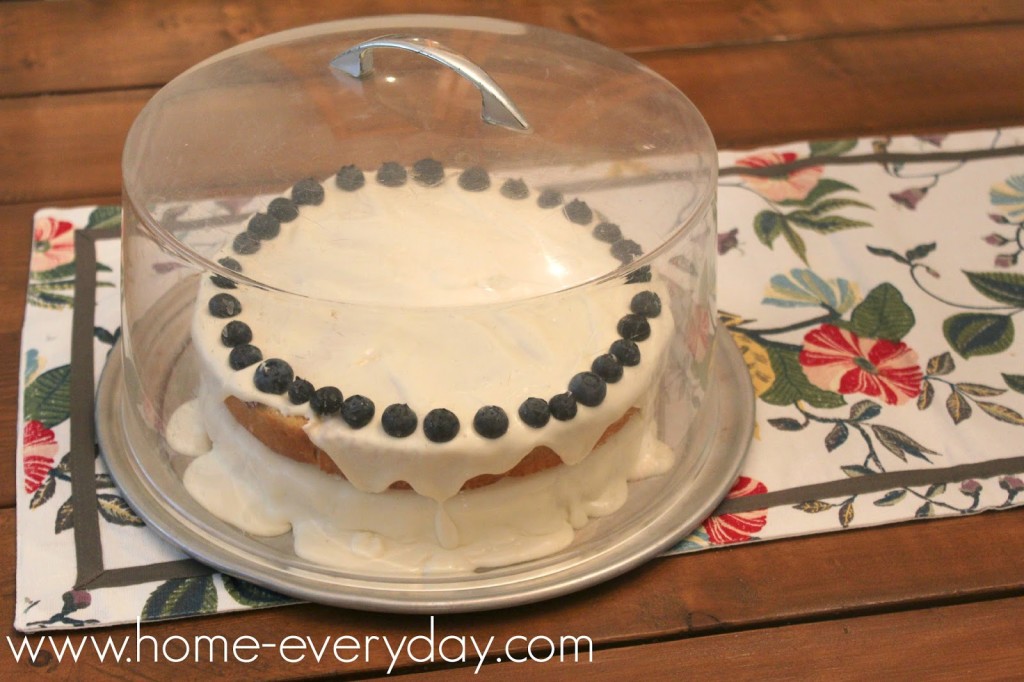
When cakes are cooled, put one cake on a plate and put half the frosting in the middle of the cake and spread out with a spatula letting it fall over sides. Top with second cake, and add the rest of the frosting to the top and spread out and fall over sides. Garnish with blueberries.

Now, go break some rules, you little rebel you!

You know you want to.

If you like this post and would like to read more about all things domestic with a touch of humor, become a Home Everyday follower! For blog updates or to see other places I write such as ChicagoNow or Chicago Parent follow Home Everyday on FacebookTwitter, and Pinterest.

Follow on Bloglovin

Refreshing and Mild Pineapple Salsa

When it comes to dinner in our house, Mexican food is a safe choice. We usually all agree as I get to show off some of my culinary skills and try new recipes, and the kids aren’t opting for chicken nuggets (what IS it with kids and chicken nuggets anyway?). Also, Brian loves all kinds of cuisine, so he happily tries all of my new recipes.

Sometimes, I will try and think of a great place that Brian and I ate at when were dating or on vacation, and recreate a recipe to reminisce. That is what I did with this pineapple salsa. When we were dating, we used to eat at this great place on the North side of Chicago that had great pineapple salsa, and I have wanted to recreate it every since. I had some fresh pineapple in the house, and the kids wanted Mexican, it seemed like the perfect thing to accompany tacos and quinoa salad.

I was not worried about the kids enjoying it as it is mild and refreshing. (NOTE: I made this batch without cilantro, but you could easily add in a handful of fresh chopped cilantro and it would be awesome!)


Pineapple Salsa
1/2 pineapple finely chopped
1 large red bell pepper finely chopped
1/2 red onion minced
1 lime zested and juiced
Salt and pepper to taste


In a large bowl, mix all the ingredients. Serve with chips or top tacos or quesadillas. Store in an aright container and refrigerate, good for about 4 days. (ours didn’t last nearly that long).


Are there any recipes that you try to recreate to remember a special time?

If you like this post and would like to read more about all things domestic with a touch of humor, become a Home Everyday follower! For blog updates or to see other places I write such as ChicagoNow or Chicago Parent follow Home Everyday on FacebookTwitter, and Pinterest.

Follow on Bloglovin

Salad Season is Here: 5 Tips for Building a Perfect Salad Plus a Berry and Goat Cheese Salad

It is like the world has sighed a deep breath of relief. The sun is shining, the breeze is blowing, and going outdoors is tolerable again.

My friend Tracy Jensen of It Builds Character and someone I shared the Listen to Your Mother stage with in 2013 said, “Salad in the summer is refreshing and delicious. Salad in the winter is nothing but a cold plate of disappointment.” Which is why, now that it is FINALLY nice, I am making salads on the regular, and cannot wait to share recipes all spring and summer long.
There is nothing worse than a salad with bland lettuce, a few wedges of tomato and gloppy dressing. If you are relying on salads as meals and to eat a little healthier, you should consider the following tips.
1. Consider Your Favorite Cuisine – Whether it be Asian or French, Mexican or American make a salad that is conducive to your palate. You will be more likely to enjoy salads and eat them more frequently if they contain flavors and ingredients that you like. If you don’t like Greek food, don’t make a salad with red onions, feta cheese, and olives.
2. Think Outside the Box – When most people think about salads, they are in a strict vegetable mindset. Adding different fruits, grains, proteins, and fats not only add flavor and interest, but round out the health factor. Sure we have all see pasta salad, but how about a salad with a tablespoon or two of cous cous or quinoa as a grain option. Instead of the typical shredded cheese, how about some crumbled goat cheese or a few pieces of shaved parmesan for a different take. Instead of the same old croutons which add crunch, but are not particularly healthy how about a few walnuts? Instead of the same old chicken how about some lean shredded pork or hard boiled eggs or even half an avocado?


3. Just a Little Bit – Remember Elaine Bennis in Seinfeld talking about “The BIG Salad?” A salad is the sum of its parts. If you are tossing or shaking (like my Mason Jar Salads) salads well enough, you don’t need to add to much of any one ingredient. The lower calorie items like veggies and fruits can get a handful or two thrown into the mix, but the higher calorie items like grains, nuts, proteins or cheese get a TBS or two and I usually only do a TBS of dressing.
4. Mix it Up – When it comes to dressings sometimes I make my own sometimes I use store bought. I have found a really good balsamic and a really good strawberry poppyseed that I buy at the supermarket, but when it comes to a cilantro lime dressing I make my own. Again, this is up to you, but I will say if there is more dressing in your salad than salad, then you need to up the ante a bit in what you are putting in your salad.
5. Storage – Whether it be tupperware, glass mason jars, or storage bags there are several ways to store salads. However, there are two things that ruin salads. Moisture and stink. My tip for keeping the moisture out is a little piece of paper towel at the top of whatever container I happen to be using. This helps to absorb any extra moisture or condensation when you put your salad in the fridge. Let’s face it, some foods are stinky. Red onions, broccoli, hard boiled eggs, fish are all examples of stinky foods. If I am making a salad that contains a food that I believe to be in the stink column and I am not eating it right away, I will leave that ingredient out and store it in a separate container and add it in when I am ready to eat.
BONUS: Last week, I happened to have the following ingredients in the fridge and I came up with this amazing salad and had to share.
1 bag baby spinach
1 cucumber (peeled, seeded and chopped)
1 red Bell Pepper (seeded and chopped)
1 avocado chopped (squeeze a bit of lemon juice over avocado to prevent browning)
1 handful blueberries
1 cup cooked cous cous
1 grilled boneless skinless chicken breast chopped
3 Tbs goat crumbled goat cheese
1 Tbs Strawberry Poppyseed Dressing (I used Marzetti’s Simply Dressed)
In a large bowl add all the ingredients except dressing. Toss together. Serve and then add dressing to each individual’s portion.
What is your favorite salad?
If you like this post and would like to read more about all things domestic with a touch of humor, become a Home Everyday follower! For blog updates or to see other places I write such as ChicagoNow or Chicago Parent follow Home Everyday on FacebookTwitter, and Pinterest.

Follow on Bloglovin


6 Ways To Use Leftover Hardboiled Eggs

Easter has come and gone! Leftover candy is easy to deal with, but leftover hardboiled eggs, not so much. Let’s face it, once hard boiled egg is yummy, knowing that you have two dozen more in your refrigerator is daunting.

We had a great time decorating our eggs, but I spent the weekend eating chocolate and thinking what to do about my leftover hardboiled eggs. Here’s what I came up with!

1. Garbage Salad – make a salad and add a sliced egg for some added protein. My favorite is a “Garbage Salad” which includes any fresh veggies left in the fridge spinach, peas, tomatoes, peppers, carrots, cucumber, zucchini. A little cheese like feta or mozzarella. Whatever protein available some chicken or in this case hard boiled eggs. Then, I top it off with balsamic vinaigrette. This is the perfect lunch!


2. Eggs Benedict Arnold – this is a cheater version of a classic Eggs Benedict, but is perfect  to use up leftover hardboiled eggs, and is much quicker than going through all the effort for real eggs benedict on a week day. Take a toasted English muffin, place a some baby spinach on the muffin, a slice of leftover Easter ham, sliced hard boiled egg, some salt and pepper, and your favorite cheese. I use swiss. Place under the broiler for 1 minute until bubbly and serve with some fresh fruit. Pretty fancy for a weekday.

3. Egg Salad –  is a classic standby for all of those leftover hardboiled eggs. Ask your Mom, aunt, grandmother or best gal pal for their favorite recipe. Every family has one. Mine is 2 hard boiled eggs chopped, 1 or 2 stalks celery finely chopped, 2 tablespoons mayo, salt and pepper to taste. I put it on whole wheat bread with lettuce and tomato. Ta Da!

4. Deviled Eggs –  again this is an old standby and everyone has their favorite recipe. My family’s is finely mashing the egg yolks with some mayo and paprika salt and pepper.


5. Nicoise Platter – this very traditional French salad is one that is perfect now that the weather is getting warm. Boiled potatoes, fine green beans, olives, tomatoes, hard boiled eggs, and a nice piece of grilled tuna arranged beautifully on a platter is an easy dinner for a warm night.

6. BLT and E – with Easter comes brunch, and with brunch comes bacon. If you are like our family, you may have some of that leftover as well. Add some sliced egg to your BLT. You won’t regret it.

There you have it, a run down of the best way to use your leftover hard boiled eggs. How do you use yours?

If you like this post and would like to read more about all things domestic with a touch of humor, become a Home Everyday follower! For blog updates or to see other places I write such as ChicagoNow or Chicago Parent follow Home Everyday on FacebookTwitter, and Pinterest.

Follow on Bloglovin

Cruciferous Green Remedy: Roasting

Believe it or not, I didn’t always have the refined palette that I do today. In fact, I would say that it was fairly recently that I even started to be able to like cruciferous greens. Cruciferous greens are greens that I used to refer to as the “yucky greens.” They include but are not limited to: kale, cabbage, brussels sprouts, broccoli, and bok choy. They are loaded with all kinds of healthy nutrients, and to be honest I really wanted to like them, but I couldn’t get past some of their more unpalatable characteristics. Cruciferous greens tend to be extremely fibrous and can be a bit stinky.


Turns out, all these years I was preparing them the wrong way! All you have to do is ROAST THEM! Roasting has always been a go to cooking method for me as it always seems so inviting. I love how the whole house heats up and smells delicious when something is roasting in the oven, but to be honest, I really never thought to roast “yucky greens.” Now, it is the only way I prepare them.


When it comes to roasting these veggies it is more of a method and less of a recipe, so I am just going to share to examples of how I roast cruciferous vegetables, and then you can try them at home.

For brussels sprouts, I cleaned them and cut them in half. I preheated the oven to 375 degrees, and then on a clean jelly roll pan, I put the sprouts and drizzled them with a little bit of olive oil and a little bit of good balsamic vinegar. Then, I sprinkle them with some salt and pepper. Next, using my hands I just toss the mixture around a bit. Then, I roast the sprouts for about 15 – 20 minutes until they are caramelized and tender. I serve immediately. This is a great side to go with roast chicken or meat loaf since the oven is on anyway.


For kale, the method is very similar. I clean and dry the kale. I remove the fibrous stems and put the kale on a jelly roll pan. I drizzle with just a tiny bit of olive oil and salt. I toss with my hands, while the oven preheats to 375 degrees. I roast the kale for 10 – 12 minutes. When I remove the kale, I sprinkle it with parmesan cheese and then let it cool. The kale is best served at room temperature. Some people eat this like kale chips, but we eat it as an almost a side dish to lemon chicken breast or grilled flank steak.


Now, that you have an idea of how to make these healthy and nutritious greens more tasty, what will you be roasting up? I think next, I’m going to try Broccoli.

If you like this post and would like to read more about DIY, gardening, cooking, baking or all other things domestic, become a Home Everyday follower! For blog updates or to see other places I write follow Home Everyday on Facebook here.

Follow on Bloglovin

Homemade is the Name of the Game for Leona’s New Menu

While I was compensated for this post by Leona’s Pizzeria the thoughts and opinions are my own. WARNING: For those not from Chicagoland, I’m sorry this post will make your mouth water and want to hop a flight here immediately. 


When my middle son was born, we had his Baptism party at Leona’s. We had always thought the food, atmosphere and service, were great, but we didn’t know it could get better. Last week, Leona’s released their new menu, and it is outstanding. It was one of those moments where I realized that just when I thought something could not get any better, it did.

Leona’s has been in Chicago since 1950, but recently is under new ownership and has reinvented the menu with all things homemade. If you’re looking for fresh, traditional Italian with a modern flare Leona’s Pizzeria is where its at. Also, with locations all over Chicagoland, take out, and delivery, you really don’t have any excuse not to try this awesomeness.


I had the pleasure of trying some of the new menu last week, and I was amazed. They have a lot of Leona’s old favorites (like the Romano Chicken) but this time it is all homemade in house. I may never cook again! That’s not true, but I do have a new place to enjoy dinner out on those nights when I’m not in the mood for eating out.


Antipasto Salad

My favorite thing on the menu is the Kick A$$ Garlic Bread. I know what you’re thinking, “C’mon, Erin, it’s just garlic bread.” NO! It’s just garlic bread.


It is HOMEMADE foccacia bread with homemade compound garlic butter. It is like when I make it myself in my kitchen. Also, some of there sandwiches like the Italian beef are served right on this awesome bread, and it is delicious. Next time I go back, it is will be an Italian Beef with extra giardiniera please!


I cannot wait to bring Brian here too! He is the ravioli man, and he will love all the varieties and homemade sauces to accompany them. I have tried making homemade ravioli for Brian, just like his grandmother used to make, and I ended up sweating and in tears. Now, I will just take him to Leona’s. I have a feeling he will like all of them from the asparagus and grana padano cheese topped with marinara sauce to the veal and portabello mushroom ravioli topped with meat sauce. I take that all back. Brian make just want the tiramisu. I cannot say I would blame him.


When I’m not cooking in my kitchen, you know where I will be from now on.

To check out Leona’s new menu CLICK HERE!

If you like this post and would like to read more about DIY, gardening, cooking, baking or all other things domestic, become a Home Everyday follower! For blog updates or to see other places I write follow Home Everyday on Facebook here.

Follow on Bloglovin

Versatile Valentine’s Treat: Red Berry Sauce

I love when I can make one recipe, but use it for a bunch of different things. My favorite example of this kind of recipe is a roasted chicken. You can use it for so many different things: eat it right out of the oven, put on top of a garden salad, make chicken salad, make tacos, have a sandwich, stir it into soup. The possibilities are endless. It’s a wonder we all don’t keep one in our refrigerator at all times.

I am starting to think Red Berry Sauce is going to be ranking right up there with a roast chicken as a pretty versatile recipe.


This wonderful smooth sauce could be used to top pound cake, ice cream, pancakes, french toast, or even be used to make a neat cocktail (come back for ThirstyThursday to see that recipe). So far it has been a nice alternative to chocolate, and is a gorgeous shade of red which is perfect for the upcoming Valentine’s Day.

Red Berry Sauce

1 pint fresh strawberries hulled and sliced
6 oz fresh raspberries
1/2 cup granulated sugar
1/2 cup water
1 tsp fresh lemon zest


In a sauce pan over medium heat add sugar and water and stir until sugar is completely dissolved. This should take about 1-2 minutes. Stir in berries and lemon zest. Bring to a slight simmer. Lower heat, and cover pan with a tight fitting lid. Cook on low for 3 – 5 minutes. Remove mixture from heat and let cool for 10-15 minutes.


When mixture is cooled, pour into a blender. Blend on medium speed for about 1 minute until berries until berries are completely broken down. Finally, pour mixture through a fine strainer.


You can eat right away or store in an airtight container and refrigerate for 3 or 4 days.


I poured ours with homemade pound cake with whipped cream.


Later this week I will be sharing a cocktail made with this treat!

If you like this post and would like to read more about DIY, gardening, cooking, baking or all other things domestic, become a Home Everyday follower! For blog updates or to see other places I write follow Home Everyday on Facebook here.

Follow on Bloglovin

Heaven in a Jar: Homemade (Nut Free) Chocolate Spread

Ahhh Nutella. Everyone who can have it loves it. However, there is a huge portion of the population that cannot have this delicious treat because of the hazelnuts in it. I was feeling bad that my littles were being denied such a wonderful and versatile treat and was trying to find something that would be similar. Unfortunately, many of these spreads have nuts or are processed in the same facilities as nuts or other allergens.

I had to take matters into my own hands. I scoured the internet, and to my delight I found ONE recipe sans nuts.

Thank you so much, SugarHero! My kids now know the joys of spreading chocolate on toast. They know how glorious pretzels and chocolate taste together. And they will never look at graham crackers the same way again.

The only change I made to the original recipe was I did add a bit more sugar and vanilla, but it is truly Heaven in a Jar.

Heaven in a Jar
1/2 cup of water
3/4 cup granulated sugar
1 Tbs unsweetened cocoa powder
2 tsp pure vanilla extract
4 squares of Baker’s unsweetened chocolate finely chopped
1 stick of unsalted butter cold and cut into small chunks
pinch of salt

In a small sauce pan, over medium heat add water, sugar and cocoa powder. Stirring constantly, cook until sugar is completely dissolved. Then, bring to a slight simmer. This should take about 2 – 3 minutes.

Remove from heat, and stir in the vanilla, chocolate, butter, and salt until a smooth texture is formed and all the ingredients are melted and incorporated.

Pour the mixture into a jar or airtight container. Cover with plastic wrap so the wrap is touching the top of the chocolate (so a skin doesn’t form), and then cover with lid.

Refrigerate overnight, and enjoy. (According to SugarHero! the spread will last for 2 weeks in the refrigerator.)

There’s only one thing I can say about this recipe. You’re welcome!

For a Printable Version of this recipe CLICK HERE!

If you like this recipe and would like to read more about DIY, gardening, cooking, baking or all other things domestic, become a Home Everyday follower! For blog updates or to see other places I write follow Home Everyday on Facebook here.

Follow on Bloglovin


Smart Cookies: Scratch Brownies

This month’s Smart Cookies recipe was inspired by a craving for some good old fashioned brownies. Usually, I will buy a store bought mix for brownies, and dress them up a bit like these Salted Caramel Brownies of yore. However, with last week’s deep freeze, I was out of brownie mix, and really not wanting to leave the comfort of my house for brownie mix, when I am pretty sure I had everything I needed in the house to make them from scratch.

Also, I really really couldn’t wait to use the new glass spout bowl for my KitchenAid mixer.

After a bit of research, I found a few recipes that I thought were doable, and created  my own version. So, for this  recipe, I used dark chocolate chips instead of baker’s chocolate as the base. Because of this, I didn’t need as much sugar as the chocolate chips have a bit of sweetness added. Also, I added some white chocolate chips to the batter, and they were twice as chocolatey.

Scratch Brownies
1 1/4 cups all purpose flour plus 1 TBS
1/2 tsp baking soda
1/2 tsp salt
1 cup dark chocolate chips (semi sweet chocolate chips would be fine too)
1 stick of butter
3 large eggs
1 cup granulated sugar
2 tsp vanilla extract
1 cup white chocolate chips

Preheat oven to 350 degrees.

Grease a 9 x 13 baking dish and set aside.

In a small bowl, toss the 1TBS of flour with the white chocolate chips and set aside (this prevents chocolate chips from sinking to bottom of the brownies).

In a large bowl, sift together  the 1 1/4 cups flour, baking soda and salt, and set aside.

In a double boiler (I use a heat safe glass bowl over slightly simmer water), melt butter and dark chocolate chips together, stirring occasionally. Once completely melted together, remove from heat and allow the mixture to cool slightly.

In a large mixing bowl, beat together sugar, eggs, and vanilla until well incorporated. Next, set the mixer to low, and carefully and slowly add the chocolate and butter mixture. Then, add half the flour mixture until just incorporated, and then the other half of the flour mixture. Be sure to not over mix.

Carefully, fold in the white chocolate chips. Pour the batter into the baking dish, and bake for 20-22 minutes.

These brownies would be great served warm with some vanilla ice cream, but we dug right in after dinner with tall glasses of milk.

To get a printable version of this recipe CLICK HERE!

For more information about Smart Cookies, click here. You can also try these other Smart Cookie Recipes.

For past Smart Cookie recipes, check out the links below:
Oatmeal Dark Chocolate and Dried Cherry CookiesLucy CookiesWhite Chocolate and Cranberry BlondiesChocolate Dipped Vanilla Biscotti Italian Butter Cookies with Lemon Glaze, and Salted Carmel and Dark Chocolate TrufflesIrish Creme DelightsErin’s Light Lemon SquaresSalted Caramel BrowniesCran Apple Cookies, Pumpkin Cookies with Cinnamon Glaze

If you like this recipe and would like to read more about DIY, gardening, cooking, baking or all other things domestic, become a Home Everyday follower! For blog updates or to see other places I write follow Home Everyday on Facebook here.

Follow on Bloglovin

Friday Pizza Night: A Family Tradition

When I was a kid, almost every Friday night was Pizza Night (even during Lent we would order veggie)!! In the Chicagoland area, pizza places are everywhere, and when I was a kid we alternated between two of my favorite local places. Some of my favorite childhood memories revolve around Friday Pizza Nights.

It didn’t matter if it was after basketball practice, or watching a football game, or renting a movie and picking up a pizza on the way home, I remember those nights like they were yesterday. I loved that it was a time that my family and sometimes our friends were all together, Mom didn’t have to cook (which now as a parent I completely appreciate), and the conversation always flowed a little easier with a pizza to share.

In this new year, I have vowed to help create memories like that for our little ones with some new routines. The kids are now old enough to appreciate Chicago pizza (unlike some people I know) and all of the fun that goes a long with it, we are thinking of starting our own pizza night and making it our own family tradition.

While, I love all kinds of pizza, I have to say that my favorite treat is a deep dish style pizza. I often request it for my birthday dinner, and to be honest there is nothing like it anywhere else but Chicago. If you are making a visit to the area or if you already live here, I am sure your mouth is watering.

To give a little background about one of my most favorite meals, Marriot has put together is awesome info graphic about Chicago Style Deep Dish Pizza and where you can get the best and most popular pizzas in town.


For more information or to see this photo in greater detail CLICK HERE!

This info graphic is Powered by Marriott. Special thanks to them for sharing it with me. Since it is Friday, you know what I will be doing tonight! I hope you can start a new tradition in your family too.

Now, to decide what kind of pizza for tonight.

For more about organization, DIY, gardening, cooking, baking or all other things domestic, become a Home Everyday follower! For blog updates or to see other places I write follow Home Everyday on FacebookTwitter, or Pinterest.