Tag

kids

Organizing Legos: A Lego Figure Display

“If I step on one more Lego!!!!!”

This is a phrase often uttered in my house. The kids have all reached the age when Legos are the primary toy. This of course means they are EVERYWHERE. On the floor. In the couch. On the table. In the kitchen. In the car.

While I love that my kids play with Legos (I mean hello hours of entertainment, education, and did I mention silence), I had to think of a a way to organize this insanity.

IMG_9852

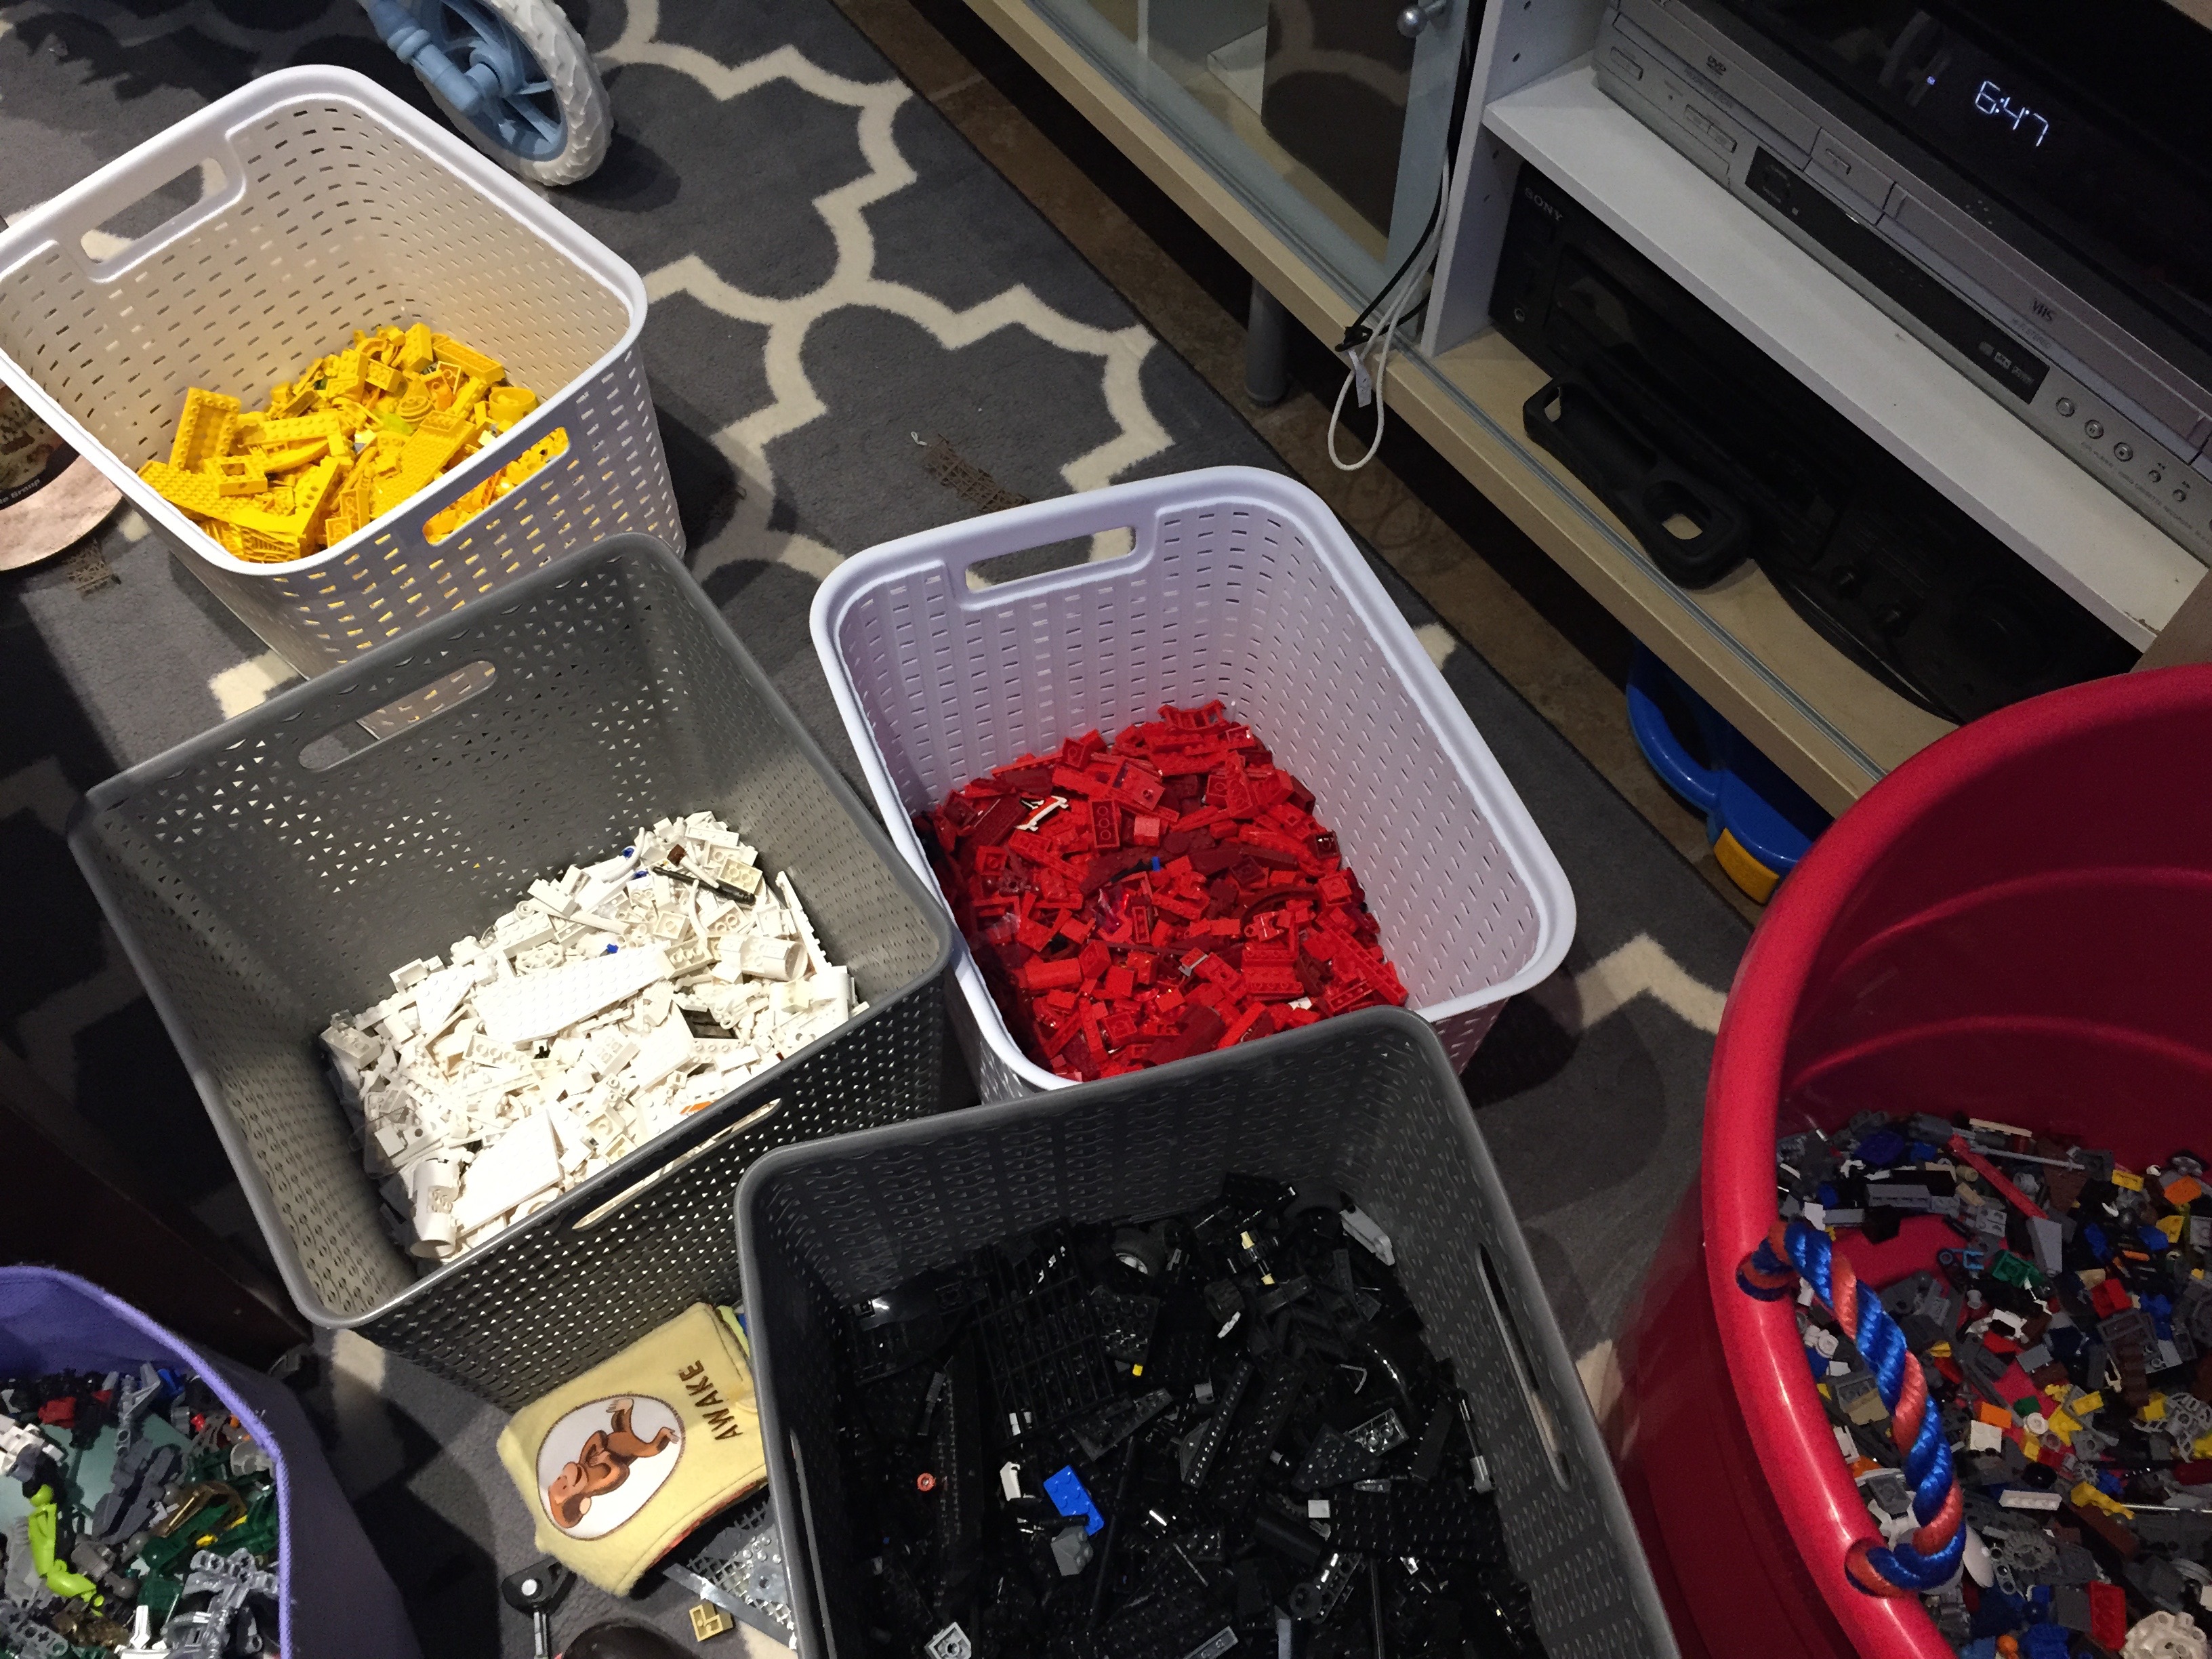
The first thing I did was to get some sets of clear plastic drawers, and I sorted all the Legos out by color. I figured this would kind of help with finding certain pieces, and when putting things away, everything would have a place. I even had a couple leftover drawers for instruction booklets, Bionicle pieces, and Lego Figure (known at our house as Lego Guys) pieces and accessories.

Lego Organization 1

After everything was sorted, I thought it might be nice for the kids to have a place to display the things they had built. Normally, they don’t mind displaying something for a few days on the craft table, but then taking it apart to build something else. However, when it comes to their Lego Guys, they really like to keep them together for some reason.

I pinned a few projects, and decided to create a display for their Lego Guys. It was simple and fairly inexpensive as I used up a few things I had on hand.

DIY Chalkboard “Lego Guy” Display

1 picture frame (I chose a large poster size frame)

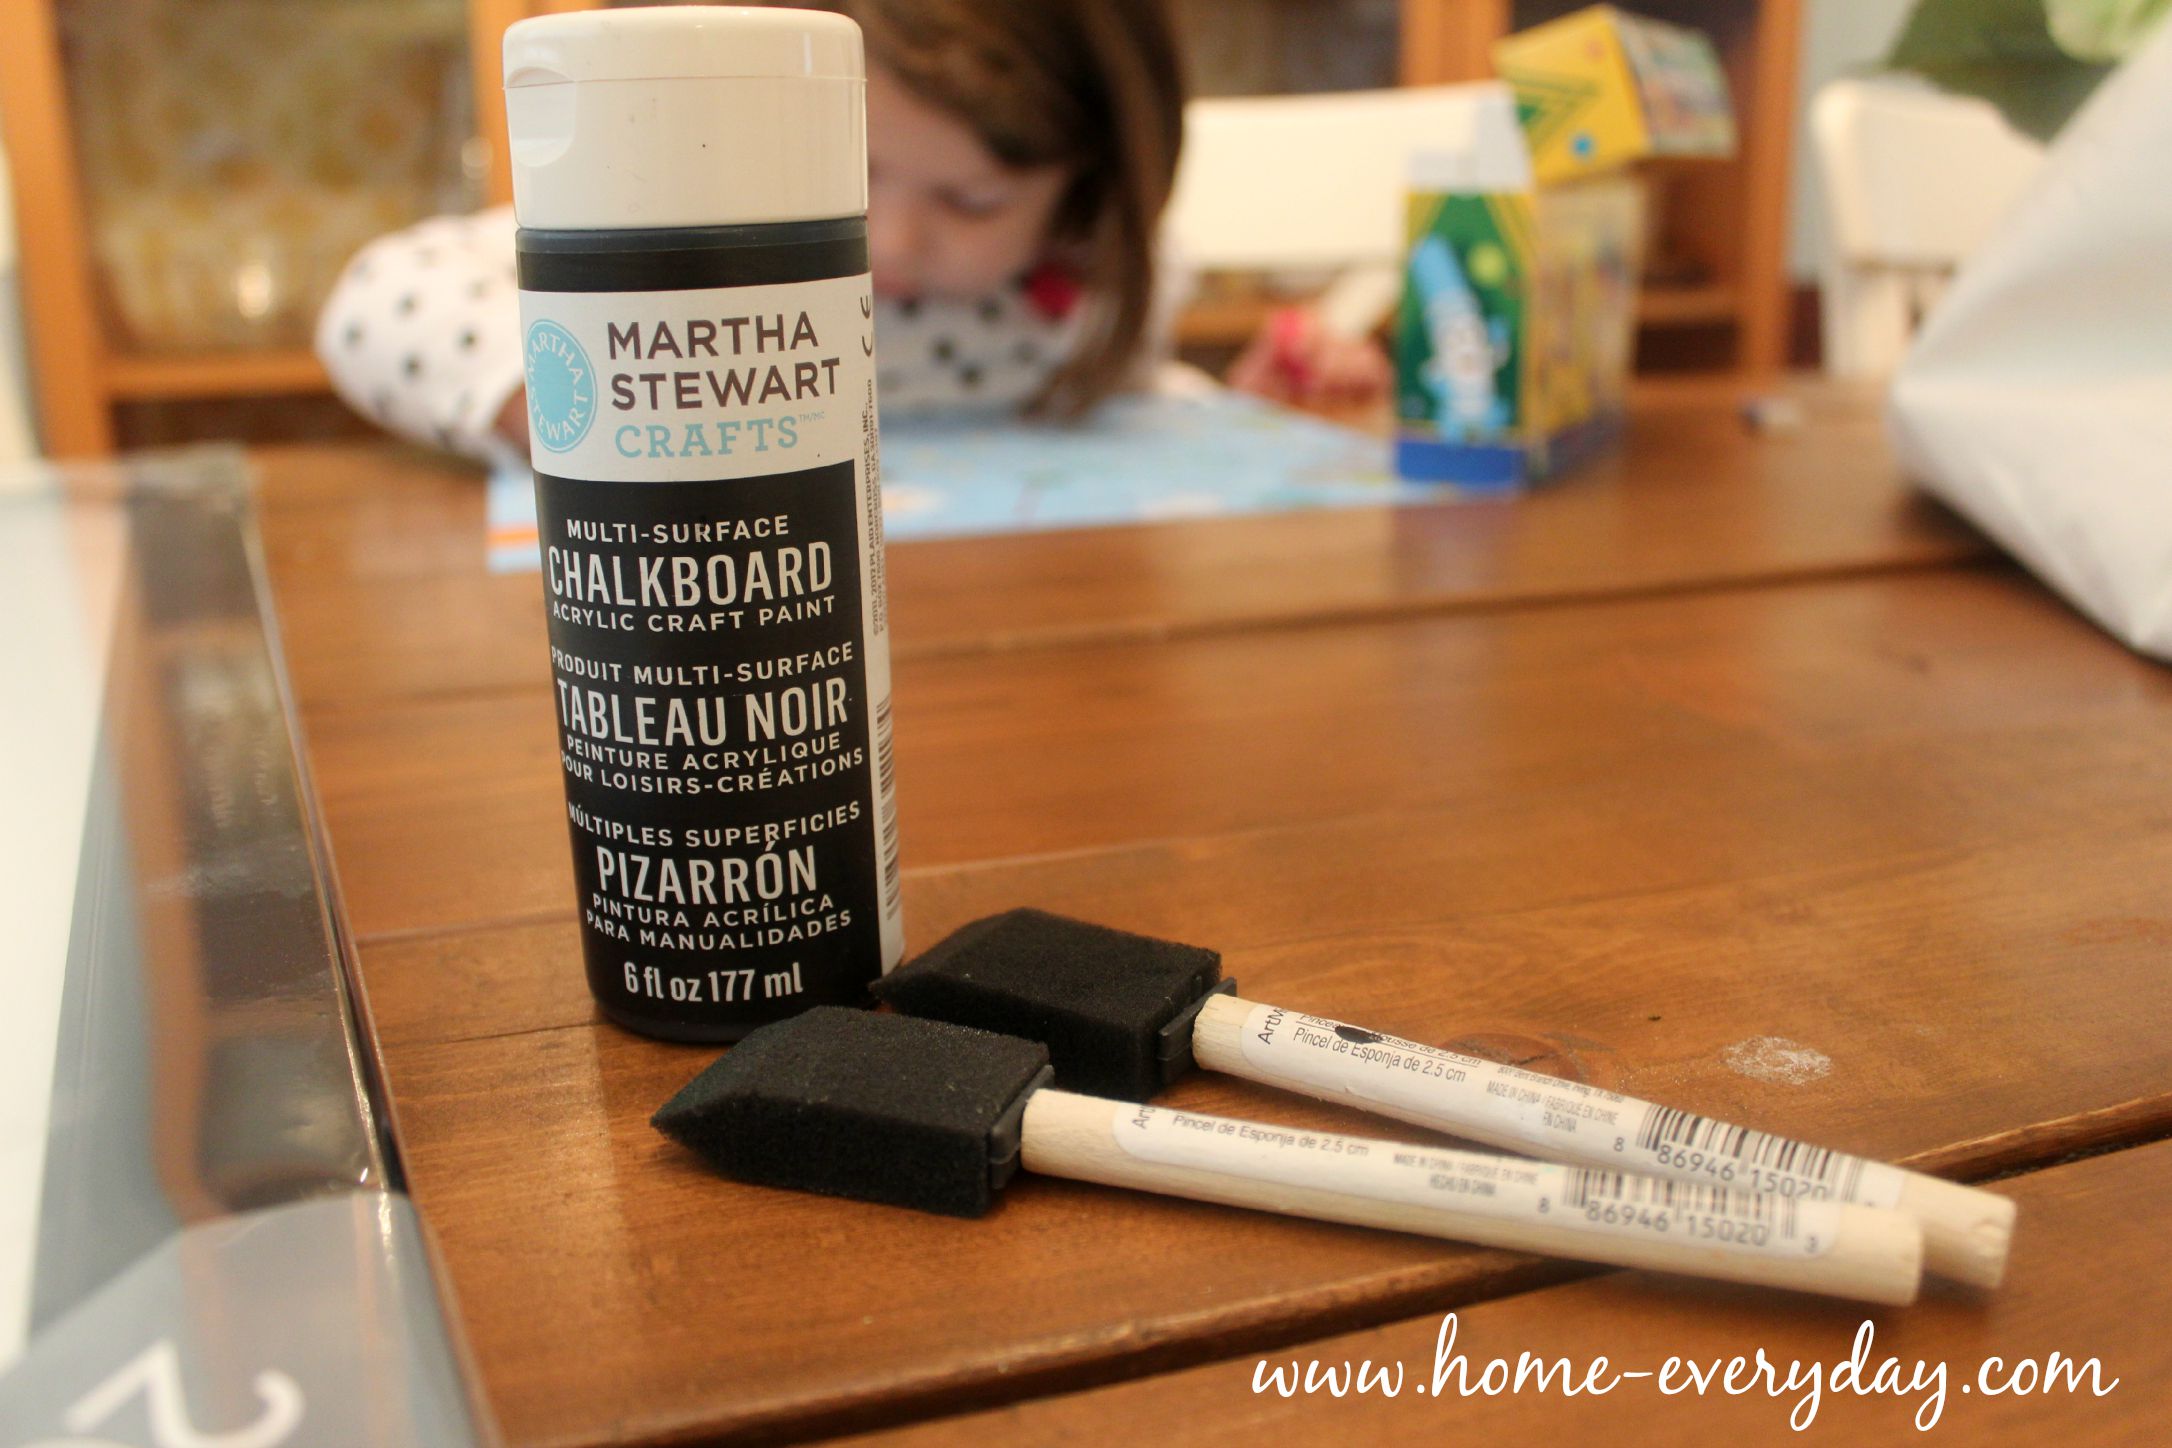
Chalkboard paint (I used Martha Stewart brand found at Michael’s)

12 – 36 (2 x 3) Lego bricks depending on size of display you want to create

super glue (I used Gorilla Glue Super Glue as I know it adheres to plastic)

chalk

Paint brush

drop cloth or trash bags

Lego Guy Frame 1

Lego Guy Frame 2

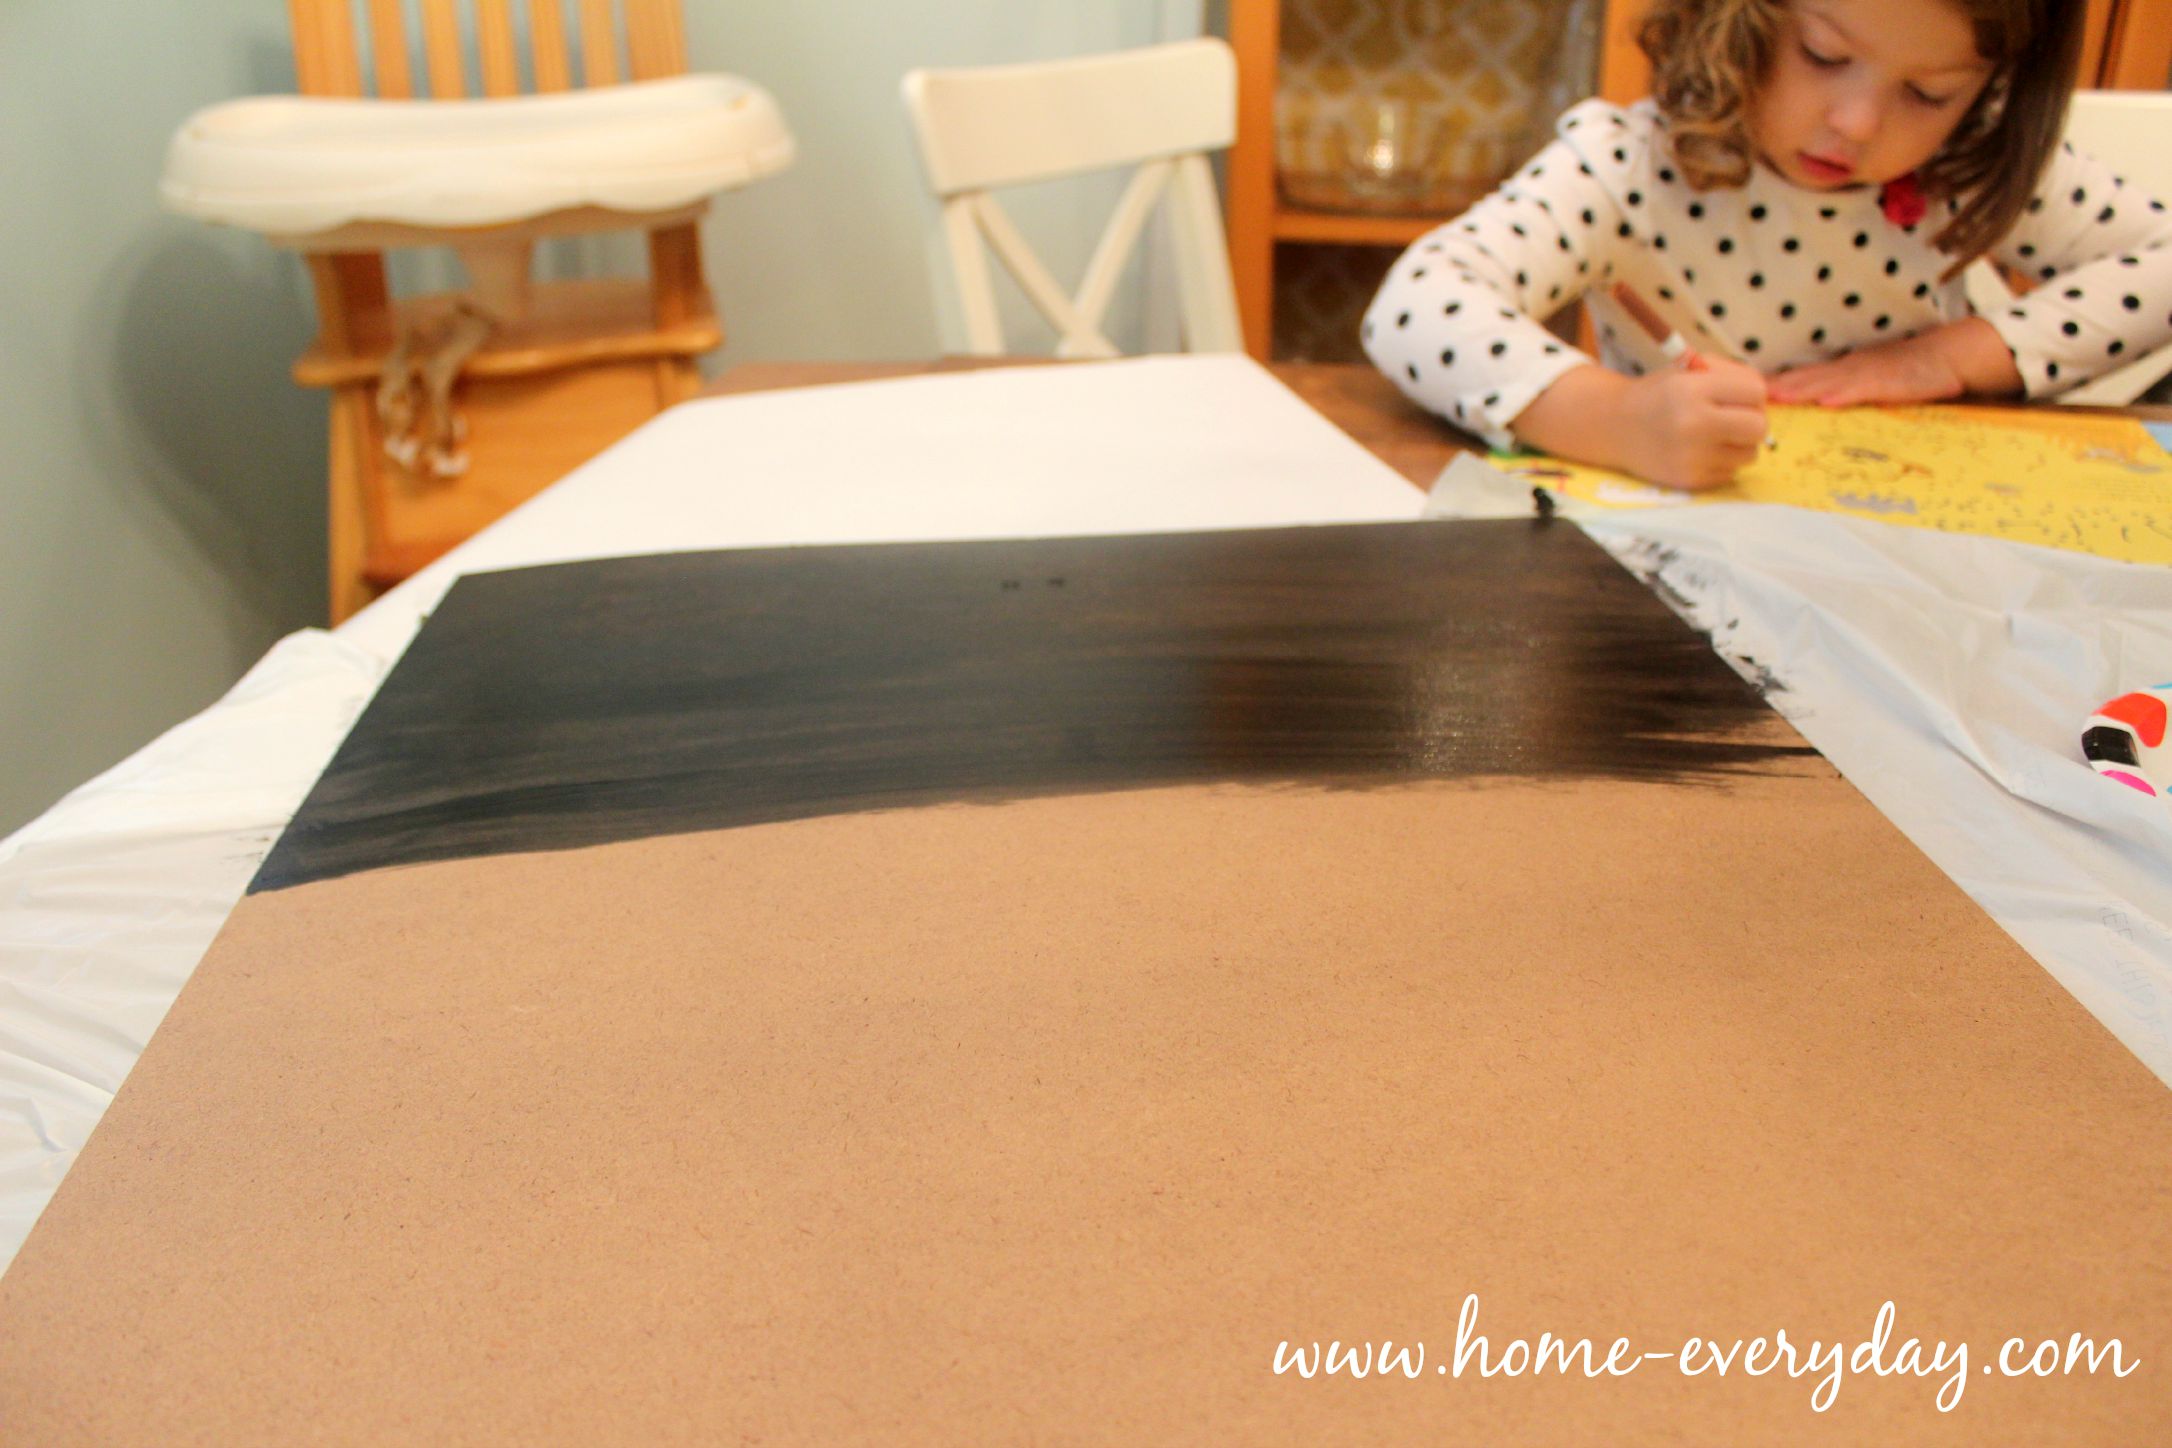
Step 1: Disassemble Frame. Take apart the frame by removing the glass or plastic, and any paper. Set aside the frame. Then place the cardboard or wooden backing on the drop cloth to prepare to paint.

Lego Guy Frame 3

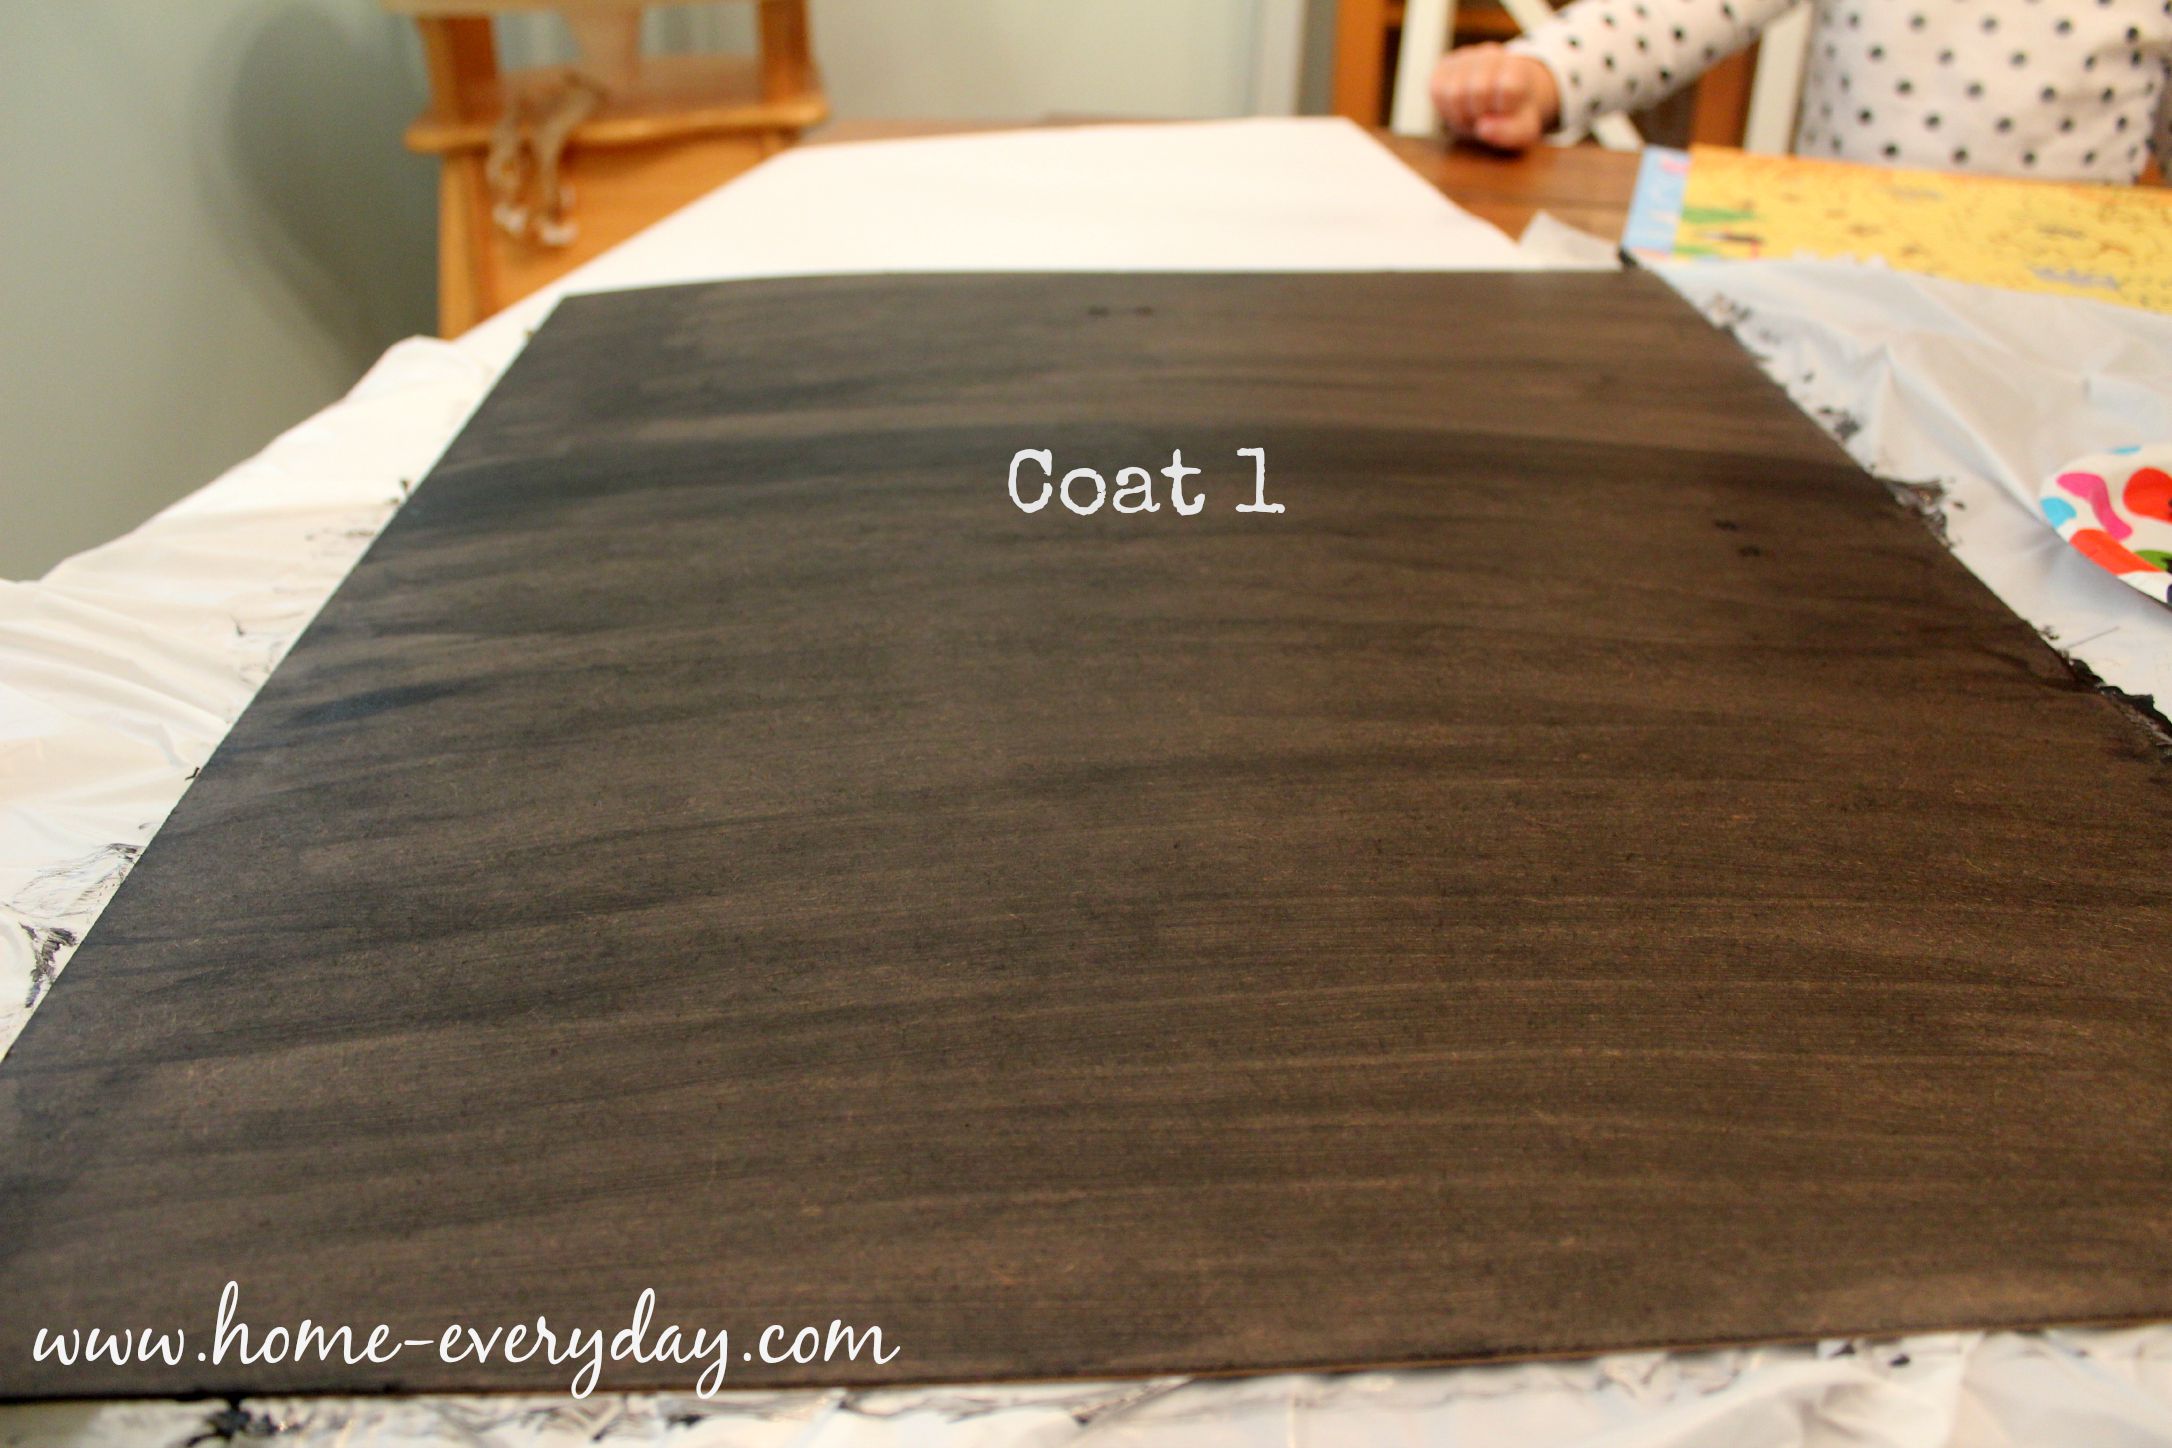
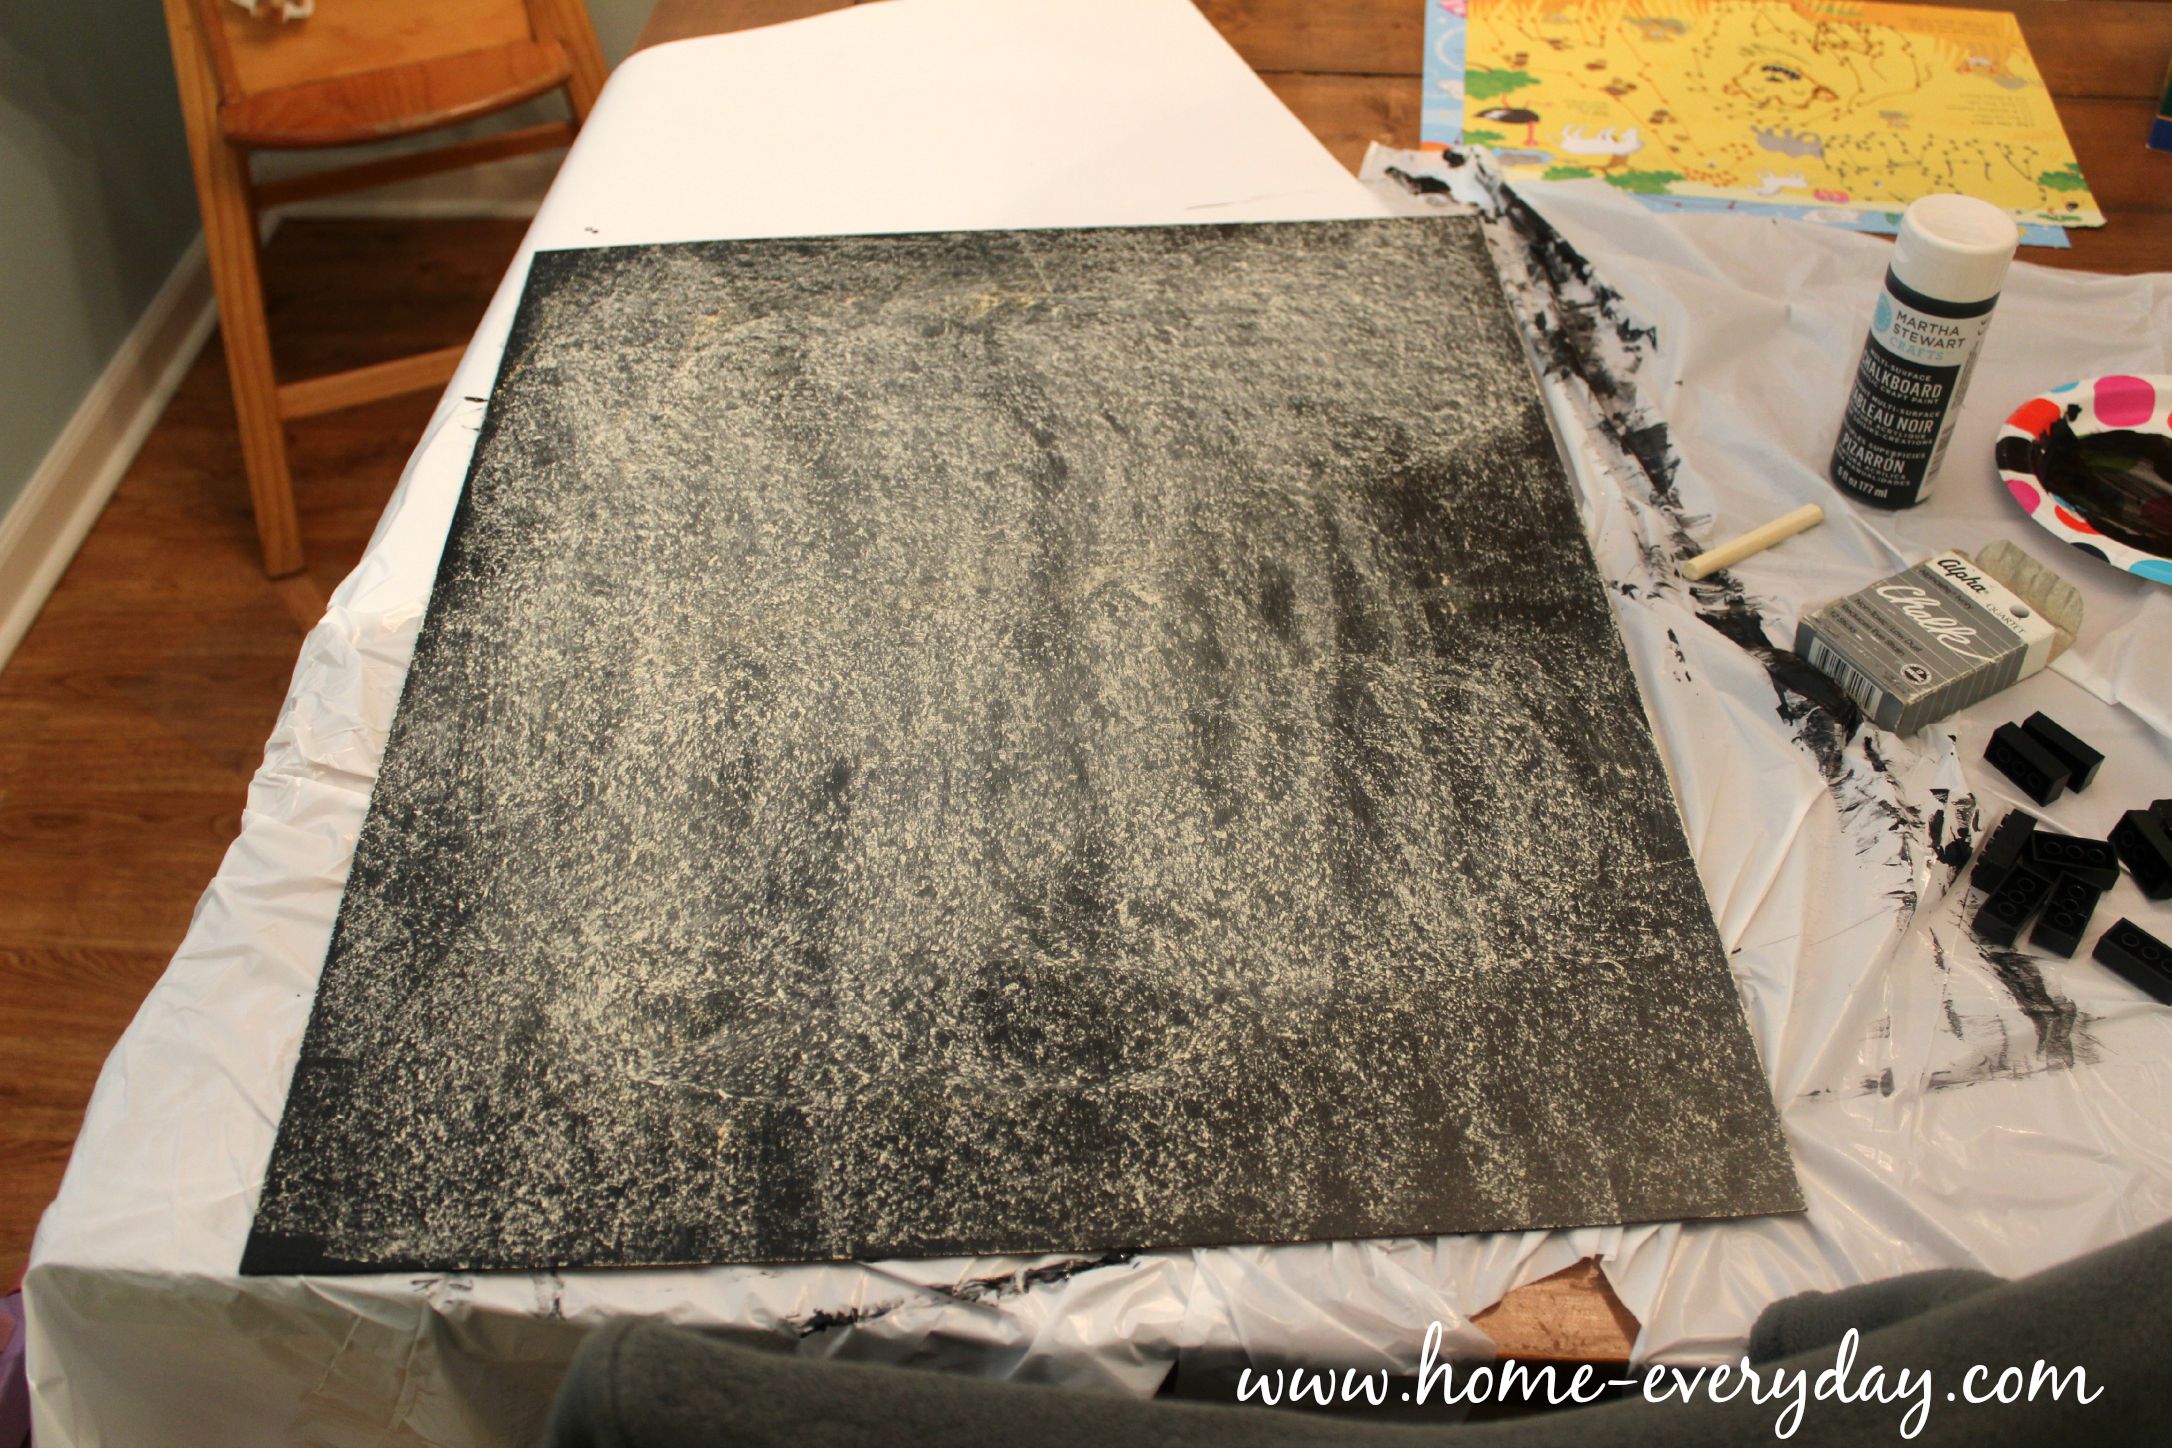
Step 2: Paint. Paint. Paint again. Paint the front side (the part of the frame without the hooks to use for hanging) with chalkboard paint. Be sure to use smooth strokes and watch for drips. I ended up painting three coats of chalkboard paint making sure to wait at least an hour between coats.

Lego Guy Frame 4

Lego Guy Frame 5

Lego Guy Frame 6

Lego Guy Frame 7

Step 3: Scribble. Most chalkboard paints require you to cure the chalkboard paint with chalk before moving on with anymore steps. To do this you must draw on the chalk paint after it is completely dry (12-24 hours) and wipe clean.

Lego Guy Frame 8

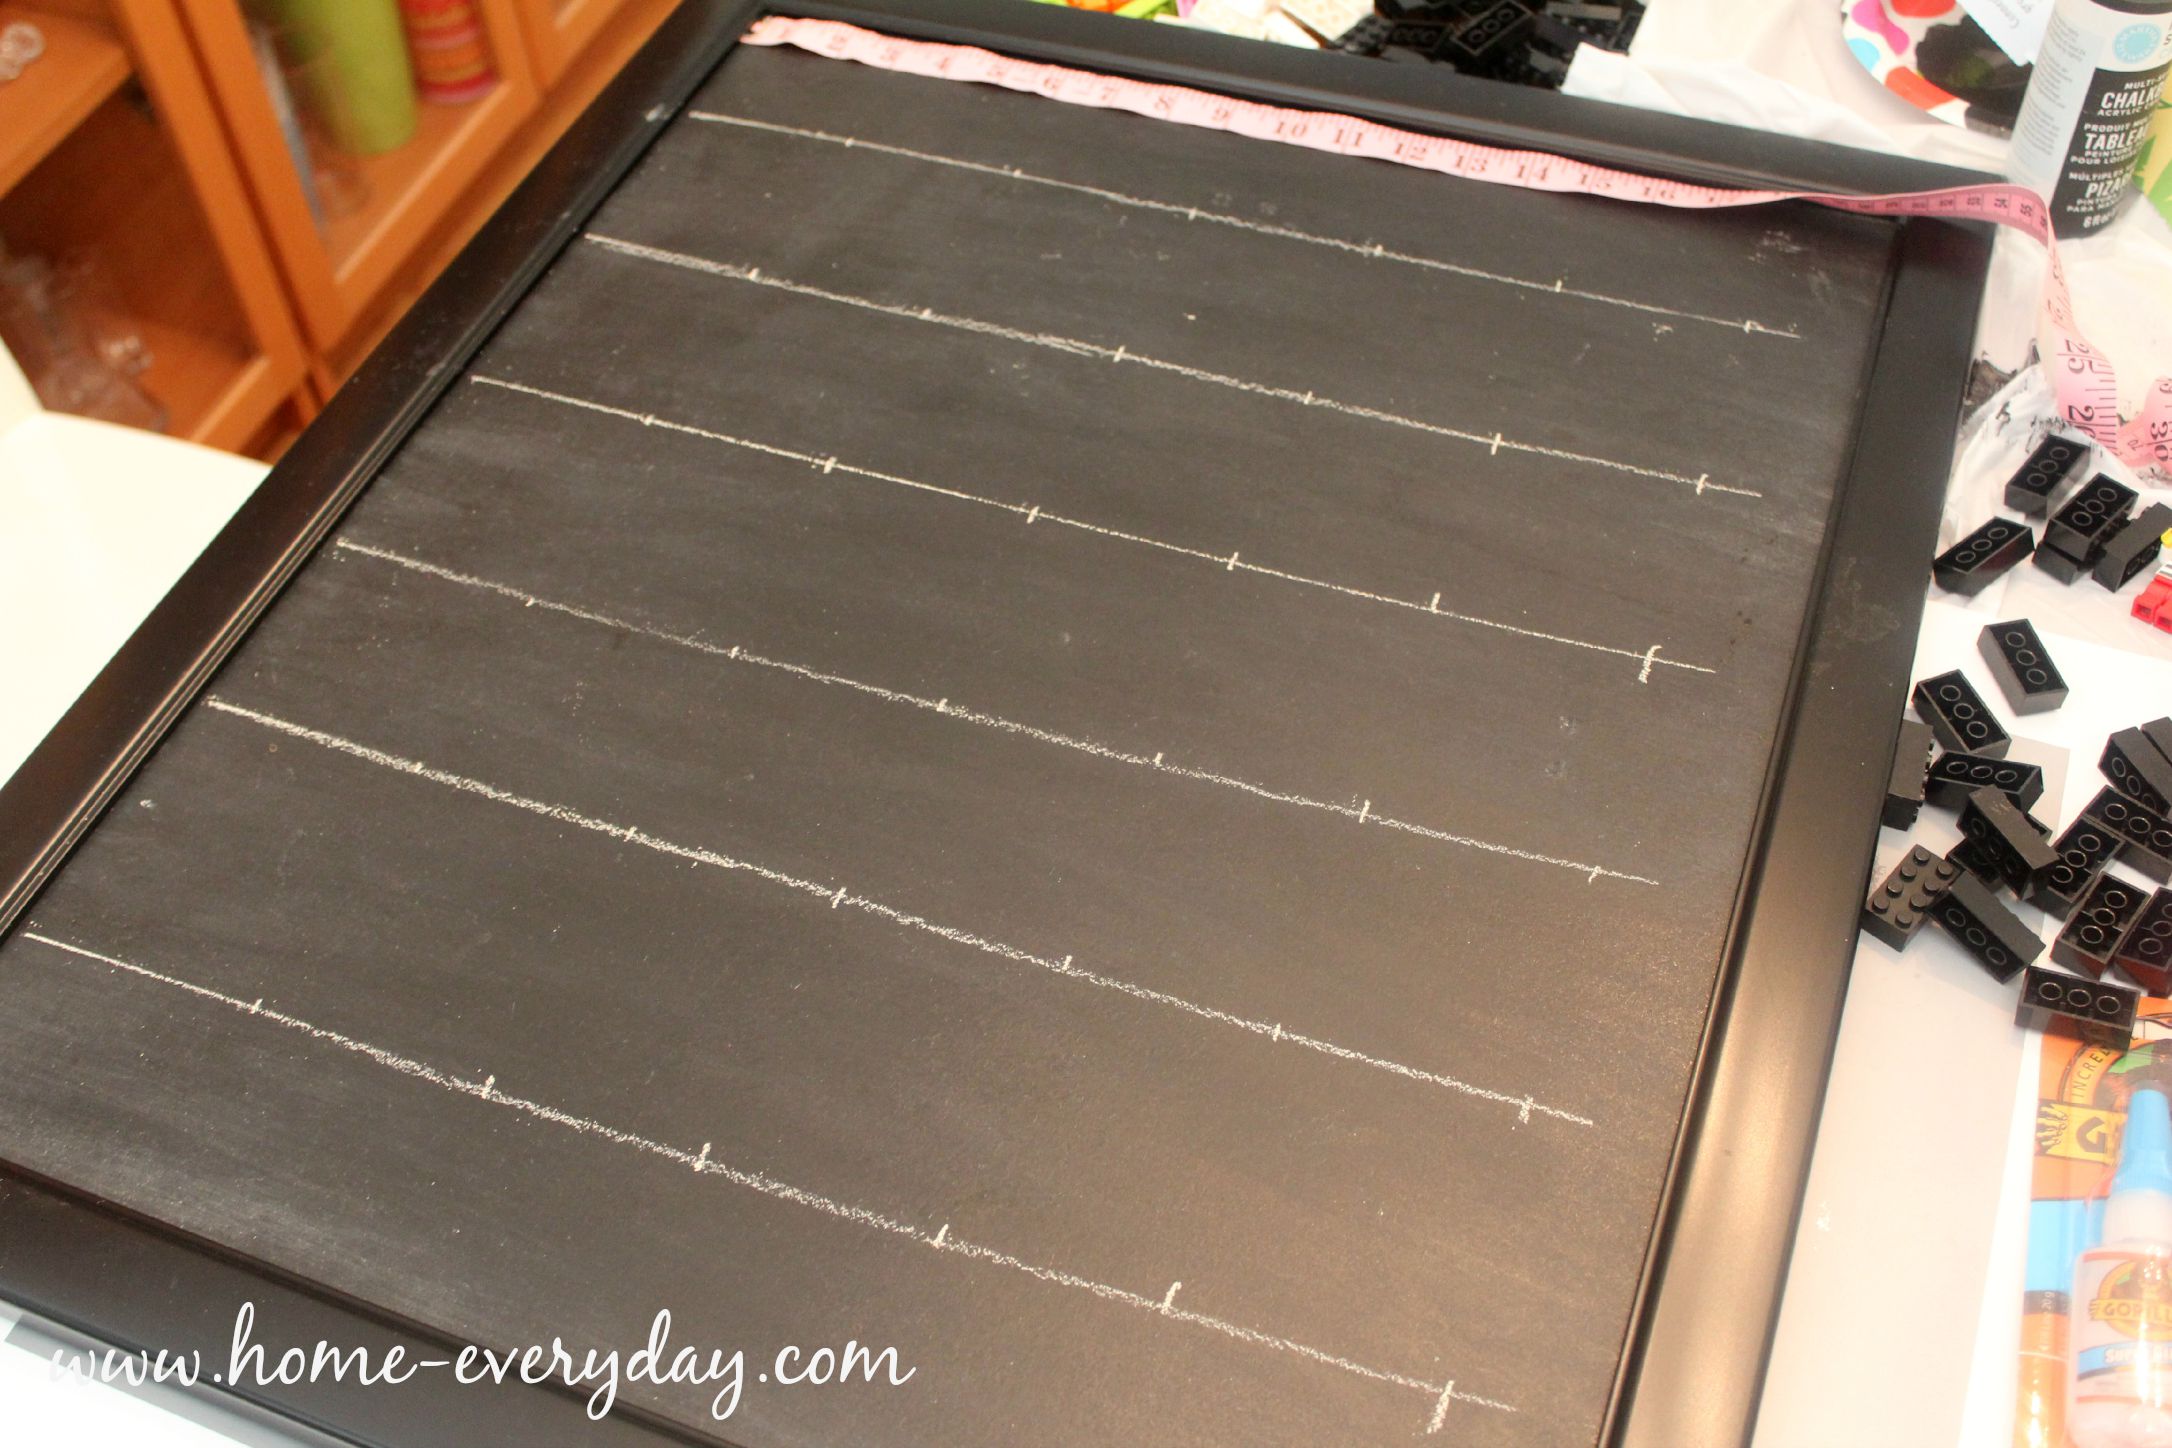
Step 4: Measure. I placed the board back in the frame without the glass. Then, using a measuring tape, a level, and some chalk I marked out some lines to help me determine exactly where I wanted to clue my Lego Bricks.

Lego Guy Frame 11

Step 5: Glue. Using the super glue, carefully put a dab of glue on the side of the Lego brick and placed the brick on the markings on the board. (I didn’t photograph this step as it made me nervous to have my camera or phone around super glue).

Step 6: Wait. It is important to wait a few hours to make sure that all the Lego bricks are secure with the super glue and are completely dry before attaching your Lego Guys.

Lego Guy Frame 13

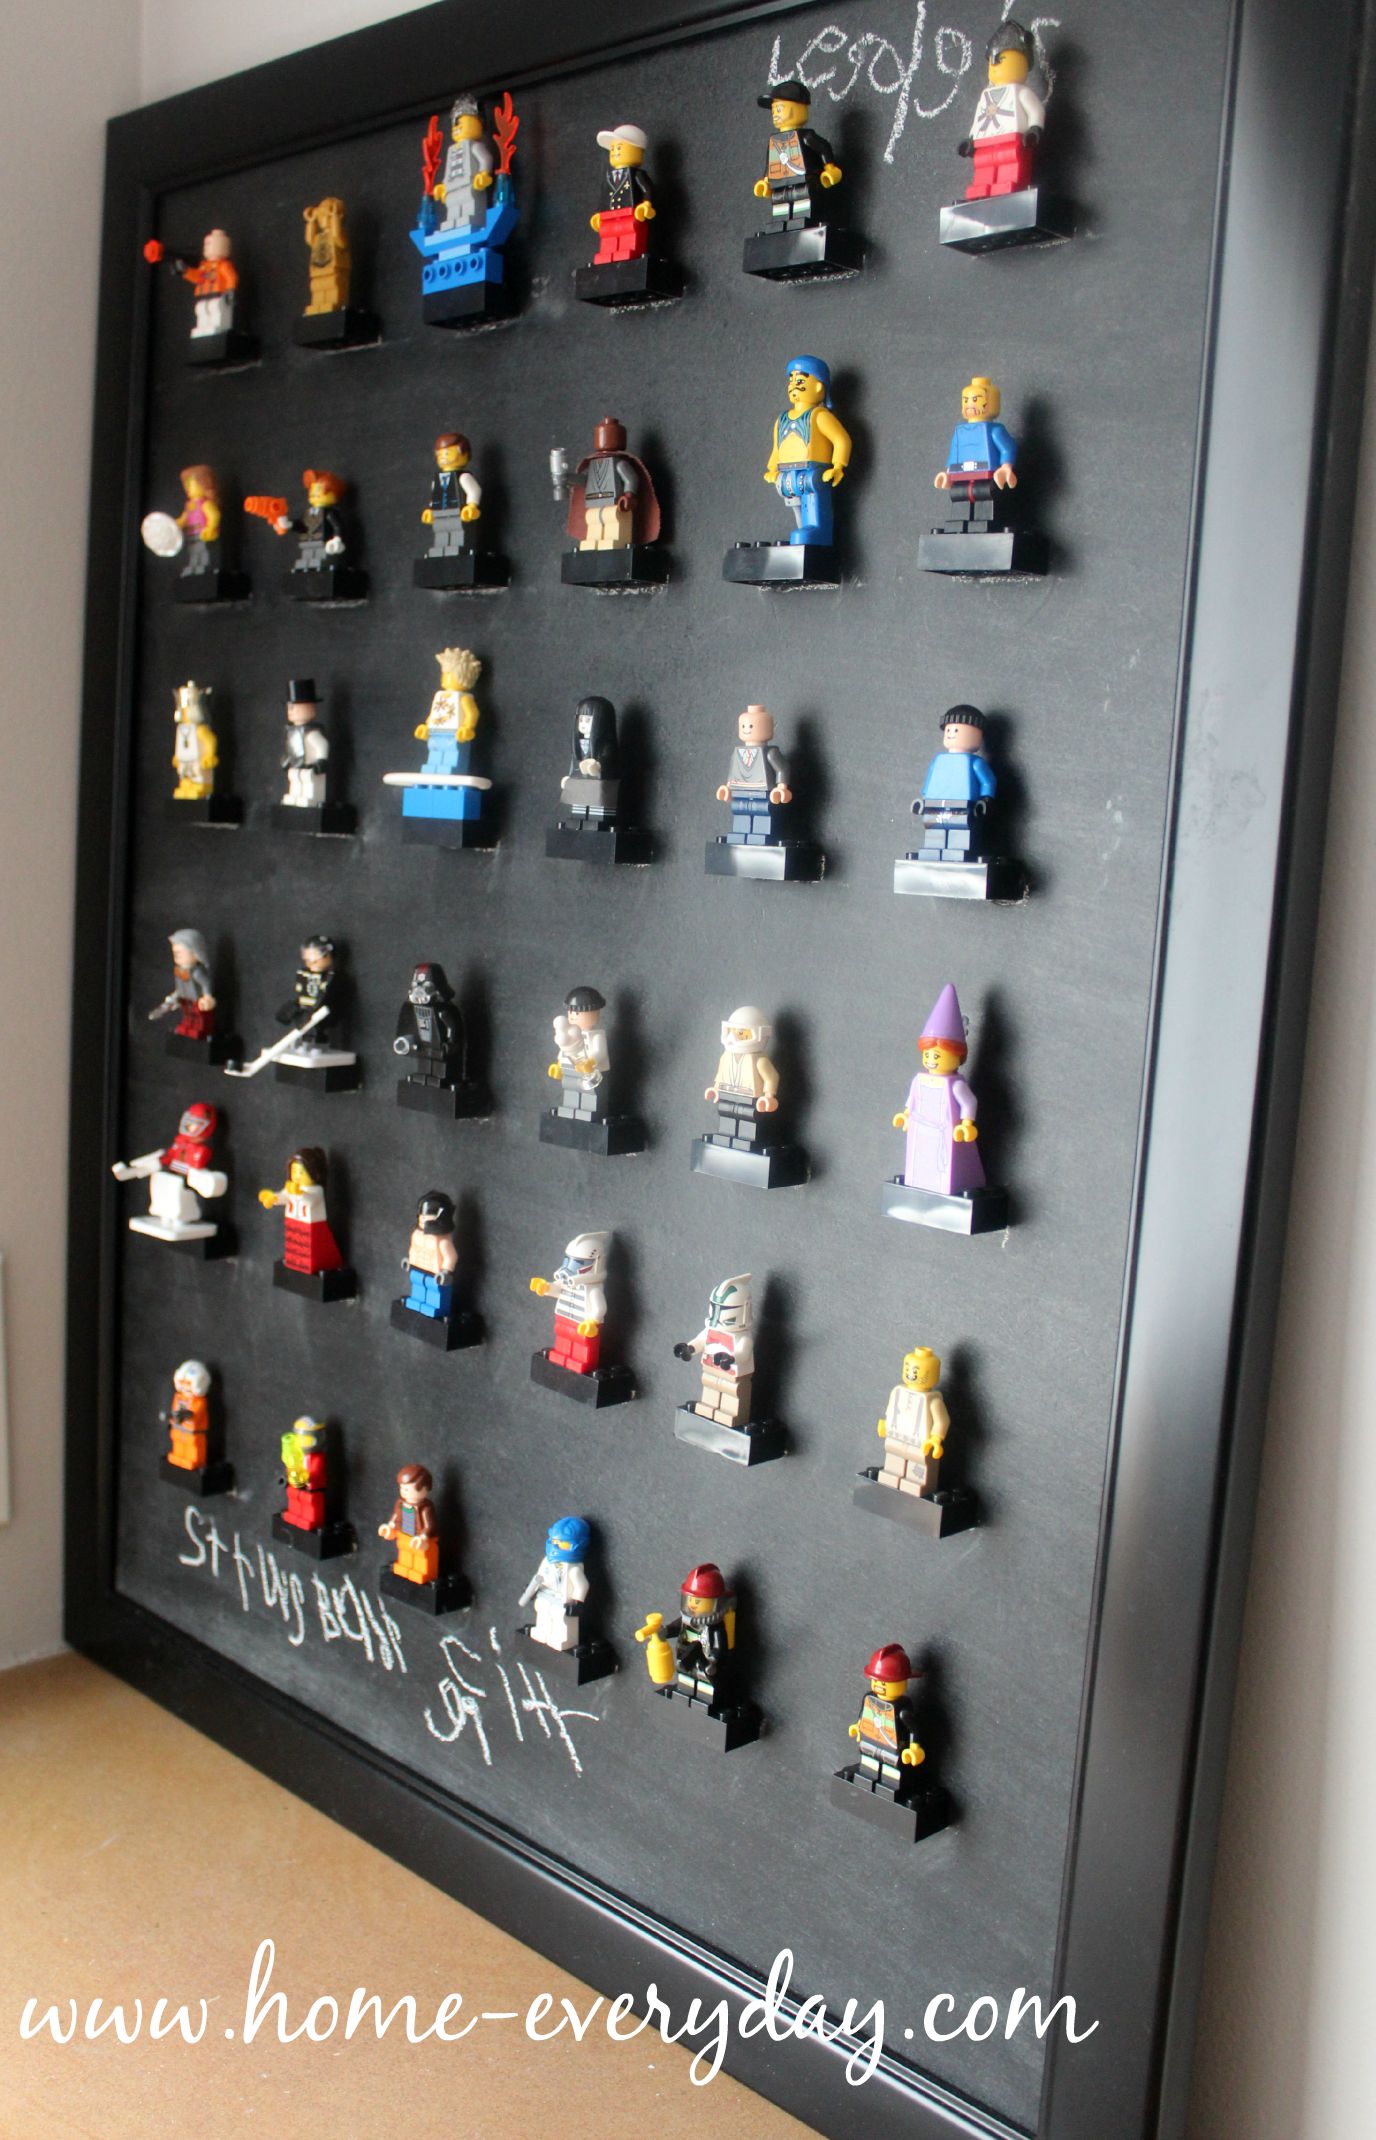
Now, you and your kids can enjoy an awesome display of Lego Guys (and label them) and you won’t be stepping on them anymore.

Lego Guy Frame 12


Autumn is Near: So Much for the Lazy Days of Summer

I mentioned how busy we were this summer, and while I sometimes dream about laying back and kicking my feet up, I must say this summer has been such an awesome opportunity for my kids to be doing and trying all kinds of new things. I am really grateful that they are able to have these experiences like I did (many moons ago).

I have loved every minute of watching them grow, learn, and develop life long skills. While my kids are just being introduced to these activities, I feel like we have already seen the benefits to being a part of them.

We started the summer with swim lessons. This was my children’s first experience with swim lessons, and I have to say they have taken to the water pretty nicely considering they were all a bit tentative in the beginning.


Then, my daughter was enrolled in a beginner to ballet class. I was amazed at how not only how my daughter followed directions and danced her little heart out but how all the little dancers in this class hung on the teacher’s every word.


Next up, was soccer camp. Watching the boys was amazing. I could not believe how much they had improved from last year, and how they were not nearly as timid with introducing themselves to their camp mates.


We also tried a t-ball clinic, which basically taught the kids the rules of the game and some fundamentals like running the bases, fielding, catching, throwing, and hitting.


With all of these organized activities, I also tried to make a conscious effort to make time for some other summer fun such as running through the sprinkler, going to a few movies, and hitting the bowling alley.


Now that school has started we are glad that used up every bit of summer.

HAPPY NEW SCHOOL YEAR!!!

If you like this post and would like to read more about DIY, gardening, cooking, baking or all other things domestic, become a Home Everyday follower! For blog updates or to see other places I write follow Home Everyday on Facebook here.

Follow on Bloglovin

One Small Step for Him, One Giant Leap for Mom & Dad

Its pretty late at night, and I just got finished packing my first school lunch as a parent.

I know this is only the first of thousands that will be packed by me or my kids over the next several years.

Sandwiches and snacks, juice boxes and pretzels, carrot sticks and grapes all packed up in  lunch pails and boxes, coolers and brown bags.


This is the start of the school years and kind of the beginning of the end of the baby years. While I am so excited for these years and know that my kids will love this time, it is still change.

My kids haven’t been babies for awhile, (I am practically done with diapers), but there is something about packing up a real lunch for a full day of school that says BIG KID.


As I was packing, I got a big blob of jelly on my shirt and I laughed/ugly cried. I didn’t cry because of the jelly. I certainly know this won’t be the last blob of jelly I get on my shirt. I cried because I am feeling such a mix of emotions.

I am happy and sentimental. Excited and nostalgic.

With his one small step on that school bus, Brian and I are taking a leap into the realm of BIG KID.

Why did I laugh? Because let’s be real, this will probably be the last time I have my act together enough to make his lunch the night before.

HAPPY NEW SCHOOL YEAR!!!

If you like this post and would like to read more about DIY, gardening, cooking, baking or all other things domestic, become a Home Everyday follower! For blog updates or to see other places I write follow Home Everyday on Facebook here.

Follow on Bloglovin

I Was Tired of Being a Taskmaster So I Made a Chore Chart

My children are at wonderful ages. They are young enough to think helping with chores is fun, and they are old enough to start doing them without a lot of direction or intervention from an adult.

Mostly, because they are still little, the kids just need a subtle reminder of ways they can help around the house. I have been a little tired of repeating myself and feeling like the taskmaster this summer. So, I thought it was time to make a chore chart for each of my kids. 


I scoured Pinterest looking for the perfect one. I saw printable ones, sticker charts, pocket charts, magnetic charts, and popsicle stick charts. I was not at all prepared for the options available and to be honest I was a little overwhelmed.
So, I took the best parts of all the ones that I saw around the internet, and made my own magnetic chore chart for each of the kids. 


Here is how I did it.SUPPLIES

Metal Board (I found mine at JoAnn Fabrics)
Letter Stickers
Child’s Photo
Glass Beads with Flat Bottoms (JoAnn Fabrics or Michaels)
Mod Podge (Gloss or Matte finish)
Sponge Brush
Heavy Duty Magnets (Michaels)
Double Stick Tape
Hot Glue Gun with Glue
1 inch diameter circle punch (Creative Memories)
Pictures of various chores (Google Images) printed on card stock 


Step 1: As Bella Karolyi would say, “Stick it!” 
The first thing I focussed on was making the boards that the magnets would stick to. I found these adorable and colorful boards at JoAnn Fabrics. I liked them because of the small holes all around the edges that would make it easy for hanging them anywhere using some 3M hooks. Using some double stick tape, I secured a photo of my child to the board. Then, I added some large stickers with the kids’ initials and created two columns with the words “to do” and “done” 


Step 2: Print it out!
This part was the hardest for me, but I did find some cute photos of chores that I liked. Once, I found images I liked, I printed a few trial pages to make sure they were the right size to be punched out. I printed on a medium to heavy weight paper because I thought it might be more durable, but honestly, I think regular paper would be fine. The chores I chose to include (FOR NOW) are Get Dressed, Make Bed, Clean Dishes, Pick Up Toys, Brush Teeth, Read a Book, and Be Kind. I thought they were all good reminders for my kids, and appropriate for their ages.Step 3: Cut and Paste (the old fashioned way)

Yes, I had to use actual scissors, a hole punch, and actual glue (Mod Podge) for this part of making the magnets. I used a one inch diameter hole punch and cut out the images. 

Next, using Mod Podge I brushed the front side of the image with a thin layer.


I pressed the flat side of a glass bead to the image.


Next, I brushed another thin layer of Mod Podge to the back of the image, and let dry overnight.


STEP 4: Magnetize!
Once the Mod Podge was dry, I used a hot glue gun to attach the heavy duty magnets to the backs of the glass beads with the images. 


Step 5: Admire your genius!
I was so impressed with how these turned out I took a few minutes to enjoy how awesome they are.


Step 6: Hang them up!
Since the magnetic boards I used already had holes, I was able to use two 3M hooks to hang them on the wall.


The kids already love them, and so do I! No more taskmaster!


If you would like to read more about my craftiness or Gardening, DIY, Cooking, Baking and all other things domestic you can check me out on Facebook or become a follower of Home Everyday here
Featured on Ten June’s Tuesdays at Ten June
Linking up at Serenity Now Weekend Bloggy Reading.

Last Day of School is Drawing Near…

… and to be honest I have mixed emotions. They boys absolutely loved school, their teachers, their friends, and everything that comes along with it. I am of course a little sad because it means my munchkins will not be little for much longer, but I am also excited for the carefree days of summer ahead.

We do have a few activities planned for the summer such as soccer camp, t-ball, swim lessons, and intro to ballet, but for the most part we will probably spend most of our time out in the sprinkler or coloring pictures.
On the first day of school, I of course took photos galore, and I didn’t want the last week of school to be any different. I even let Caroline in on the fun. As a little tribute to this school year, I added my favorite quotes from the kids.
This is one of those things that Caroline says that I will have to remind her of when she is in her teens.
Russell’s teacher informed us that a few weeks ago in some frustration, asked if he could make an announcement to the class. He really wanted to go outside and everyone seemed to be acting up. He gave everyone a little pep talk.
George said this to me a few months ago, and my heart just melted.


HAPPY HAPPY SUMMER!

Earth Day, Goodwill and a Puzzle

A few months ago, we made our way to Goodwill to look for lamps. While we were unsuccessful with the lamps, we did find some puzzles and books. We were able to find a book of Nursery Rhymes for Caroline, The Encyclopedia of Horses and Ponies for George, and this awesome 3D Globe Puzzle for Russell.

Yesterday, I was trying to find something to do for Earth Day with the kids, when Russell suggested we do the earth puzzle since we hadn’t tried it yet. ‘What a great idea!’ I thought. I mean what better way to celebrate Earth Day than with a reused puzzle of the Earth. Russell is a genius.

While I realized that this puzzle was kind of difficult for the age range of my kids (540 pieces), they were extremely helpful by taking the pieces out, flipping them all over, and then they sorted the puzzle by the numbers printed on the back of each piece into groups. (NOTE: If you’ve never done a 3D Puzzle before, they are often numbered as they must be put together in a certain order so they do not collapse).

My favorite part of doing the puzzle was talking about Earth Day with the kids. When George asked about it, I said that it is a day where we celebrate our planet. We then talked about things that we could do help keep the Earth happy and healthy. This activity was perfect for opening up the conversation. Which I will say doing any kind of simple with my kids lends it self to conversation.

We started after lunch, and worked on it all afternoon taking breaks to play outside and take naps. We were able to finish before bedtime.

They were so excited.

What did you do with your family mark Earth Day?

Just a Reminder: It’s Better to Give Than to Receive

With the week that we have all had, I thought it might be nice to remember there is good in this world. Sometimes, we just need a reminder.

A few months ago, Russell turned 5. As part of his birthday celebration, he asked to collect glasses for those that cannot get glasses themselves. You can read more about Russell’s birthday and collecting glasses here.

Over the past few months we have been collecting glasses from everyone we know. We got the word out to our parish in the city, and even the kids’ babysitter asked her sorority sisters to help out. Meema was able to gather quite a few pairs from her friends.

Well, over the course of 4 months, Russell (with the help of our wonderful family and friends) was able to collect hundreds of pairs of glasses (if I could guess it would be in the 200 to 300 pair range). Every time we wanted to send them on there way, people would give us more and more glasses. It was amazing to us how many people wanted to help. It was also so wonderful to see Russell get so excited to put the glasses in the box every time he received a pair.

A few weeks ago, we thought it would be a good time to box them all up and get them ready to send to New Eyes for the Needy.

The kids were so happy to help.


The kids very carefully put them in some boxes with bubble wrap.


These two HUGE boxes are ready to go, and give so many people the opportunity to see.

I’m so proud of my children I cannot even explain. I am always proud of them and their accomplishments in school, sports, and as they achieve developmental and personal milestones, but I have to say to see my kids willingly and excitedly showing compassion and wanting to help people has been the most rewarding accomplishment of all.

Sometimes we just need a reminder of all the good there is in this world.


A Day of Firsts: SNOW DAY!

Yesterday, we got anywhere from 5 to 8 inches of snow.

We had a day of firsts. Since starting pre-school, this was the boys first official SNOW DAY! Since getting a new snow blower, this was Brian’s first real chance to use it. Since Caroline has been born, it was the first time she was actually able to play in the snow.

The snow day got called for everyone (Brian included), the night before. When we woke up there was no snow on the ground yet, so I ran to a new grocery store in town to check it out. When I walked out of the store, the snow was falling hard.

Brian made this ruler for the kids to see how much snow was falling throughout the day.

By mid-afternoon it looked like this.

While the kids were napping, I went outside and watched it the snow fall. It was so quiet.


Next, we bundled up the munchkins.

We played in the snow.


Then, they took hot baths and drank hot cocoa in their warm jammies. I loved having everyone home with nothing to do except play in the snow and snuggle on the couch. Why can’t every day be a SNOW DAY?!


If You Say So: Rocket Ship Construction

My kids are learning about outer space in school. Planets, rockets, stars, moon, etc. You can only imagine the questions. I have been a little scared to mention the whole NASA space exploration thing to them. I know they would be heartbroken, but by the time they are of age, maybe they can go to space.

If you follow me on Facebook or Instagramyou saw that my kids created something.


A few weeks ago, the teachers asked us to save boxes of all shapes and sizes for in class projects regarding space. They also asked for paper towel and toilet paper tubes. I guess I went a little overboard. When my husband dropped them off, they said they didn’t need this many boxes. So, we brought some of them back home. I was going to throw them in the recycle bin, but the kids squealed, “Let’s make a rocket!”

So we did.

I gave them all the boxes we had, aluminum foil, duct tape, stickers, popsicle sticks, and this is what happened.


Caroline lost interest in the rockets, and decided to color instead.


They boys say they are very advanced rockets. I said, “If you say so.” Here are the final products again.


I’m still not convinced that these could make it to space, but the kids are happy.

No Two are Alike: Snowflake Garland

Check out the kids and I’s latest craft.


No two of the snowflakes are alike. My kids love anything to do with paint and glitter so this was the perfect craft for them. Plus, I love how simple and rustic it turned out.

The inspiration for this project came from a table runner I found Target on clearance last year. The runner has stitched snowflakes (I will show pictures when I reveal my holiday tablescape). Instead of ornaments, I thought a garland would be more unique and actually more useful as I keep trying to find the perfect decor for our entry way and dining room.

Last week, at Michael’s getting supplies for another project, I grabbed some popsicle sticks for around $3.00 and then I saw a bag of pre-cut snow flakes for around $2.00. The total cost for this project was about $5 and we still have plenty of supplies to string enough snowflake garland around the entire house (which I may do as it kept the kids busy, and turned out so cute).

First, I covered the craft table with some paper and then covered the children with some of Brian’s old shirts. Next, I laid out some paper plates with brushes for each kid to have a work surface. Finally, I gathered some red paint (I kept it to one color to cut down on color mixing), glitter, and glue.

We first made some snowflakes out of popsicle sticks by gluing them into a star pattern.


Then the kids started painting.


Then came their favorite part: GLITTER!


After painting and glittering, I let everything dry for about 8 hours. Then, using a small hole punch, I made some holes in the snowflakes, and then carefully strung each of them on some twine I had on hand.


The kids are so proud they made the snowflakes themselves, and I am happy to have such a beautiful new decoration hanging in our entryway.

Linking up at Hi Sugarplum for the Christmas Cheer to the Blogosphere. Come check out all the amazing holiday crafts and projects. It seems like a Pinners Paradise!

Also linking up at Centsational Girl for the Holiday Home link event. Another great place for Christmas craft ideas.