Tag

recipe

Still Stranded: Turkey, Corn and Three Bean Chili

When it is as cold as it had been around here lately, I make chili. It is one pot meal, you can change it up with toppings, it is great leftover, and it warm up even an -14 degree day (You read that right. I told you it was cold).

Here is a recipe for a very hearty chili, but is healthy as it is made with ground turkey. Perfect for those who are looking to eat a little more healthy in the New Year.


Turkey, Corn, and Three Bean Chili
1 lb ground turkey
1 Tbs extra virgin olive oil
1 medium onion chopped
2 or 3 ribs celery chopped
3 cloves garlic minced
2 Tbs ground chili powder
1 Tbs ground cumin
2 tsp ground coriander
1/4 tsp ground cayenne pepper
1 tsp dried Thyme
1/2 bottle of your favorite beer
1 14 oz can white cannellini beans drained and rinsed
1 14 oz can black beans drained and rinsed
1 14 oz can red kidney beans drained and rinsed
1 cup frozen whole kernel corn
1 28 oz can crushed tomatoes
Salt and Pepper to taste
Avocado for garnish


In a large pot over medium heat add olive oil. When the oil is glistening, add ground turkey, breaking with a spoon. Add onion, celery, garlic, salt, and pepper and cook for about 5 – 7 minutes until onions are soft and turkey is cooked through. Stir occasionally. Next stir in chili powder, cumin, coriander, cayenne pepper, and thyme. Stir until well incorporated and then add beer. Bring this to a simmer (about 3 minutes) and then add all the beans, the corn, and the crushed tomatoes. Stir, lower heat, and cover with a tight fitting lid for about 10 minutes or until chili is just bubbling. Serve with sliced avocado.


This was the perfect dinner for being snowed in the past few days. Also, the leftover held us over until I could get to the grocery store.


For another great chili recipe, check out THIS ONE I made awhile ago.

For more about organization, DIY, gardening, cooking, baking or all other things domestic, become a Home Everyday follower! For blog updates or to see other places I write follow Home Everyday on FacebookTwitter, or Pinterest.


Warm Up: Roasted Red Pepper Soup

This time of year things are quite busy. Every night there is something to do in the way of holiday preparation. Add in the regular busy schedule with school, activities, and meetings, and it doesn’t leave much time for dinner prep.

With my meal planning for the next few weeks, I have put together a few freezer meals, pulled out some 30 minute meal recipes from the arsenal, and got the ingredients for a one pot meals so that we can spend more time enjoying holiday fun and less time cooking and cleaning up.
A few nights ago, the weather was pretty chilly and very cloudy, and I thought it would be the perfect night for soup and paninis. So I whipped up some creamy roasted red pepper soup with ham and swiss paninis.
This recipe is simple, and is so much better than soup from a box or can.
Roasted Red Pepper Soup
1 Tbs butter
1 Tbs extra virgin olive oil
1 large sweet onion chopped
2 cloves of garlic minced
2 – 15 oz jars of roasted red peppers drained and chopped
2 Cups chicken stock or vegetable stock
1 cup half and half or cream
2 tsp dried thyme
Salt and Pepper to taste
In a large pot over medium heat at butter and olive oil. Then, add onions and garlic and cook until soft, about 2 or 3 minutes stirring occasionally. Next, add red peppers, salt, and pepper, and continue to sauté for another 2 or 3 minutes. Add chicken stock. Bring to a simmer and cook for 10 – 15 minutes.
Turn off heat, and let the mixture cool slightly. Using an immersion blender, food processor, or blender, blend the soup until desired consistency.
Finally, stir in cream, and serve.
For more about DIY, gardening, cooking, baking or all other things domestic, become a Home Everyday follower! For blog updates or to see other places I write follow Home Everyday on FacebookTwitter, or Pinterest.

Follow on Bloglovin

Apple Crisp: An Impromptu Dessert

Last week the temperatures started to plummet and I could tell everyone was kind of getting a bit worn down. So, right before I started dinner I put together the apple crisp and popped it in the oven. When dinner was ready, I took the crisp out of the oven to cool. Right after dinner, I surprised everyone with warm apple crisp and it literally only took about an extra 10 minutes before dinner to put together. Because of our impromptu dessert, I don’t have any pictures (sad trombone).

I guess you’ll just have to make it yourself.


FOR PRINTABLE RECIPE CARD CLICK HERE

Apple Crisp seems like one of those desserts that tastes, looks, and feels like it takes a ton of work and preparation, but actually I bet you would be surprised to learn that you probably have everything on had already and it only takes a few minutes to put together before baking. Also, with it being autumn, there are so many wonderful kind of apples that are fresh and readily available.

Weeknight Apple Crisp
6 to 8 large apples (I used Honeycrisp) cored and sliced
3 Tbs. granulated sugar
1 tsp. ground cinnamon
1 cup packed brown sugar
1 cup old fashioned oats
2/3 cup all purpose flour
1/4 tsp. salt
1 stick of cold butter cut into small pieces
Vanilla Ice cream for serving

Preheat oven to 350 degrees.

Spray non stick cooking spray in a 9 x 13 baking dish and set aside.

In a large bowl, combine the apples, granulated sugar, and cinnamon and toss until apples are coated with sugar and cinnamon. Put the mixture in the baking dish.

In the same bowl, whisk together brown sugar, oats, flour, and salt until well combined. Then, either with your fingers or with beaters on a very low setting cut the cold butter into the flour mixture until pea size clumps are formed.

Spread the flour and oat mixture over the apples.

Bake for 50 – 60 minutes or until top is golden brown.

Let cool for 15 minutes and then serve with vanilla ice cream.

Anyone else have any impromptu dessert ideas?

If you like this post and would like to read more about DIY, gardening, cooking, baking or all other things domestic, become a Home Everyday follower! For blog updates or to see other places I write follow Home Everyday on FacebookTwitter, or Pinterest.

Follow on Bloglovin


Delayed Steak Fajitas

This is the infamous recipe that I was working on the day I cut my finger. Now, that I am over the trauma (it wan’t the bad, unless you’re a baby, which I am), I think it is ok for me to share the recipe finally.

Fajitas are a family favorite here because I always have guacamole with them. While the kids aren’t that crazy about the actual fajitas, they do love guacamole. If they really aren’t having the fajitas, I will grill up some quesadillas (cheese between two tortillas thrown on a low grill for less then a minute on each side) for them to dip in the guacamole too.

I personally like this recipe because it is quick, and Brian likes it because well, he likes steak and Mexican food, so for him it is the best of both worlds.

Steak Fajitas
1 lb flank or skirt steak
3 limes zested and juiced
1 Tbs extra virgin olive oil plus 1 tsp for cooking.
1 pinch of Cayenne pepper
1 large sweet onion thinly sliced
2 mediums sized bell peppers thinly sliced (I used yellow)
I bunch of Cilantro
Flour Tortillas shells
Salt and Pepper to taste

In refrigerator safe dish add lime zest, lime juice, 1 Tbs of olive oil, cayenne pepper, and salt and pepper and whisk together. Add steak, cover and refrigerate to marinate for about 4 to 6 hours.

Preheat grill (around 400 to 425 degrees).

In a large skillet over medium high heat, add 1 tsp olive oil, sliced onions and peppers. Stir occasionally and cook until tender by still crispy, about 7 minutes. Keep warm.

Put the marinated steak on the grill, and cook for about 12-15 minutes flipping about halfway through. When the steak is finished, tent with aluminum foil, and let rest for about 10 minutes.

While the steak rests warm tortillas shells (I usually heat them in a dry skillet on medium low heat).

Slice the steak against the grain and at an angle in VERY thin slices. Assemble fajitas with pepper and onion mixture, steak, and a few sprigs on cilantro.

Enjoy, just please don’t cut your finger!

Smart Cookies: Salted Caramel Brownies

If you follow Home Everyday on Facebook, you’ll know I mentioned last night that I am on the salted caramel bandwagon. After making salted caramel dark chocolate truffles in February, I thought it was time to do something with this flavor combination again.

Leave to to Ina Garten, one of my favorite Food Network chefs, to give me the idea for this month’s Smart Cookie recipe.

The first time I make anything, I typically follow the recipe exactly and then I doctor it up or change what I don’t think my family will like. I do NOT think I will have to do that with this recipe. Everything is perfect. The only suggestion I might make is if you don’t want to make the brownies from scratch, I would say it is ok to use your favorite box mix and then add 3/4 of a cup of chocolate chips. Then, follow the rest of the directions.

Without further ado, here is the recipe or you can click here.

Salted Caramel Brownies

1/2 pound (2 sticks) unsalted butter
8 ounces plus 6 ounces Hershey’s semisweet chocolate chips
3 ounces unsweetened chocolate
3 extra-large eggs
1 1/2 tablespoons instant coffee granules, such as Nescafe
1 tablespoon pure vanilla extract
1 cup plus 2 tablespoons sugar
1/2 cup plus 2 tablespoons all-purpose flour, divided
1 1/2 teaspoons baking powder
1/2 teaspoon kosher salt
5 to 6 ounces good caramel sauce
2 to 3 teaspoons flaked sea salt

Preheat the oven to 350 degrees F. Butter and flour a 9 x 12 x 1 1/2-inch baking pan.

Melt the butter, 8 ounces of the chocolate chips, and the unsweetened chocolate together in a medium bowl set over simmering water. Allow to cool for 15 minutes.


In a large bowl, stir (do not beat) together the eggs, coffee, vanilla, and sugar. Stir the chocolate mixture into the egg mixture and allow to cool to room temperature.

In a medium bowl, sift together 1/2 cup of the flour, the baking powder, and salt and add to the chocolate mixture. Toss the remaining 6 ounces of chocolate chips and the remaining 2 tablespoons of flour in a medium bowl and add them to the chocolate mixture.

Spread evenly in the prepared pan.


Bake for 35 minutes, until a toothpick comes out clean. Don’t overbake!


As soon as the brownies are out of the oven, place the jar of caramel sauce without the lid in a microwave and heat just until it’s pourable. Stir until smooth. Drizzle the caramel evenly over the hot brownies and sprinkle with the sea salt.


Cool completely and cut into bars.

WARNING! MUST HAVE MILK ON HAND! These brownies are tasty and very rich.

For past Smart Cookie recipes, check out the links below:
Oatmeal Dark Chocolate and Dried Cherry CookiesLucy CookiesWhite Chocolate and Cranberry BlondiesChocolate Dipped Vanilla Biscotti Italian Butter Cookies with Lemon Glaze, and Salted Carmel and Dark Chocolate TrufflesIrish Creme Delights, Erin’s Light Lemon Squares.

Mariano’s, Family History, and Clover Quiche

Let me preface this whole post by saying, I have a thing for grocery stores. It is weird, I know. When I was a kid, my favorite thing was to join my parents on their weekly shopping trip. I loved checking out every part of the store. To this day, I love wandering around grocery stores thinking of all the things I can make.

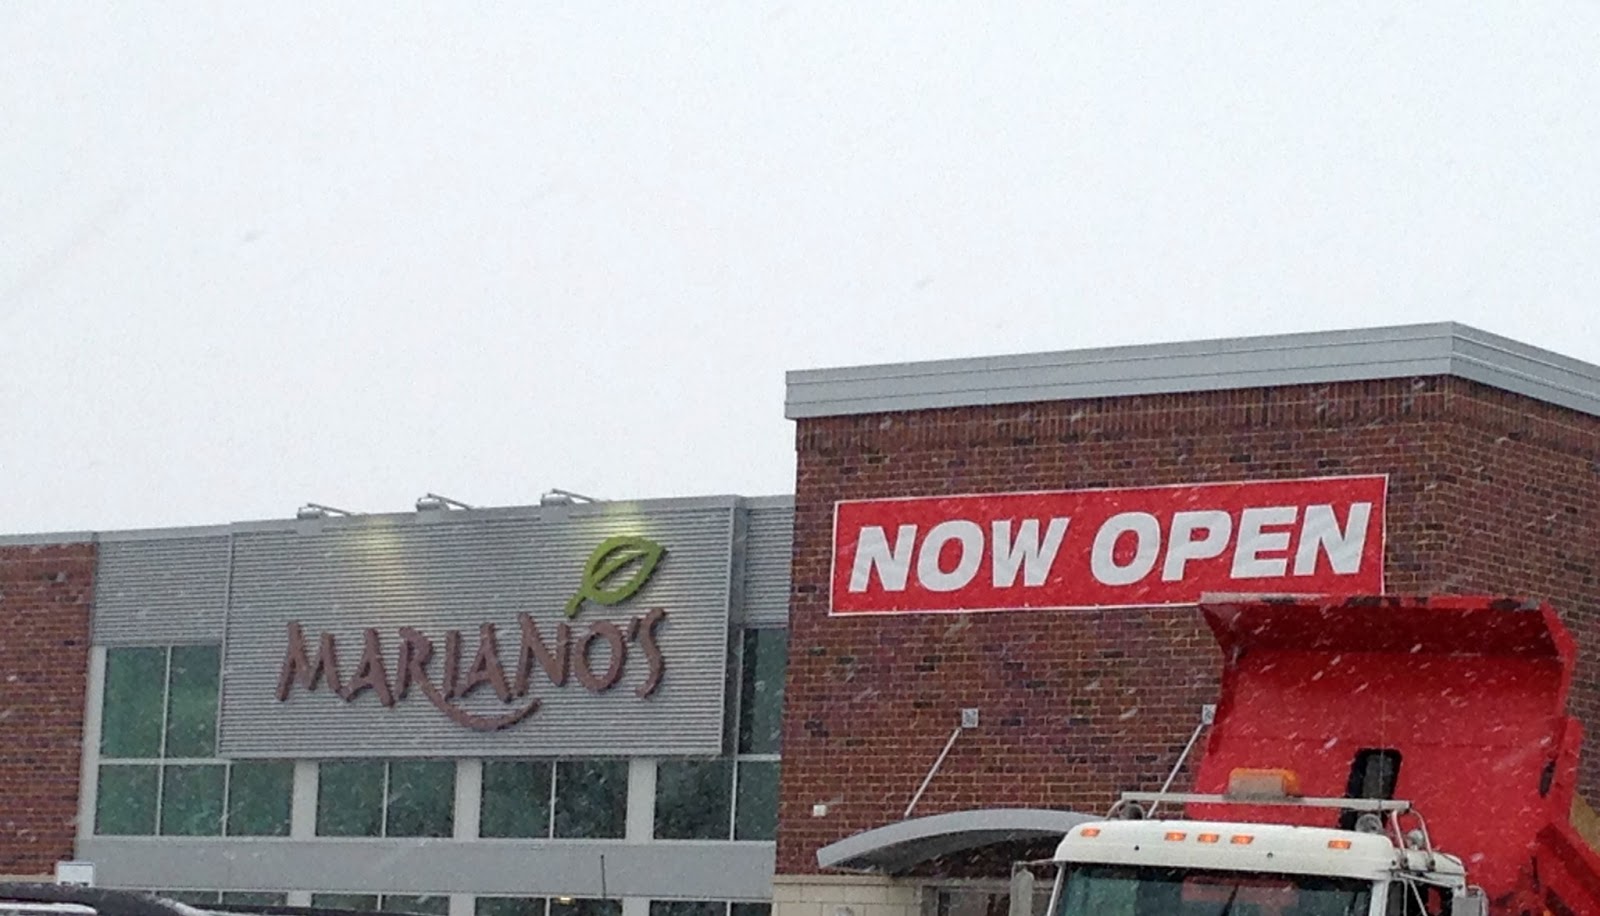
Well, my favorite grocery store is here! It’s HERE! Mariano’s! For those of you outside of the Illinois/Wisconsin area, Mariano’s is a grocery store that recently made its way to my neck of the woods (no more driving to the city). It is like nothing I have ever seen before (for those that live in the upstate New York area, the closest comparison would probably be a Wegmans).

Mariano’s is a full service grocery store that carries all your favorite brands with prices comparable to other stores in the area, but it is unique with all the amenities they offer.

First stop, the wonderful bakery(two words: Chocolate Croissants).

The store also has great amenities that include gorgeous floral department, a fantastic deli, amazing produce department with an excellent organic section, and a fish and meat department that will prepare your fish and meat however you want for FREE while you wait. I think next time I am in a hurry, I will have them cook up some fajita mix, while I run and grab tortillas. Healthy dinner, on the go, and much healthier and less expensive than eating out or grabbing fast food!

Also, did I mention the do it yourself trail mix bar? Brian’s favorite trail mix is M&M’s, peanuts, and raisins. I surprised him with some trail mix, and made it just the way he likes it with extra M&M’s. Also, all do it yourself trail mix was a dollar off.

It also has a prepared food section with things to take home for dinner like homemade chicken pot pies or home made meatloaf. All you have to do is take it home and heat it up.

What I love most about Mariano’s so far is the convenience. They have a Hot Bar to pick up lunch or dinner, a gorgeous salad bar, (you can eat in the seating area or take home). Mariano’s also has a cafe (their French Kiss latte with Hazelnut and Vanilla is to die far),a smoothie bar, a sushi bar, a gelato bar, and fresh pizzas, BBQ, and sandwiches (the turkey with melted havarti cheese, arugula and apple slices is awesome) all made to order.

Typically, I don’t recommend grocery shopping while hungry, but at Mariano’s it is totally ok! Last Friday, I was able to tour the new store near me, and grab lunch for the kids. They had mac and cheese, fresh veggies, a fruit salad from the salad bar. To finish, I grabbed some fruit smoothies to keep them busy while we did our shopping (the police car shopping cart helped too).

Cheese is probably my favorite food group. My mother’s family is from the part of Ireland (Ballyporeen, County Tipperary) that is like the Wisconsin of Ireland, so it is in my blood to love all things dairy.

As you can imagine, during my tour of Mariano’s I quickly made my way to my favorite part of the store: The Cheese Section (which, coincidentally, is right next wine section my second favorite part of the store). I have never seen a cheese section like this before. They had six year sharp cheddars, smooth and creamy and reasonably priced brie, and a gruyere that was so wonderfully mild, I just HAD to use it in a quiche.

I grabbed a few other things and headed home to make a St. Patrick’s version of a quiche with lots of cheese as a nod to my Irish ancestry.

Erin’s Clover Quiche with Gruyere

1 frozen Pillsbury frozen pie crust
5 eggs
1/4 cup cream, half and half, or milk
2 or 3 scallions chopped
1/3 cup grated gruyere
2 tsp. fresh thyme
Salt and pepper to taste

First, I carefully bent the metal pie tin into the shape of a clover by bending the opposite sides gently inward.

Preheat oven to 350 degrees.

Beat eggs, and add cream, scallions, salt and pepper and mix until well incorporated. Pour egg mixture into pie crust. Top with cheese and thyme.

Bake for 45 – 55 minutes.

I will be heading to Mariano’s again tomorrow. You know, just to hang out and get some cheese.

I was not paid or perked in anyway. I just love Mariano’s that much.


Linking up at Serenity Now for Weekend Blog Reading!


Chatting: Irish Soda Bread

This is a recipe that I can honestly say, I have only made once myself. It isn’t that it is difficult or time consuming. It is actually quite easy and a little different than a traditional Irish Soda Bread.


The reason I have only made it once, is my Mom makes it for everybody all the time, and therefore always has some in her house. She makes it when babies are born, when she is visiting a friend, when someone is sick, or when it is someone’s birthday. She gives it to the families of people who have suffered a loss, and people who have moved in next door. She brings it to people when she is stopping by for a chat. It is just what she does.
Last night, I stopped by to pick up the recipe to post, and of course she had a loaf that she has just made on the counter with the kettle on for tea. She grabbed my Grandma’s dishes, and we drank tea, ate soda bread, and had a chat. I’m so glad she lives only ten minutes away. It was nice to have her listen to my hellacious boot shopping trip with the kids or how we are in the middle of a project right now.
This recipe had originated with my Mom’s cousin Laura. We’ve been eating it all the time (not just on St. Patrick’s Day), and it kind of has a quick bread or cake consistency. If you slice it a little thicker and put it in the toaster it is delicious. Also, it makes two loaves, one for you, and one to share.
My favorite way to eat it is with just a little butter, a cup of tea, and a chat.
Laura’s Irish Soda Bread
5 cups all purpose flour
1 tsp salt
1 tsp baking soda
1 tsp baking powder
1 cup sugar
2-3 eggs (2 large 3 medium)
2 cups raisins
2 1/2 cups buttermilk
2 sticks butter (cold)
Preheat oven to 350 degrees.
Grease and flour two loaf pans, and set aside.
Put the raisins in a small bowl, and pour some very hot or boiling water over them and let sit for 3 to 5 minutes. Drain and set aside (this step is not necessary, but makes the raisins plump and delicious).
Sift together flour, salt, baking soda, and baking powder. Cut in butter, or mix until butter and dry ingredients are a cornmeal like consistency. Add raisins, and set aside.
In a separate bowl, mix together sugar, eggs, and buttermilk until well incorporated.
Finally, add the egg mixture to the flour and butter mixture, and mix until just combined (do not over mix). Pour the mixture evenly into the to prepared loaf pans.
Bake for one hour or until golden brown.
Get your kettle ready and call a gal pal.

Another Make Up: Greek Pasta Salad

It is the dead of winter, my mind is on planning another vegetable garden, walking to the park, and ballet flats instead of boots. Typically winter doesn’t bother me, as I love the change of seasons, but this is the time of year I start getting a bit of spring fever.

Last week, I dug through my refrigerator and pantry. This is what I came up with. I love when I am able to mix some fresh ingredients and come up with something easy.


This is a perfect take on a classic pasta salad, but with some Mediteranean flavors like olives and feta cheese. It is easy to make, it is the perfect lunch, and best of all with all the fresh veggies, it is a reminder that spring is on its way.

Greek Pasta Salad
1 lb tiny cut pasta like Orzo or Stelline cooked, drained and cooled
1 large bell pepper (I used yellow) chopped
1 pint grape tomatoes cut in half
1 large seedless cucumber chopped
1/2 red onion chopped
1/2 cup green olives pitted and coursely chopped
1/2 cup black olives pitted and coursely copped
5 oz Feta cheese crumbles
1/2 cup of your favorite balsalmic vinaigrette (I used Panera Bread brand)


Mix all the ingredients together until well combined. Serve room temperature or cold.
(NOTE: To keep pasta from becoming one big mass when cooling stir in a couple of teaspoons of olive oil and mix.)


What kinds of dishes get you thinking about springtime? Anyone else have plans for their garden this year?

CLICK HERE FOR FREE RECIPE CARD


For a printable recipe card, click on the caption below, click Greek Pasta Salad, and then click download.


Breakfast for One: Banana, Berry, and Almond Oatmeal

Out of the five of us, only two of us like oatmeal. Russell and I sometimes enjoy it together in the morning, but when given the option of yogurt or oatmeal, Russell usually picks yogurt. This means I am often enjoying oatmeal alone, and because of this, I am experimenting with very healthy and tasty variations.

As I have mentioned before, when I cook I kind of throw things together. Then, I often have to make the dish again to factor in measurements so that I can share it with you. This is one of those recipes that was so easy and so delicious, I didn’t mind making it over again. In fact, I have eaten it for breakfast the past few mornings after workouts. It is so healthy, but you won’t even know it. It is that delicious!


Banana Berry and Almond Oatmeal

1/2 cup Quaker Old Fashioned Oatmeal
1 cup water
1 Tbs almond butter
1 small banana mashed
1/2 cup various berries (I used strawberries, raspberries, and blueberries)
Pinch of salt


In a microwave safe bowl, combine oats, water, and salt.


Microwave on high for 2 minutes. Carefully remove oatmeal from microwave and stir in almond butter and banana. Finally, top with berries.


What is your favorite quick cooking breakfast?

Linking up at Serenity Now for Weekend Bloggy Reading.

Super Easy Dinner: Deconstructed Greek Salad with Roasted Salmon and Yogurt Sauce

Yesterday, I shared my goals for 2013. Like most people, eating healthier is at the top of the list. I think it is hard to not want to eat healthier after a season of indulging in home made treats and butter laden food.

When I think healthy food, two things that always come to mind are fish and salads. With both of these things I am kind of a novice, but I was able to adapt a recipe I saw on Ten Dollar Dinners with Melissa D’Arabian. She made a Greek Salad with roasted salmon. While I was watching her I couldn’t help but think that she just paired my two favorite healthy things.


My version turned into a Deconstructed Greek Salad with Roasted Salmon and some Yogurt Sauce, and here’s why. Everyone in my family is so picky when it comes to their salads. My husband doesn’t like tomatoes, the boys don’t like peppers, Coco doesn’t like olives, and none of the kids like are that crazy about a lot of lettuce. So I cut everything up that I normally would, but displayed it in a way that everyone could just take what they wanted for their salad. I have decided that this is how we are going to do salads from now on. The kids loved all the veggies and feta cheese, and spent a lot of time dipping pita chips in the yogurt sauce.
The best part of this dish is it is a “throw together meal” as it doesn’t require a lot of actual cooking and it takes about 15 minutes to prepare. By the time you put the salmon in the oven, you can mix up the sauce and cut the veggies. Then dinner is served. No more excuses for an unhealthy meal due to lack of time around here.
Deconstructed Greek Salad, Roasted Salmon and Yogurt Sauce
12 oz of fresh Salmon sliced into 3 oz pieces
1 lemon zested and cut into wedges
1 head romaine lettuce washed and cut into bite sized pieces
1 package of grape tomatoes cut in half
1 cucumber seeded and chopped
2 bell peppers cut into strips
1 14 oz can black or Kalmata olives
1 very small red onion cut into thin slices
1 6 oz package of feta cheese crumbles
1 bag of plain pita chips
Salt and Pepper to taste.
Yogurt Sauce
1 1/2 cups plain Greek yogurt
1 lemon zested and juiced
1 clove of garlic finely minced
1 tsp dried oregano
Salt and Pepper to taste.
Preheat oven to 400 degrees.
In small baking dish sprayed with cooking spray place salmon. On top of each salmon filet put a pinch of salt, black pepper, and some lemon zest. Put in the oven and roast for 15 minutes.
While the salmon cooks, place vegetables and feta cheese on a large platter. Then, make the yogurt sauce by mixing together the yogurt, lemon zest, lemon juice, garlic, oregano, salt and pepper. Put in a small serving bowl.
Remove the salmon from oven and squeeze a little lemon juice on top. Then serve with vegetable platter, yogurt sauce and pita chips and let everyone construct their own salads.
*Side note. I also had some balsamic vingegrette on the table in case no one likes the yogurt sauce.
I hope you enjoy this dinner as much as we did. Brian is still talking about it.
Linking up at Serenity Now for Weekend Bloggy Reading.