Category

Entertaining

Young at Heart: Showing our #DisneySide

I received free products in order to host a Disney Side @Home Celebration. However, the opinions expressed here are my own.


There is no better reason to have a party than: Just Because.

Sometimes the cold weather and daily routine can put everyone in a funk (and not the fun Bruno Mars kind). It was time for a party!

DisneySide Celebrations was kind enough to set us up with some amazing products for us to host an amazing at home party, and with a few things I already had around the house, I was able to make it a party that everyone (even the grown ups and my allergy kids) enjoyed!

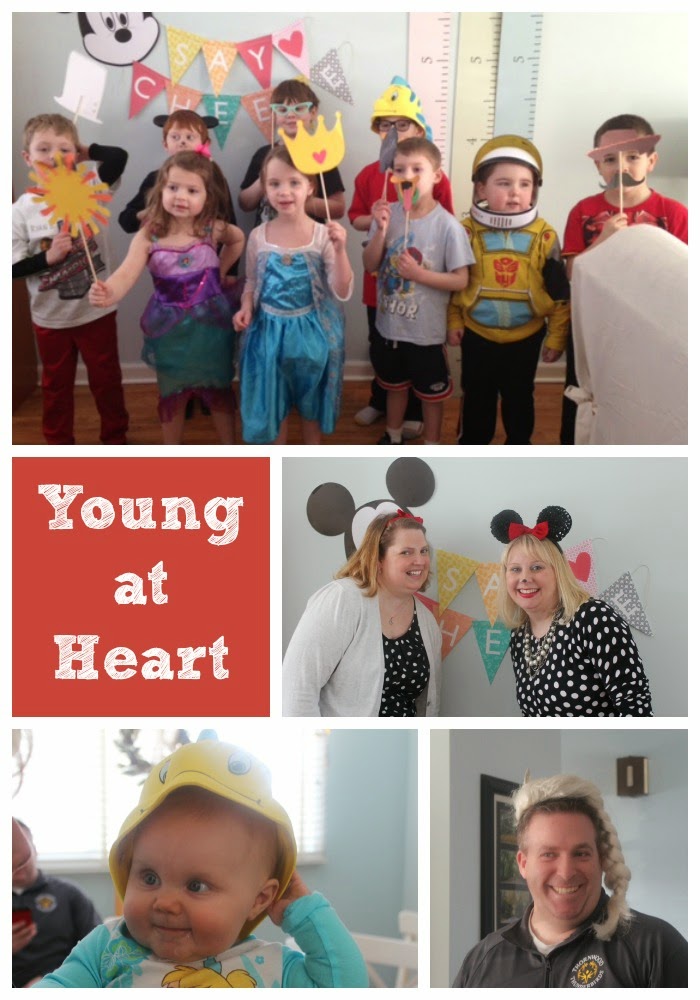
We invited some friends and told them to wear their favorite Disney gear. Let’s just say, everyone (8 adults and 10 kids) showed their #DisneySide. As you can see, some of us, are still very young at heart.


With the release of Big Hero 6 on DVD, my kids thought that would be a good place to start. The movie is great for children and parents alike. To quote my friend Vanessa, “I was so excited that all the heroes were smart geeky nerds!”

Knowing we would watch the movie, it helped us guide the day as far as activities, decor, and food went.

First, we decorated the house with some of the cute decorations sent to us as well with a few things we had on hand. We used some outdoor lantern lights we had to make things in our family room look a little more like SanFransokyo.


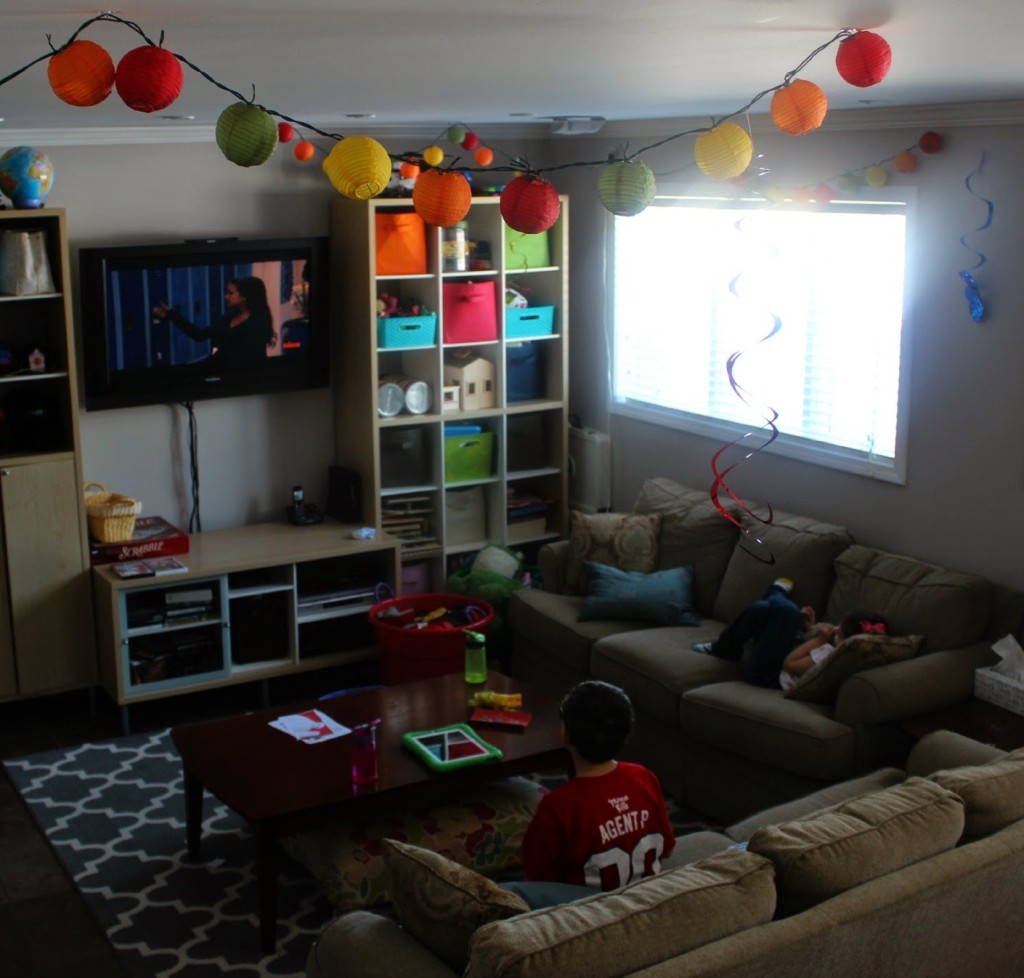
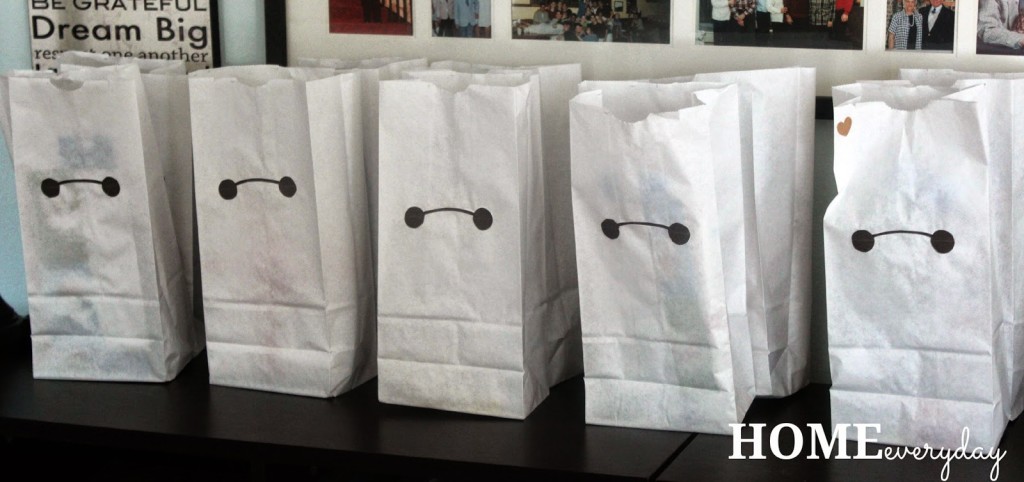
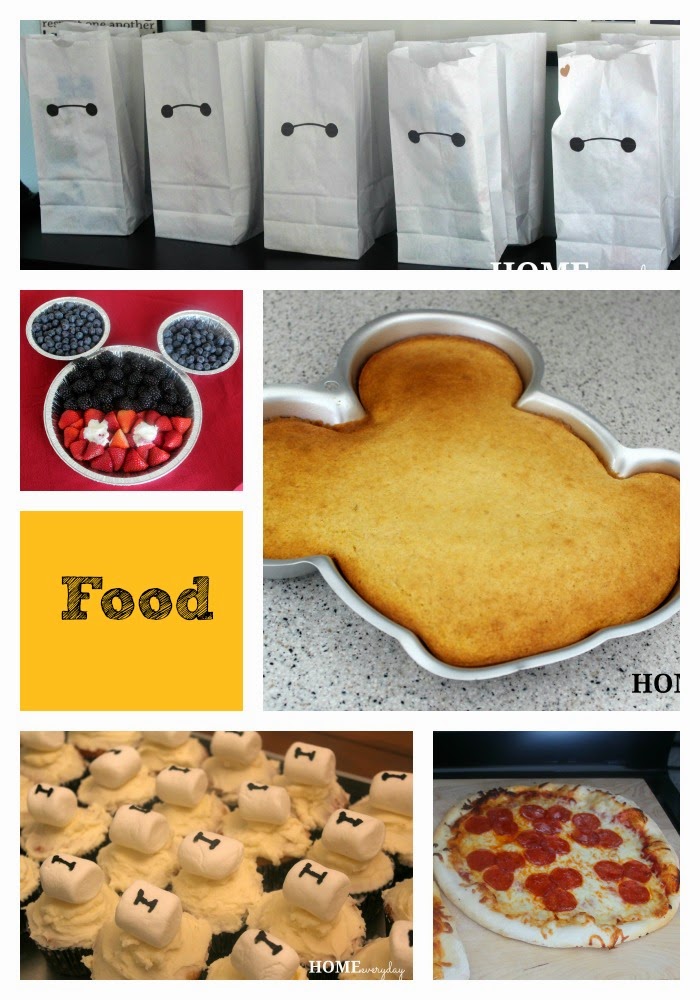
We even made some Baymax treat bags (just white lunch bags with Baymax eyes) and filled them with some goodies.


Then, for the menu I kept it simple. For the grownups we had “Wasabi” Green Turkey Chili with Cornbread (made in my new Mickey Mouse cake pan thanks to Disney) and quinoa salad. For the kids, we served up homemade pizzas, veggies, and fruit. For dessert, we had Baymax cupcakes!


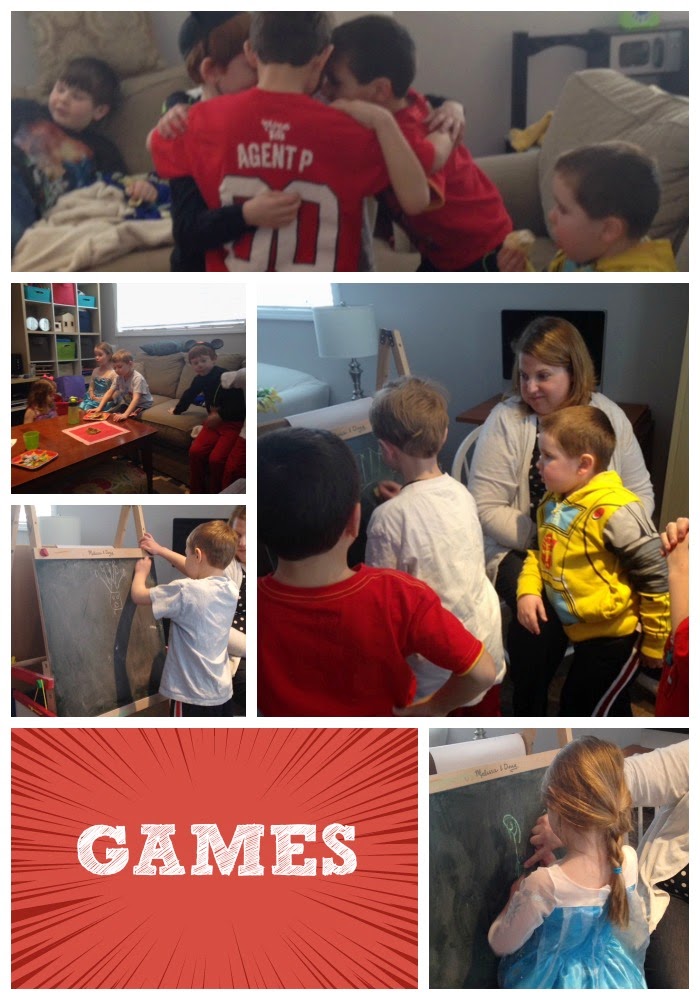
After some food and a movie, we enjoyed some games like a Disney Character word search, Disney Dance party, and my favorite Disney Pictionary. This was so easy to do. We divided the kids into teams, and a grownup whispered a movie into a player’s ear. The player had one minute to draw their picture on an easel with chalk. Then that player’s team would guess. If they couldn’t guess, the opposing team would get a chance. Seeing the kids collaborate and work together was so much fun.


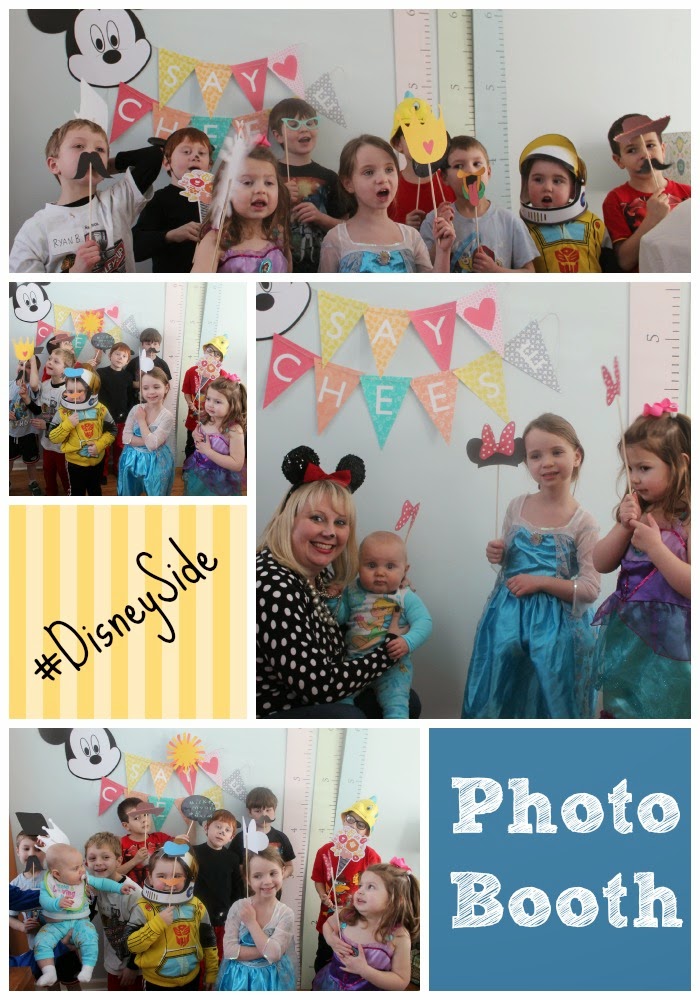
My favorite part of the day was the “photo booth.” I was able to find some free Disney photo booth printables that we cut out and attached to small dowels. The kids had a blast posing for us as we snapped some pictures (HP even provided us some photo paper and envelopes so I put that in each treat bag so parents could print out their favorite photos from the day).


This party definitely broke up the mundane Winter routine. I am so thankful I was given this opportunity, and I think having #DisneySide parties might be part of a new tradition!

If you like this post and would like to read more about all things domestic with a touch of humor, become a Home Everyday follower! For blog updates or to see other places I write such as ChicagoNow or Chicago Parent follow Home Everyday on FacebookTwitter, and Pinterest.


Give Thanks Place Mats: A JoAnn Fabric Celebrate the Season Craft

While I have been compensated for this post by Jo-Ann 
Fabrics and Crafts, the thoughts and opinions are my own.
 

Thanksgiving is right around the corner and I thought it might be fun to have a week of preparing for one of my favorite days of the year. I know that there has already been a lot of talk about that holiday in the winter with the trees, wreaths, and cards and such, but around here I do like to celebrate Thanksgiving with a little something (speaking of a little something, at the bottom of the post is a coupon to Jo-Ann Fabrics and Crafts just for you).


Since so much time will be spend in the dining room for Thanksgiving, I decided to make some Thanksgiving placemats using some supplies from my favorite craft store Jo-Ann Fabrics and Crafts. These were extremely inexpensive and simple to make. They only took me about an hour to create.

Supplies.
2 yards of burlap
Stencils
Black Acrylic Paint
Pain Brush or Paint Sponge
Scissors
Measuring Tape
Scrap Paper


Tricky Measuring: Burlap is a fabric that frays very easily, so in order to cut down on having a huge mess of threads, it is important to cut it in a straight line. To do that, I measured my fabric and marked on the fabric how big I wanted each placemat. Then, at the edge of the fabric, I very carefully tugged the thread closest to my mark and gently pulled it all the way through to the end of the fabric.


You will notice a gap in the fabric where there used to be a thread. I did this wherever I had marked my fabric and then I was ready to cut.

Careful Cutting: When all the threads had been pulled, I cut in all the places where there was a gap in the thread. I was very careful to stay within the gap as I was cutting. When I was finished, I had eight placemats.


Clever Stenciling: I thought of a few of my favorite words when it comes to Thanksgiving, and using a paint sponge, black paint and some letter stencils I carefully painted the words in the bottom right hand corner of the placemats (NOTE: Make sure to place scrap paper or cardboard underneath your placemat as you paint as you don’t want to paint on your table or flat surface).


Let the placemats dry over night or for a few hours before using them.


I am so happy how they turned out. They are the perfect addition to our table for Thanksgiving.


To see this craft or to browse other Thanksgiving craft ideas visit the Jo-Ann Fabrics and  Crafts catalogue HERE.

Also, as a THANK YOU, Jo-Ann Fabrics and Crafts is offering my readers a coupon to create your own #TurkeyTablescape.


Happy Thanksgiving, and stay tuned the rest of this week for other Thanksgiving ideas and recipes.

If you like this post and would like to read more about DIY, gardening, cooking, baking or all other things domestic, become a Home Everyday follower! For blog updates or to see other places I write follow Home Everyday on FacebookTwitter, or Pinterest.

Follow on Bloglovin


Fancy Meets Practical: Party Favors

Party Favors are something that I kind of have a love/hate relationship with.

The girly side of me loves all the ideas on Pinterest with beautiful gift bags filled with pretty little things.

But the practical side of me thinks that party favors are pretty pointless unless they are a.) food  or b.) something I need.

While I understand that a favor is something that says Thank You to your guests, I sometimes feel that isn’t the party, entertainment, appetizers, meal, and dessert kind of a Thank You too?

So, when planning a party, I try to have a little something for my guests to take with them, but I always do something food related or practical.

A few weeks ago, with the help of some friends, we threw a small baby shower. I had thought about doing Sprinkles Cupcakes because c’mon, who doesn’t like cupcakes, but then suddenly a wonderful idea came upon me: Champagne Favors!

In our wonderful world of technology, there are no more phone trees to get the news out of a baby’s arrival. With a few clicks or swipes on a smartphone, people can send notice of the baby’s safe arrival, that Mom is doing alright, and a picture of the new baby hours… or even minutes old.

With that, I thought it would be awesome if all of our friends could be toasting to the new baby at the same time. While we couldn’t all be together for the arrival of the baby, we could all be sharing a sip of something bubbly and sending good wishes to the new family.

I wrote a short poem, printed it out using PicMonkey, and then tied them with ribbon to splits of bubbly.

The favor cost less than even cupcakes, and seriously, what’s more practical than champagne?

PS I am over at ChicagoNow this week too!


LINKING UP TODAY AT SERENITY NOW FOR WEEKEND BLOG READING!


Paula Deen Saved the Day: Mini Quiches

The holidays are usually a time when people drop by our house. There are some family birthdays this time of year as well as people just popping by to say hello. Personally, I love when people stop by (yay adult interaction), but sometimes I feel like a little treat or snack is always nice to serve our guests especially if they are bearing gifts. Also, I figure if someone stops over, a little bribe of food so they don’t tell everyone there are toys all over our house never hurts, right?
via

A nice cheese and some crackers with a bit of fruit was always nice with a beer or a glass of wine, but honestly it was getting a little blah, and sometimes we have visitors in the middle of the day who aren’t up for a cocktail.

So, I began the search for something I could serve in the evening with cocktails or in the afternoon with tea. It had to be easy and something that contains ingredients I always have in the house. So, I searched and who came to the rescue?

Paula Deen (of course) and her amazing mini quiches.


Who doesn’t have crackers, eggs, milk, butter, and cheese in the house (especially this time of year with all the baking)? Also, this recipe is very versatile as you can put just about any combination of cheese or herbs. Also, while they are in the oven, you can straighten in the house!

Paula Deen Mini Onion Quiches (I made a few changes but for the original recipe click here)

3/4 cup Saltine crackers crushed (I used Club crackers because that is what I had on hand)
1/2 stick of butter melted
Nonstick Cooking Spray
1 cup green onions chopped including green tops (you could sub. chives or any herb)
2 Tbs butter
2 large or 3 small eggs
1 cup milk
1/2 tsp salt
1/4 tsp pepper
1 cup Swiss cheese grated (you could sub cheddar, gruyere, or any other cheese too)

Preheat oven to 300 degrees. Spray mini muffin pan with non stick cooking spray.

Combine cracker crumbs and melted butter. Divide this mixture among mini muffin cups and pat down with you fingers or with the bottom of a shot glass (not just for cocktails anymore).


Divide onions or herbs among muffin cups reserving a tiny bit for garnish. Then, in a bowl with a spout, beat eggs with milk, salt and pepper until well combined. Pour this mixture into muffin cups about 1/2 to 3/4 full (don’t over fill or they will run over when baking). Then sprinkle the tops with cheese. Put muffin tin on top of larger cookie sheet in case of run over and place in oven.

Bake for 15 to 20 minutes or until set. Remove from oven and cool slightly before removing from pan. Use a small pairing knife run around the edge of the quiche for any that stick to the pan. Garnish with remaining onions or herbs.

These can be served immediately or put in the refrigerator and reheated the next day.


What combination of herbs and cheese will you use?

Oktoberfest: Brats and Orchard Salad

This past weekend, we hosted a bunch of friends for dinner and an autumn bon fire complete with s’mores. The menu consisted of two of my favorite autumn dishes. Grilled Brats and Orchard Salad.


This is a great meal for entertaining, but also for a weeknight dinner.

Grilled Brats
3 bottles of your favorite beer (I used Swithwick’s)
1 package Brats
1 package rolls

In slow cooker add brats and cover with beer. Cook on high for 3-4 hours or on low for 6 hours. Preheat grill on medium heat. Remove brats from slow cooker and put on grill  turning occasionally for about 10 minutes or until crispy. Serve with rolls and favorite mustard or grilled onions.

Orchard Salad
1 bag of pre washed Romain lettuce or two heads of romaine cleaned and chopped
1 large apple (Braeburn, Honeycrisp, Gala are some of my favorites) cored and sliced thin
1 large pear cored and sliced thin
8 oz sharp cheddar cheese (I use Kerry Gold Extra Sharp Cheddar) cut into thin slices
1/2 cup of dried cranberries
2 Tbs Apple Juice or Apple Cider
2 Tbs Apple Cider Vinegar
1/4 cup Olive Oil
Salt and Pepper to taste

In a large bowl add romain, apple, pear, cheese, and dried cranberries. In a separate bowl, add cider, vinegar, salt, pepper. While whisking the vinegar mixture, slowly pour olive oil until thoroughly combined. When ready to serve, drizzle dressing over salad.

It is worth mentioning that this meal tastes especially good with an ice cold beer and a Bears game, but that is of course optional.


Spoooooooky: Halloween Mantel

Sometimes, more is more. I usually do not subscribe to this methodology as I like clean lines, simple decor, and practicality, but when it comes to Halloween candy… er I mean decor, I cannot get enough.


This year, again, with the help of my niece Allison, I have put together a Halloween Mantel with all of my Halloween candles. These candles have been collected slowly over time. I can usually find them after Halloween at places like Party City and Target for deep discounts. Together with some ceramic decor made by my mother in law, some faux cobwebs, and glittery spiders, I think we came up with a pretty spooky mantel.


When the candles are lit, it creates the perfect spooky atmosphere for watching a spooky movie (which at our house is Monsters Inc.) with some cozy throws and popcorn.

Linking up at Centsational Girl as part of It’s Fall Ya’ll Link Up Series. Come and see everyone’s Autumn Mantels.


She’s Two: Coco’s Birthday

My youngest is two. No more babies in the house.

Birthdays at our house often get celebrated a few times. Sometimes it is a little crazy, but it works for us.

Because of this, we have lots of cake, and lots of opportunities for adorable photos.

On Coco’s ACTUAL birthday, we had a very busy day, so the boys wanted to give Coco the gifts they had picked out before they left for school. We don’t have a ton of dolls in the house, and because of this, the boys thought it might be a nice gift for her. They picked out toddler versions of Rupunzel from Tangled and Merida from Brave. Needless to say she loved them at first sight.


The next night she got to celebrate with Brian’s family. I made a cake for her with the sun from Tangled and her Meema got her a Tutu. She danced and twirled for everyone to see.


Sunday, my family got to sing happy birthday to her at our monthly Sunday Dinner, which of course meant more cake!


You don’t turn two every day you know… well unless you are at our house, you get to do it three times.


Sunday Dinners: Autumn Decor

When my Mom was growing up, my Grandma Nano hosted Sunday Dinner every single Sunday for whoever wanted to come. Most of the time it was family, but often the parish priest or friends were known to stop by for my Grandma’s cooking. My Dad used to talk about coming over for Sunday Dinner while him and my Mom were dating. Over the years, Grandma Nano kept the tradition alive. I even remember helping her set the table for Sunday Dinner at her house, and my sister helping her clean up in her kitchen after dinner.

Recently, I have picked up the Sunday Dinner tradition, and while we don’t do it every single week (seriously I don’t know how Grandma cooked for that many people every week), I host my family once a month.

This past weekend, I hosted Sunday dinner, and wanted to dress up the table with some autumn decor, but wasn’t really keen on spending any money to do it as I already have tons of fall decor (it is my favorite season after all). Since, Brian and I built and finished the plank table, I have been having some trouble coming up with tablescapes that aren’t dwarfed by the size of the table.

So, I called in some reinforcements. My niece, Allison, just graduated from college with a degree in Film, and she has had some experience with set design. I asked her if she would help me decorate the table.


She started with a red table cloth and folded it to make it a runner. Then added the beaded runner for some texture. Then she filled two simple glass vases with some river rock, a branch (which we found outside), and wrapped a little twine around the vase for some extra texture. She placed them on each end of the table.


Then, for the centerpiece, she placed some candles at different heights, filled a shallow glass bowl with apples and wicker balls, and placed a faux hypericum wreath around the container.


Finally, for each place setting she used some cloth napkins that I found on clearance awhile ago (I originally planned to use them for Christmas, but she thought they were perfect for autumn, and now I agree).


Voila! Simple, elegant, and inexpensive. What do you have around your house to create a tablescape? Anyone go outside and grab a few sticks? How about using twine to make something a little more rustic?


Linking up at The Lettered Cottage for their Autumn Tablescape link party.


Also sharing at DIY By Design for the Fall into Fall Link Party.

I Do: Our Wedding

When Brian and I were planning our wedding day, we tried to think of all the weddings we had been to, and the best wedding receptions were the ones that had the best food. I know it sounds ridiculous, but good food can go a long way to your guests enjoyment of the reception. Once we knew the food would be fabulous, we tried to focus on lots of sentimental and personal touches.

The Date: After the proposal, it was kind of a whirlwind of telling people and picking a date for our big day. We knew we wanted an autumn wedding. We love cool weather, the colors, and we met in the fall, so we thought it was appropriate. We finally came around to picking September 16th. It was the only date that both the church and our banquet hall had at the same time, but it was totally meant to be. You see, this is also my parents’ anniversary. My parents were married for almost 34 years before my Dad passed away so we figured it was  a nice tribute to my Dad, and almost like a lucky day since my parents had such a happy a loving marriage.


The Church: Old St. Pat’s is an important place to us. We spent a lot of time there when we were dating. We attended mass there, volunteered there, and met life long friends there. Brian popped the question there. It remains a very special place to us as it is still our parish and the parish where our children were baptized.


The Band: Brian and I LOVE music (mentioned here). We spent a lot of time at concerts (Guster is still one of our favorites), listening to music, downloading our favorite songs, and researching new bands together. One of our first trips together was to Graceland and then to Nashville where we saw Josh Turner before anyone knew who he was. A monthly tradition of ours was to see a band called Tributosaurus. They are a band that each month has one concert and picks a different artist or band to cover. We saw them become Chicago, Stevie Wonder, Pink Floyd, The Smiths, Paul McCartny just to name a few. It was/is still one of our favorite things to do. Anyway, we explained to the band how we are die hard fans, and would you please play for our reception. They agreed and played a mix of all of our favorites. Everyone enjoyed because it was good oldie type music perfect for dancing, but they also played some newer music for the young ones.

The Sweet Table: Brian and I didn’t have a traditional dessert of wedding cake at our wedding. In Brian’s family, it is tradition to offer an entire table of sweets and treats after dinner. Ours was piled high with tiny creme puffs, eclairs, small pieces of cake, chocolate covered strawberries, and other sweet treats. To keep with tradition, we had a very small two tiered cake  to cut. Our baker actually made us a replica of the cake for our first anniversary for FREE.


The Bouquet: My bouquet was a place that I found it easy to add personal touches. It contained lots of sentimental flowers. My Dad’s family is Dutch so even though it was fall I included ivory tulips. My Mom loves hydrangeas so I made sure I had a few of those. My grandmother had gardenia in her wedding bouquet so I included those, and my sister had roses in her bouquet so I included those as well. I also added a few of my favorites like ranunculus and stephanotis with pearl centers.

The Shoes: Another very personal touch was to honor my Dad. My Dad passed away when I was only 19. Him and I were extremely close, and one of our favorite things to do together was run (I still run today). Our favorite brand of running shoes was New Balance, so I found a pair of all white New Balance shoes and my friend and bridesmaid, Sara, bedazzled them for me with crystals and pearls. My brothers and my “Dad’s shoes” walked me down the aisle on my wedding day.


The Photos: We wanted to make sure we got some pictures with the Chicago skyline behind us. Brian and I feel like it is “our” city so that was important to us.


The Little Things: Instead of table numbers we labeled the tables with all of our favorite Chicago date spots. For favors, we are big believers sending people off with a little snack for the car ride home or something to share the next day. Our favorite fall treat is a carmel apple, so everyone got a carmel apple from Affy Tapple (pretty much an institution in Chicago). Our programs contained pictures of the stained glass windows of Old St. Pat’s.

I’m not an expert wedding planner, but I will say this. It is very similar to hosting any party. The food should be great but there should be a few personal and sentimental touches that help to make it personal and special to you and your guests.