Month

January 2015

A Cozy Little Hideaway: A Master Bedroom Refresh

I have been blogging for a few years now, and there are some things that I have noticed. One of them is, you don’t need to see me hang every picture in my home. So, for those moments when I do a little tweak here, a nip there, a picture hung on a wall, I don’t write about it. However, a bunch of nips and tucks, and pictures hung can completely transform a room.

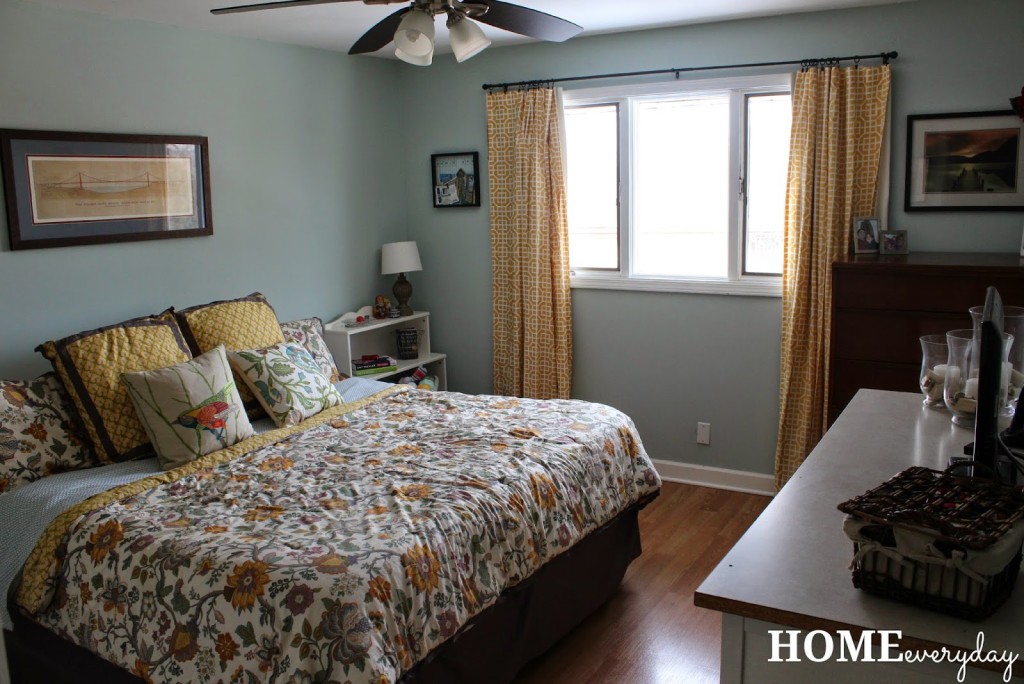
I was looking through the home tour page of this here blog, and I noticed that my Master Bedroom went from this:
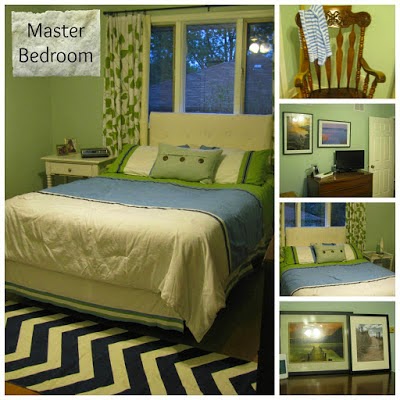
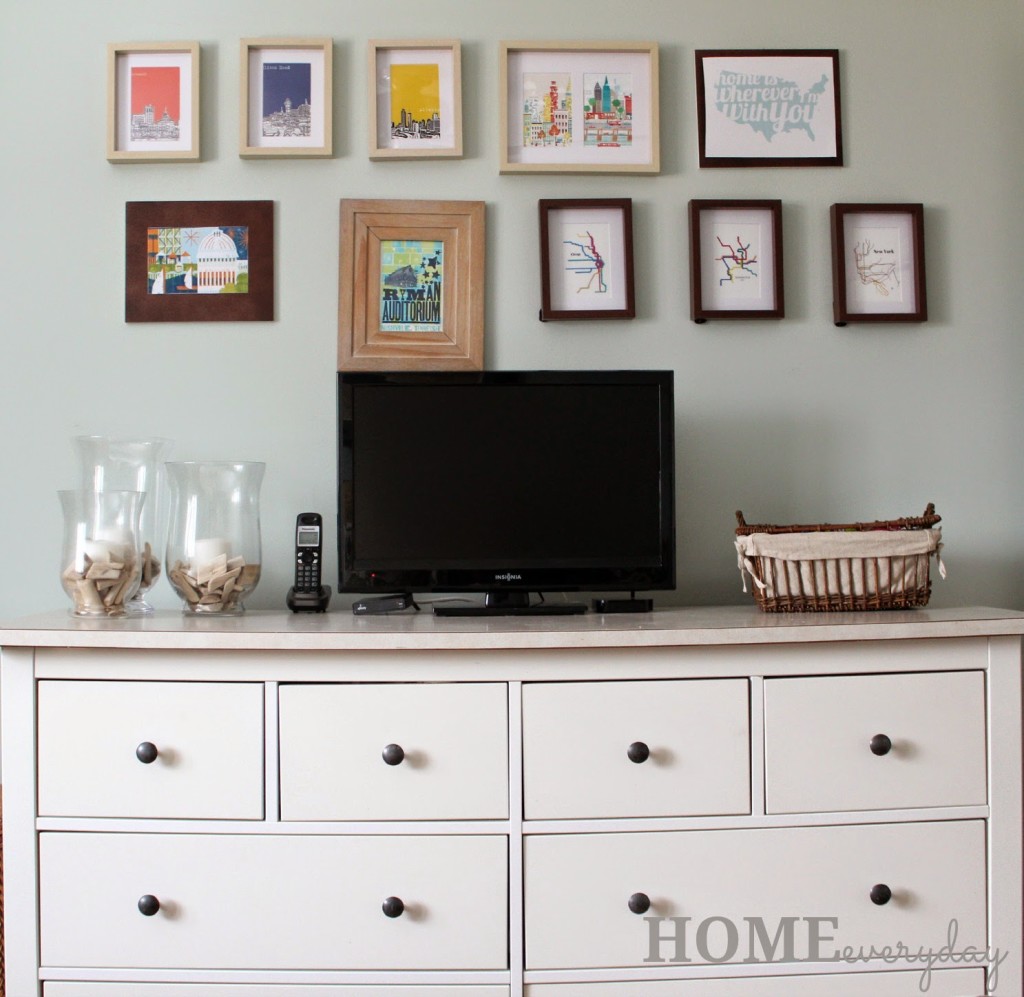
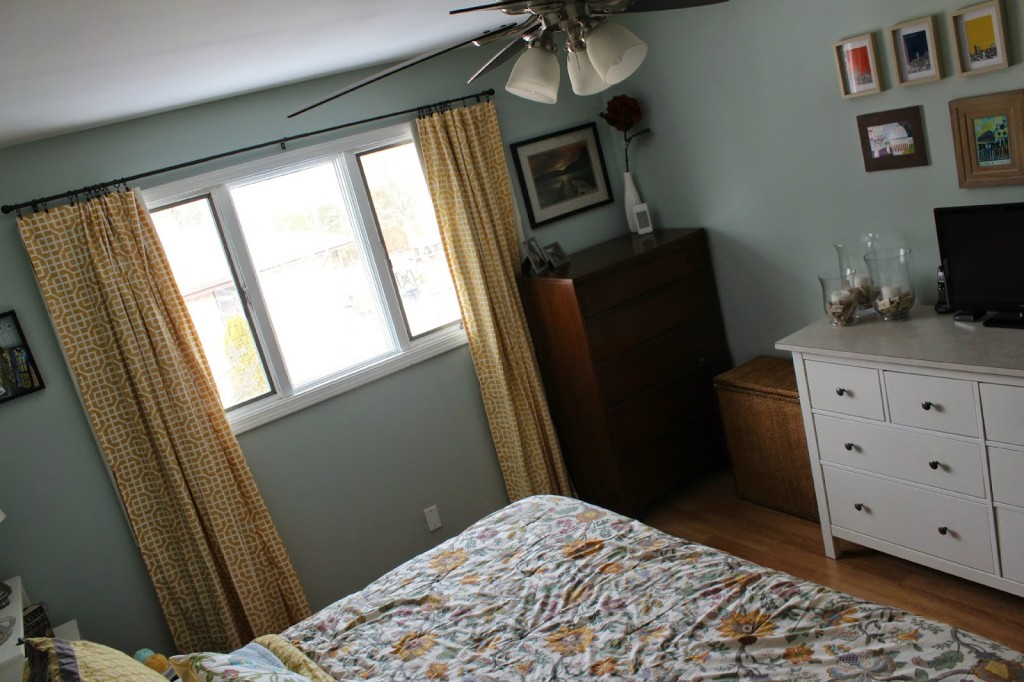
 

To this:


And none of you knew anything about it. I was feeling terrible that I hadn’t updated any of you on the inner workings or smaller updates  as they were happening after I saw how different everything looked!

Over the course of a year, I have made so many nips and tucks I thought I should share, because apparently NOW there is a WOW factor.

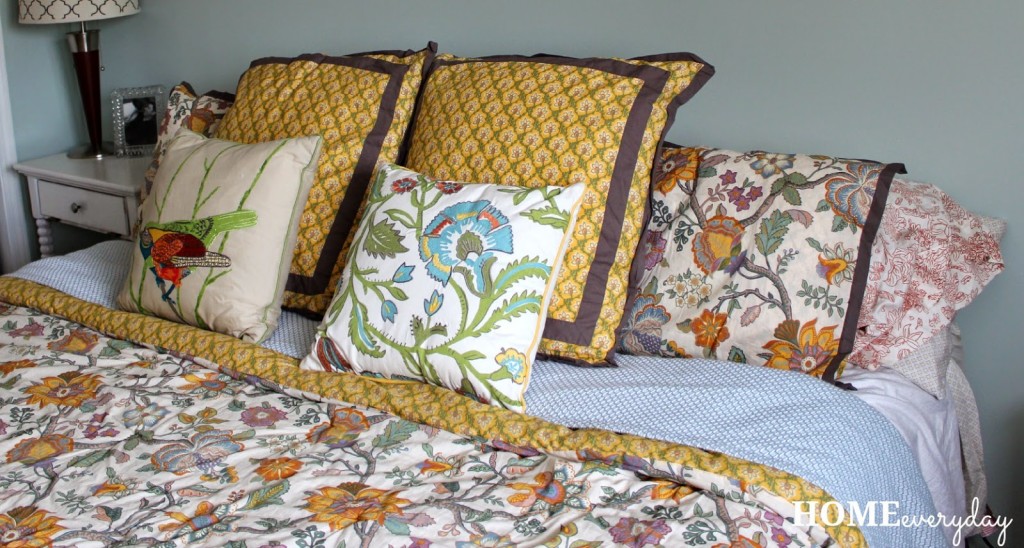
Last Christmas, Brian and I decided it was time to upgrade from a Queen to a King Sized bed. With that came new sheets and bedding and some toss pillows.


Then, because I couldn’t handle the curtains not going anymore, I found some cute ones on way way clearance at Target.


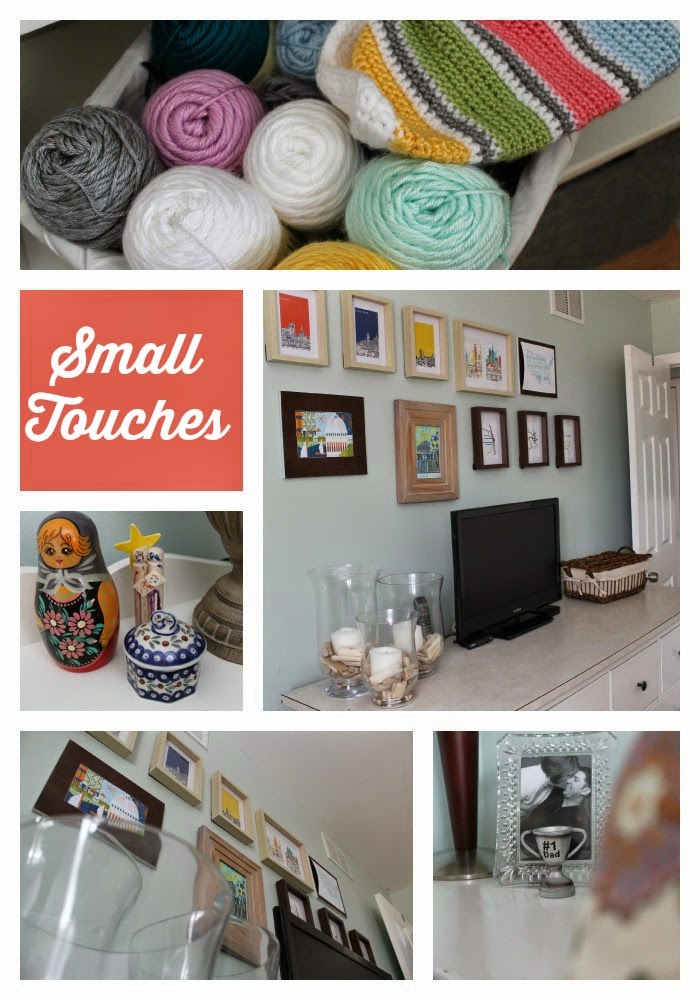
Brian when on a business trip to San Francisco he bought a gorgeous print of the Golden Gate Bridge. So, for our anniversary I had it framed, and then had a few other things printed and framed from all of the places we’ve been together to switch up the artwork in our room and give a little more color to our room.


We are currently in the process of playing musical furniture in the house. The boys needed some more clothing storage so we gave one of our dressers, we took the white one from the living room after I was able to get a writing desk and some new bookshelves in there (reveals to come).


I also added Caroline’s bookshelf to serve as my night stand because she now had more storage in her room with one of the boys’ dressers (and round and round we go).


Brian’s night stand stayed the same… well except for one little addition from his adoring fans.


Finally, I added some other small touches to make it seem relaxing in there like some candles, the books I’m currently reading, and my crochet basket to work on my blanket while I watch TV during naptime (yes, I’m working on a blanket).


So, I’ve learned my lesson. I will not show every picture I hang, but I will try to perhaps show more stages of the process of changes that happen around here.


Now, to take a snooze in my cozy little hideaway.

If you like this post and would like to read more about all things domestic with a touch of humor, become a Home Everyday follower! For blog updates or to see other places I write such as ChicagoNow or Chicago Parent follow Home Everyday on FacebookTwitter, and Pinterest.


My Target Addiction: 9 Tips for Getting the Best Deal at Target

If I put a band together, I will probably call it My Target Addiction.

Target is one of those places that reminds me of the the local grocery stores of the past. Our relationship with our local Target is not just commercial. I mean sure, the sweatpants I’m currently wearing and the cup my daughter is drinking out of, and the pillow behind my back are all from Target. And yes, Target is where we bought the ONLY sheets that would not slide off our mattress. We buy groceries, clothes, toiletries, housewares, and a lot of other things we need at Target. I’m typing this to you right now, and as I look around at my house I can point to everything we bought at Target.

However, we know the employees at our Target. We talk to them. When Brian and I were first married, on the nights he worked much later than me, I would grab a small cup of tea and walk around Target for about an hour because I didn’t want to head home to an empty house. Target is where I would push a newborn baby around in a stroller when it was raining. Target is where I picked up baby reflux medicine and the kind pharmacist showed us how to use it. Target Optical is where they first diagnosed me with optic nerve swelling, and I got an early diagnosis. Target Clinic is where I go to see my favorite nurse practitioner when I cannot get in to see my doctor.


However, unlike most people I don’t think I’ve ever paid full price for anything at Target. A.) I’m cheap and B.) Because at some point Target will have a deal on it.

With these simple tips and tricks you too will know how to spend wisely at Target.

1.) Target RedCard (credit or debit). This allows you to save 5% off of every single purchase made at Target.

2.) Pharmacy Rewards. Sign up for Pharmacy Rewards and have your scripts moved over to Target. Every time you move a new prescription over to Target or you have up to 6 prescriptions filled at Target you get a 5% off your entire purchase coupon.

3.) Download the Target Cartwheel App. This is a FREE app with additional offers to those to download it. There are two ways to use it. You can look through it and add certain offers offers onto your Cartwheel to scan at checkout OR you can scan the items in your cart to see if they currently have a deal. Some items are always on Cartwheel and you can save every time you shop: like milk and cheese.

4.) Clearance Schedule. I know my local Target Clearance and Sale Schedules. I also ask my sales associates or managers when this might change. For example at my Target I know

Monday:Electronics, Kids Clothes, Baby Stuff, Accessories
Tuesday:Women’s Clothes, Pets
Wednesday: Men’s Clothes, Furniture, Health & Beauty
Thursday: Housewares, Shoes, Toys, Sporting Goods, Home Decor
Friday: Auto, Hardware, Jewelry

This means if I have my eye something I wait and see what day of the week it is before I buy it.

5.) Seasonal Cycles. It is good to know seasonal cycles at Target. For example,  right now we are in the midst of what I like to call “ORGANIZE/BULK/HEALTH” time at Target. This means this is the time of year in the seasonal section at Target when organizational items, workout clothes and sporting things, and bulk foods and items are available in the seasonal section. This also means that in a few weeks they are going to want to clear this section out to make room for what I like to call “SPRING INSANITY” stuff, which is all the planters, gardening stuff, outdoor decor and furniture, lawn toys for kids and the like. So to clear it out they will put it all on sale. There is always a rotation so if you have your eye on some hand weights, wait a week or two they might go on sale to make room for some patio furniture.

6.) Shop the end caps first. Some of the best deals I have found on sheets, towels, dishes, cups, table linens, or toss pillows are on the end caps. Especially, when it comes to home decor or housewares. These items typically follow the seasons, and are switched out often. The end caps are where Target puts older sale things to make room newer non sale items.

7.) Goodwill and Target. Did you know that Target will donate things it cannot sell to local Goodwill stores who will sell it at even steeper discounts?

8.) Don’t forget your bags! Target will reward you for bringing your reusable shopping bags by giving you a $.05 discount for every reusable bag used.

9.) Text Coupons. Make sure to ask a sales associate or look on the shelf if there are text coupons available. Sometimes there are signs indicating text coupons for items available that will not exclude Cartwheel or other discounts.

If you like this post and would like to read more about all things domestic with a touch of humor, become a Home Everyday follower! For blog updates or to see other places I write such as ChicagoNow or Chicago Parent follow Home Everyday on FacebookTwitter, and Pinterest.


Winter Pot Roast over Mashed Potatoes

This is the time of year when we kind of get into a “Winter Dish Rut” around here. I keep rotating the same things for dinner, and with the weather being cold I feel like they are all typically comfort food things like pasta, meatloaf, and chili.

I was flipping through cookbooks in the library recently though, and I saw a picture for Pot Roast, and realized that my kids had never had it before. They had kind of always had a disdain for beef until recently, so I thought it was about time I try something new in my Winter dinner repertoire. I made a Winter Pot Roast and served it over Mashed Potatoes.


I took all the things I love about pot roast, and made a recipe I thought my family and I would like. And I left out all the things I hate about old fashioned pot roast like soggy potatoes, and overcooked veggies.

The recipe seems long, but I promise the results are so delicious that the subtle changes and additions to the recipe won’t bother you after your first bite!

So, here is my version of Pot Roast.


Winter Pot Roast over Mashed Potatoes (makes 6-8 large servings)

For Pot Roast
1 2 1/2 to 3 pound beef roast
4 or 5 large carrots peeled and cut into half
3 stalks celery cut into chunks
1 large onion chopped
1 clove garlic minced
2 tsp dried thyme
2 tsp dried rosemary
1 or 2 dried bay leaves
1 32 oz box beef stock (I used low sodium)
Salt and Pepper to taste
2 Tbs flour
1 tsp olive oil
1 TBS of butter
1 10 oz package frozen peas (2 bags if you like a lot of peas like my kids)


For Mashed Potatoes
1 5 pound bag of yukon gold potatoes peeled
4 TBS unsalted butter melted
1/2 cup of milk
Salt and pepper to taste

For Sauce (Optional Last Minute Addition)
2 TBS Butter
2 TBS Flour
A few ladles of beef stock drippings from slow cooker

Roast: In a slow cooker, make a bed of carrots, celery, and onion. Add the thyme, rosemary, garlic, salt and pepper. Set aside.


In a large heavy bottomed skillet over medium high heat add olive oil and butter. Coat roast in flour, salt and pepper.


Sear the roast on all sides (about 3-5 minutes on each side) until a crust is formed.


When roast is done searing, remove from pan and put in slow cooker. With pan on medium heat add a bit of the beef broth and scrape the bottom of the pan to get drippings. Pour this mixture into the slow cooker. Add the rest of the beef broth from the box. Turn on the slow cooker on high, cover. Cook for 6 hours or until beef is fork tender.

When beef is done, remove it from slow cooker and put it into a large dish. Shred with a fork and cover.

Prepare frozen peas to package directions and add to shredded roast.

Potatoes: In a large pot add potatoes and cover with water. Put on medium heat and bring to a rolling boil. Cook for about 15 minutes or until just tender.

Drain the potatoes and add back into the pot. Add milk, butter, salt and pepper. Mash with potato masher.

Optional Sauce: In a small sauce pan over medium heat. Add butter. When the butter is melted whisk in flour. After about 1 or 2 minutes, flour will be dissolved, ladle in remaining beef juices from slow cooker. You may add as much as you want until desired consistency is formed making sure to stir consistently.


For a serving, in a bowl, make a bed of potatoes, add beef & peas, cover with sauce or just ladle some of the beef stock from the slow cooker. (My little ones preferred everything served separately on their plate, but they ate every bite just the same.)


I am already looking forward to making this again, hopefully next time for guests.

I hope your family loves this as much as we did.

If you like this post and would like to read more about all things domestic with a touch of humor, become a Home Everyday follower! For blog updates or to see other places I write such as ChicagoNow or Chicago Parent follow Home Everyday on FacebookTwitter, and Pinterest.

Installing a Rail with Hooks Saves Space (and Tears)

There was a day not that long ago where Brian called to see how things were going at home. I am lucky to have a husband that texts and calls to see how we are throughout the day. However, on this particular day, I am sure he was sorry he asked because I was close to tears about how messy the kids rooms were. (I know, first world problems.)

Hear me out, though.

I am not going to follow my kids into their rooms and pick up after them every day, nor do we have a cleaning lady. The kids used to have a place for everything, but it seemed just like their growing bodies their stuff was taking up more space.  They just seemed to need more room. Clothes were overflowing dresser drawers, books were scattered everywhere, socks were strewn about, Legos and other crap that didn’t belong in certain places was just everywhere!

It was like they were TRYING to put stuff away, but they just didn’t have anywhere else to put it all.

I wasn’t going to run out and buy a ton of furniture. As you know, I am kind of a make due with what I have kind of gal. Plus, I would so much rather refinish a bunch of furniture for the kids before buying them anything new and fancy. But something had to be done ASAP!

So, after sorting the drawers, and picking up, and trying to find a place for everything, I had a brilliant idea of using the wall space as storage.

Awhile back, I saw the Bygel Rail and hooks at Ikea. So I purchased one, and decided to hang one in Caroline’s room to see how it goes for awhile. Well, now I can buy out the store and start hanging them all over the kids’ rooms. I have decided they are AWESOME!

Paired with those little buckets from the dollar spot at Target, these this rail has been a lifesaver. The buckets hold her hair ties, clips, and little things, the hooks can hold anything from bags, to towels, to pjs, to ballet clothes, to everything! I also like the idea of some of the accessories they sell at Ikea to go with the Rail to sort and store other things.

Installation was easy.


Dollhouse not needed for installation.

I measured about on the wall where I wanted the rail to go. I asked one of the kids to hold the rail against the wall while I made sure it was level. Then using a pencil, I marked where the holes should go.

For extra security, rather than securing the rail right to the wall with screw, I decided to use mollies. I figured if the kids hung backpacks or anything with a little weight to them, I’d rather be safe than sorry. So, I drilled holes where I marked the the wall, tapped the mollies in (GENTLY!)


Then, I affixed the rail to the wall drilling screws into the mollies.


The rail was ready for hooks and stuff.


Now, to install these all over the kids rooms, then perhaps Brian will avoid tearful phone calls.

What is and organizational item that makes your life easier?

If you like this post and would like to read more about all things domestic with a touch of humor, become a Home Everyday follower! For blog updates or to see other places I write such as ChicagoNow or Chicago Parent follow Home Everyday on FacebookTwitter, and Pinterest.

A Not so Crafty Craft: Good News Jar

My friend, Heather, a teacher, always has awesome parties, as well as little crafts, do dads, and thingamabobs for kids. She is one of the most generous people and one of my most favorite people.

For New Year’s she gave each child a plastic container with stickers. She told them to decorate it, and it could be their “Good News” Jar for the year.

Every time they had good news, something they want to remember, something they were thankful for, anything, they could write it down on a slip of paper and put it in their good news jar.

On New Year’s Eve of 2015, we will read them.

I loved this! I wanted to do it too. So, I did. It isn’t as elaborate, but I am proud of myself for putting some good news in our jar already.


I didn’t care so much what the jar looked like. I did however have a few criteria.

1. The slips of paper were scrapbook paper quality so that if someday I did want to put them in a book I could.
2. There were pens available at all times for writing the good news, memories, moments of gratitude down.
3. Everyone could reach in case they wanted to write.

First, I put some Becky Higgins Project Life card stock rectangles I found on sale at Michaels in a vase with a few Sharpie Pens (you guys these are my favorite pens, they are like Sharpies but they are pens and don’t bleed through paper.)


Grabbed an empty jar that I was no longer using to put our memories into.


Then, put it all on my desk.


Now, anytime Brian or I have a memory, good news, something to be grateful for, or anything we just think is special (like someone pulling out his own wiggly tooth last night) we have a place to put it all.


Thank you, Heather for your great idea! I know mine isn’t as crafty, but at least now all the memories are safe.

What is some good news that would go in your jar?

If you like this post and would like to read more about all things domestic with a touch of humor, become a Home Everyday follower! For blog updates or to see other places I write such as ChicagoNow or Chicago Parent follow Home Everyday on FacebookTwitter, and Pinterest.

Losing Teeth: Tooth Fairy Pillows

The parents of older children like Tweens who are in the aloof stage of life asserting independence and start to pull away probably don’t want to commiserate with me. The Teen parents probably whose kids apply to colleges and DRIVE around from place to place (by the way you’re saints) will most likely think I am absolutely ridiculous. These parents have bigger problems than to talk to a Mom who is clearly unstable about a stage of life that is seemingly normal, and passes so quickly.

The losing of the baby teeth is emotional for me. With every one that falls out, and with every visit from the Tooth Fairy I am reminded of how close these little people are to not being so little anymore.


Look at them, they’re huge!

I remember when these kids had no teeth and I was lovingly nursing, making bottles, and pureeing baby food. Now, they are eating like horses and the amount of pancakes I flip in the morning would be enough to give anyone carpal tunnel. I remember waking up with teething little babies in the night to comfort them and give them something cool to gnaw on while they settled in to my shoulder to be rocked to sleep. Now, my darlings take up more room in the bed in my husband. I remember when they would stick their chubby little fingers in their mouths when those back molars would be coming in. Now, they are wiggling those teeth free or to point to an adult tooth coming in.


The only team we all agree on is the Blackhawks.

AN ADULT TOOTH. There is no way the boys kids in my house playing Playmobile Soccer and helping their baby sister put clothes on her baby dolls are ready for adult teeth.

When the first tooth was lost by oldest son, I kind of shrugged it off. However, now with my kids being so close in age, they are popping out all over the place. Sometimes, I think the Tooth Fairy is going to forget whose pillow to put money under.

To mark this milestone, to keep things organized, and as a little therapy for myself, I made the kids Tooth Fairy Pillows.


As my regular readers know, I don’t have a sewing machine, so I had to do this the old fashioned way, but honestly, I was able to do them while watching Netflix. Let’s not pretend I wasn’t going to be watching a show anyway. I got them done in about 2 – 2 hour sessions this includes tracing, cutting, and sewing. (Remember I did THREE and I stop to take pictures for my lovely Readers.)

Supplies:
White Felt (for tooth shaped pillow)
Color Felt for Heart and Pocket
Scissors
Needle
Embroidery Floss
Pillow fill cotton balls
Pen

Full Disclosure: I don’t have measurements or amounts of felt or thread used as I wasn’t sure what size my pillows would be. Please note that these can be any size you want and you can always return any unused and UNCUT felt.


Trace or Draw: I am not good at anything free hand, so I printed out  a picture of a tooth, a square, and a heart and traced each of these on the the felt. (Yes, I even traced the square.) Remember, you are making a pillow, so you will need two EXACT tracings of the teeth to sew together.


Cut: I, then, cut out all the teeth, squares and hearts.


Find your a show: I would suggest something that isn’t too deep, like a comedy. Maybe even a movie you have watched before as you will have to kind of pay attention to the hand sewing until you get hang of it. Unless of course you have a sewing machine, then you can ignore this entirely.

Sew: First, using the embroidery floss, sew a square onto the center of one of the teeth. This will serve as the pocket so you will only want to sew the bottom, and two sides. I used a straight stitch.


Then, on the other tooth cutout sew your heart using the same stitch.

Next, putting the wrong sides together (meaning the heart and the pocket facing out, begin sewing the two tooth pieces together using a whipstich. NOTE: Make sure not to stitch the entire way around because you still need to fill the pillow. 

Fill: After the pillow is stitched about 3/4 of the way around, using your pillow fill or some cotton balls go ahead and fill the pillow just an tiny bit. NOTE: If you stuff the pillow too much it will be difficult to get teeth and treasures out of the pocket.


Finish it Up: Finish sewing using the whipstitch.

Voila!


What milestones of your children are making you sentimental? Any of them inspire a craft?

If you like this post and would like to read more about all things domestic with a touch of humor, become a Home Everyday follower! For blog updates or to see other places I write such as ChicagoNow or Chicago Parent follow Home Everyday on FacebookTwitter, and Pinterest.

A 2015 Mantra: Simplicity, Creativity, Generosity, and Gratitude

Hello, 2015! I feel like I have been waiting for you to get here for a few weeks now.

I have never been one to wish away my days. In fact, I would consider myself to be about as sentimental as they come. Hoping to soak every last minute, second, moment out of an event or milestone.

I also always felt that a new start can begin at any time. You don’t need a new year to begin a new routine, to try something new, to start fresh.


A new desk to refinish! Hooray!

Like anyone I have always made goals throughout the year. Specifically, I do this at the beginning of every school year, or even at the beginning of a season. I know statistically I am destined to fail at the beginning of a new year, so I try not to pressure myself too much. Mostly, I am happy if I get the Christmas crap down before I start debating if I should start a new trend known as the “Valentine’s Bush.”

However, for some reason, I am feeling like 2015 was just whispering me to come along and get moving with it.

2015 just seems like a nice even number. Years from now I can say something like, well in 2015 I started my book, or in 2015 I took a meeting with an executive at Netflix about my series, etc. etc. Also, 2014 gave me some good and bad experiences that helped give me the skills I need to help me achieve those goals, and give me a little perspective.

Rather that make long list of goals with detailed milestones, and then when those goals are inevitably unmet, crying and falling into a slump an ice cream despair a Netflix binge watch session while eating Twizzlers in my bed, I decided a long list was not the way to go. Instead, I would focus on a few simple words that would become my mantra for every area of my life.

This will be the year of simplicity, creativity/productivity, generosity, and gratitude.

When there is a decision to be made, something that needs to be done, a problem to be solved, or when I am feeling aimless. I will ask: Is this simple? Is this creative or productive? Am I acting generous? Am I acting with gratitude?

Simple: Last year I think I wanted to do too much, and in doing that I got overwhelmed very easily. Whether it be with writing, responsibilities with the kids, household projects, or anything. I was overdoing it. I also think that when things become overwhelming, more waste is created, more money is spent, more time is wasted. I just want to simplify and streamline things. I consider myself to be a pretty organized person, but there is only so much an organized person can do in a day too, and I realized that everything I was doing was done quickly, last minute, and without my eventual end goal in mind. I need to simplify. So, some things will have to be cut from the list. If something isn’t for the betterment of getting my end goal (helping my family, writing career, saving money, streamlining) I have to say no or it has to go.

Creativity/Productivy: There are times, when I am the biggest time waster of them all. I was watching Aziz Ansari’s Dangerously Delicious comedy special and how he talked about how he gets distracted on the internet doing Joe Pesci research. I laughed particularly hard, because as I was watching this, I was elbow deep on IMDB looking up the complete filmography of Mary Lynn Rajskub (don’t know her, look her up) because of a very minuscule scene she was in on Gilmore Girls that I had watched two days prior. I scoff at your time wasting, Aziz Anari! Long story short, if I am not doing something to create or produce (i.e. better myself, my health, my family, my writing) I think it has to go too.

Generosity: I am bringing back the email. Remember when you’d open your inbox and there would be an email from someone just to check in and see how you are, and not a a bunch of Zappos coupons and Zulily ads? Hell, I might even bring back snail mail. The post office might even stay in business because of me this year. I just want to be more generous with my words this year as well as my time, my cooking, my baking, my comments, and Facebook shares with fellow writers. I want spread the love.

Grateful: I’m just going to say thank you all the damn time. There is always, always, always something to be thankful for. Always.

Simplicity, creativity, generosity, and gratitude. I should probably write that down somewhere.

What is going to be your mantra for 2015?

If you like this post and would like to read more about all things domestic with a touch of humor, become a Home Everyday follower! For blog updates or to see other places I write such as ChicagoNow or Chicago Parent follow Home Everyday on FacebookTwitter, and Pinterest.