Tag

recipes

A May 2014 Wrap Up

Happy Sunday, readers. I typically shy away from posting on the weekends. However, I realized that I kind of miss doing my monthly wrap-up posts. They are a great way to look back, and they actually help me to plan for the upcoming month.

May finally brought with it nice weather in the Midwest, which meant plenty of recipes using fresh and vibrant flavors like mild pineapple salsa. Also, in Spring I cannot get enough of salads, so I shared my favorite tips for making the perfect salad.

In addition to spending more time outdoors planting and playing, I have also loved the opportunity to take my laptop outside and get some work done on the patio. It has been a great respite from being huddled up inside. My friend Kari of A Grace Full Life blog, invited me to a blog tour where I shared more about my writing process and to continue the trend I asked my friend Elizabeth of The Circular Home to share her process as well.

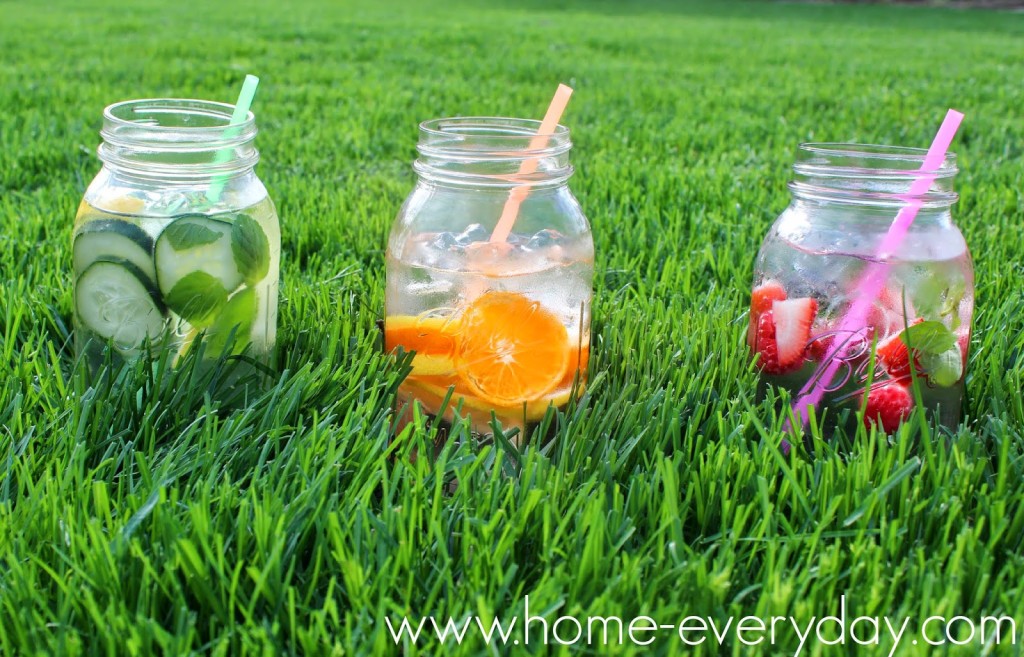
Then, for Thirsty Thursdays (my favorite day of the week and yours) in May I was able to try out some of my new favorite drainable recipes! To get ready for The Kentucky Derby I shared two recipes for mint juleps (Irish Mint Julep, and Virgin Julep Tea) fit for whether your guests like alcohol or not. Then, I tried out some flavored waters by using some fruits and herbs to freshen things up as things heat up. The kids loved trying out a recipe for pure vanilla milkshakes, and I was able to re-create some fresh pink lemonade from one of my favorite movies.

In May, I was also given the opportunity to partake in a wonderful day with hhGregg and Maytag to discuss happy homes, and Home Everyday was able to offer its second every giveaway!

Finally, May saw the first every installment of #FridayFail, where I the first of many stories of mistakes made when it comes to DIY. Let’s just say, we have been much better about checking our light bulbs around here.

Looking back at May, I cannot believe how busy it was, and how fast it went by. Summer is here which means it is time to start sharing some outdoor, and perhaps I will be able to do some painting outside.

If you like this post and would like to read more about all things domestic with a touch of humor, become a Home Everyday follower! For blog updates or to see other places I write such as ChicagoNow or Chicago Parent follow Home Everyday on FacebookTwitter, and Pinterest.


Follow on Bloglovin

Commence My Yearly Organizational Freak Out Oh and I Made Mason Jar Salads

If this post seems a bit spastic, I want to apologize. This is the time of year that I start organizing drawers, cabinets, and closets. I also try to purge what we are no longer using and start making list upon list of things that need to be bought and organized.
Why all the craziness? School is starting soon. I have always treated the beginning of the academic year as my own personal January 1st. I will sometimes still make New Year’s Resolutions in January, but I have always felt that September is a great time of year to start with new routines.
Last day of school last year.
Last year, I panicked a little bit about our entry storage. I knew that with kids starting school and sports they would be bringing home all kinds of things that would need to be storied. I did some major organization in our front hall with converting our closet to one with hooks and a bench and baskets for the kids to easily put away their things. I also created like a command center by using an old dresser.
This year, I started to panic about the kitchen.
I was filling out the calendar with some upcoming events and schedules, and I realized there are going to be a lot of nights that we will be eating dinner in a hurry. Then, I looked at the pick up schedule for the day, and I realized that there will be a lot of running around in the middle of the day too.
That is when I decided it was time I organize every kitchen cabinet, clean out the fridge and freezer and start some batch cooking.


I scoured the internet looking for lunch ideas and I of course found the crazy popular phenomenon of Mason Jar Salads.
They are EVERYWHERE, and now they are in my fridge too!
I decided to try my hand at these delicious looking and healthy lunches (and in a pinch dinner).
I was able to find Mason jars pretty easily. This is a great time to buy them as people are harvesting from their gardens and pickling all kinds of veggies. I got a box twelve 32oz jars at Target for ten bucks.
I washed them thoroughly and made sure they were COMPLETELY dry. Nothing wilts a salad faster than added moisture.
Next, I prepped all of my veggies. I wash, dried, sliced and chopped everything I would need.
Then, I poured about one or two tablespoons of my favorite dressings in the bottom of the jars.
Next, I started stacking. I hunted around the internet looking for the best way to stack, and here is what I found:
– Hearty veggies first. Carrots, cucumbers, unsliced grape tomatoes, or peppers. These veggies will hold up in the dressing, also will taste delicious as they have been marinating in it for awhile.
– Next comes proteins, grains or cheeses. These will help to create a barrier for the lettuce to keep it dry.
– Last is the lettuce or in my case spinach.
– Last put a tiny piece of paper towel on top of the lettuce and close up the jar. The paper towel will help to draw out any extra moisture, but don’t forget to remove it before you shake up your salad to eat it.
I made a few of my favorite salads for the week. I made Mexican quinoa salad, which didn’t really need to be stacked as it contains no lettuce and hearty veggies.
Then, I put together a basic garden salad with balsamic dressing.
Next, up was strawberry vinaigrette, chicken, goat cheese, cucumbers, whole strawberries and spinach.
Finally, I made a more elaborate Caprese salad with extra veggies and fresh mozzarella and mixed in some basil with the spinach.
Put the jars in your fridge. The next time you are hungry, grab a jar and a fork, shake up the salad with the dressing and have a delicious and healthy lunch.
This is a routine I can get used to!
Anyone else freaking out about the start of school?

If you like this recipe and would like to read more about DIY, gardening, cooking, baking or all other things domestic, become a Home Everyday follower! For blog updates or to see other places I write follow Home Everyday on Facebook here.

Follow on Bloglovin

LINKING UP AT SERENITY NOW FOR WEEKEND BLOG READING!!

A Blast from the Past: Recipes

There seem to be few things that can take you to the past like food. While I agree, old photographs and mementos can remind of you certain moments of you life. The smells and tastes of certain foods can immediately take you back in time to experiencing a moment again.

Sometimes, I like to think of food as a time machine.

There are certain recipes that I make to remind me of certain people. There are recipes in my family that come to be known by the person’s name, simply because it reminds us of them.

We have a recipe for baked chicken that has come to be known as Nano’s Chicken. My Grandma Nano made it quite a bit. While it is a common recipe and can be found pretty easily, I make it from memory and think of eating dinner with my family at her house.

I have been trying to master zucchini frittata for years, as it reminds Brian of his own grandmother. When I first made it for him, he immediately started telling stories of sleepovers and stopping by his Grandma’s house after work.

A few weeks ago, my cousin emailed and asked if I had any old recipes. I am so glad she did. I asked my Mom and one of my Aunts if they had anything, and they had a few things for me.


After sending them to my cousin, I cannot wait to try some of them.

Perhaps, I will be transported back in time.

What are your favorite family recipes? What do they make you think of?

Home Everyday continues to send concern and thoughts to those affected by the events at yesterday’s Boston Marathon. 

Baby, It’s Finally Cold Outside: Snow Cream

In my neck of the woods, we have had kind of a mild winter (which I’ve been thankful for) However, there hasn’t been much of an opportunity for the munchkins to play in piles of snow as most of the time our yard just looks like a muddy mess.

This past week, we got a few inches of good, heavy, packing snow. The kids were thrilled.

By the time the snow stopped falling, it was dark outside, and too late to play in the snow. However, I remembered I had seen recipes all over the internet for how to make snow cream, and thought it might be a good way to hold them over until we could play in the snow the next day. When they heard the words snow cream, they forgot all about playing in the snow before bed.

The first order of business was for Brian to bring in a huge container of snow.

Hold ’em over til tomorrow Snow Cream

2 zip lock bags (one large and one small I used a 1 quart bag and a snack size)
1/2 cup cream
1 Tbs sugar
1/2 tsp vanilla extract
3 cups snow
2 Tbs Kosher salt

In the larger bag, put snow and salt. In the smaller bag, mix cream, sugar, and vanilla and seal as tightly.

Place the smaller bag in the larger bag filled with snow and seal tightly.

Finally, squish the bags all around for 20 minutes or until an soft ice cream consistency is formed. *NOTE: You may want to wrap towels around the bags so little fingers don’t get too cold while squishing.


Finally, enjoy!

Ours was a little liquidy, the kids used spoons and straws. But there were no complaints.

Honey Wheat Bread and Grilled Cheese [How I Get Around a Food Allergy]

My kids have a few food allergies. I feel bad for them sometimes because they have to be denied certain foods that other kids get to have so regularly, but overall, they are very healthy.

One of the allergies that we have at our house is an egg white sensitivity. We call it a sensitivity, as it is not severe, and according to the doctor, it will probably be outgrown over time. Egg whites are everywhere it seems, including bread. This is why sometimes I make my own bread for the kids. There are a few brands out there without egg whites, but if you suffer from an allergy, it is nice to have a recipe that you know EXACTLY what all the ingredients are.
My cousin, Sarah, sent me a recipe last summer from allrecipes.com It is a Honey Wheat Bread that is outstanding. It is pretty simple to make for the first time bread baker, and you can make a few alterations to the recipe. For example, Sarah’s suggestions were to change up the white to wheat flour ratio, or possibly add some flax seeds or sunflower seeds.
Just like last week’s french bread recipe, I wanted to share some things we like to make with Honey Wheat Bread. Brian and I love it toasted with the chicken salad recipes I shared on Tuesday. The kids absolute favorite is Pear and Cheddar Grilled Cheese. 


Pear and Cheddar Grilled Cheese
1/4 of a large pear cored and sliced thin
2 sandwich sized slices of sharp cheddar cheese
2 slices honey wheat bread
1 tbsp unsalted butter softened*Disclaimer: If you know how to make grilled cheese, skip the directions. I actually felt weird typing them out, but I figured someone (cough cough Brian cough) could use them.


Spray a small skillet with non-stick spray and preheat over low heat. Then using a butter knife, divide the butter evenly and spread on one side of a piece of bread. Place the slice of bread butter side down in the skillet. Quickly add one slice of cheese on the bread, then the pears.


Finally, add the second slice of cheese. Butter the second slice of cheese with the remaining butter, and place butter side up on top of the sandwich. When the bread is starting to brown and cheese just starting to melt, this takes about 2 minutes. Using a spatula, flip the sandwich over, and cook until the cheese is completely melted. Serve while still warm.


Know Anyone who Doesn’t Like Chicken Salad? Me either…


Remember this clip from Scrubs? I still love that show. It is one of the only shows I own on DVD, so sometimes it comes up in conversation.Anyway, it’s summertime, so as much as I love the warm weather, when it gets REALLY hot (as in the heat index was about 108 degrees last week) I like to stay away from the stove, oven, and even the grill as much as possible. This is when I start breaking out the chicken salad recipes.

Brian likes chicken salad (is there anything he doesn’t like?), and he doesn’t mind eating it for lunch or dinner. I’m sharing two recipes that have been family favorites for years, and are perfect when you don’t want to be near anything hot, as I use precooked rotisserie chicken from the deli section of the grocery store. However, you can poach or cook your own too.

The first recipe is one I kind of adapted from a few other recipes based on likes and dislikes. The second recipe is one that my Mom used to make all the time.

Sweet Chicken Salad

3 cups cooked chicken chopped
1/2 cup dried cranberries
1/2 cup green grapes diced
1/2 cup celery diced
1/2 bell pepper diced
1/3 cup mayonnaise (more or less depending on taste)
Salt and Pepper to taste
Red Onion Slices
Lettuce leaves
Favorite sliced bread, wraps, or rolls
Mix first eight ingredients until well incorporated. Serve on bread/wrap/roll with lettuce and red onion slices.
Mom’s Chicken Salad
1/2 cup raw slivered almonds
2 1/2 cups cooked chicken chopped
3 medium size stalks of celery diced2 green onions diced
1/4 cup sour cream or plain green yogurt
1/2 cup mayonnaise
2 tbs fresh dill removed from stem and chopped
1/2 cup of seedless grapes cut in half
Salt and Pepper to taste
Lettuce leaves
Favorite bread, wraps, or rollsIn a small dry skillet over low heat, put in slivered almonds and heat until fragrant. This takes about 2 or 3 minutes (don’t burn), and set aside in large bowl until cool. Then in the same the with almonds, add chicken, celery, green onions, sour cream, mayonnaise, dill, and  salt and pepper and combine thoroughly. Serve on bread, wrap or roll with lettuce leaves.

Enjoy!