Tag

how to

A Novice Blogger’s Guide to PicMonkey

If you like reading Home Everyday, you can vote for me to win The Best Home Projects and DIY Blog at Apartment Therapy’s 2013 Homie Awards here
Thank you so much!


A few weeks ago, a blogger friend, Nikki (More for Four) asked me how I get labels and things on my photos. I told her I could do a quick tutorial of PicMonkey to show how I use it to quick edit my photos, add labels and make collages. The features I use most are cropping, exposure, labels, and text. In this tutorial, I will show you the steps I use most often when editing a picture. I will then show you a few tricks to creating a collage.


Editing


1.) Open your internet browser, and go to www.pickmonkey.com (it is free and there is no registration). The main page looks like this:


2.) Click on Edit Photo. A window will open asking you to choose the photo you would like to edit. Choose the photo, and click Choose.


3.) Once you have chosen your photo, on the left hand side of the screen, there is a list of editing options on the far left indicated by pictures. They are Basic Edits, Effects, Touch Up, Text, Overlays, Frames, Textures, and Themes. The three I use are Basic Edits, Overlays, and Text.


4.) The first thing I do, is crop my photo.


5.) I then adjust the exposure.


6.) Next I click on the Overlays button on the left, and choose my overlay, as well as color. (once you choose an overlay a window opens allowing you to adjust color and if you would like it to fade). You can adjust size just like you would adjust the size by clicking, holding, and dragging the dots around the edges of your overlay. You can position your overlay, by clicking it and dragging it to its location.


7.) I then add text. If you would like your text to appear inside an overlay, you must do the overlay part first. Then you can position text on top. This process is similar to the overlay. You can choose a font, and then click add Add Text. A window will appear so that you can adjust color, fade, bold, center, etc.


8.) Once you are done making all your adjustments. You can click Save at the top of the page. Choose where you would like to save it, and give your photo a name.


Making a Collage

1.) Open your internet browser and go to www.picmonkey.com
2.) Click on Create a Collage
3.) On the left hand side, click Open Photos. This will allow you to choose any photos you would like included in the collage. (NOTE: For ease, I suggest first editing any photos before making the collage.)
3.) Once you have chosen your photos, you can now choose a layout.
4.) Once you have chosen your layout, you may now click back to
5.) Finally, you can drag and drop your photos where you would like them. If you want to remove a photo or move it location, you may click the small gray X in the corner of each photo and drag and drop again.
6.) Save just as you would when editing.
There you have it. My novice blogger’s uses for PicMonkey. I know it isn’t nearly elaborate as using PhotoShop, but it works for now, it is easy, it is free, and I have been happy with how the pictures have turned out thus far.
Hope this helps!
Linking up today at Serenity Now for Weekend Bloggy Reading!


Not as Hard as I Thought: Painting Stripes

Over the summer, we noticed that some of the paint around the shower in our downstairs bathroom was starting to peel and bubble off the wall like this:


After talking to some bathroom experts, they advised us to re-caulk everything in the shower to prevent water seeping onto the drywall. We hired a professional to come and make sure that every corner of the shower was water tight. After a few weeks of making sure there were no more leaks, I decided to re-paint the bathroom.

This room was left pretty much untouched out of necessity. It was the only working bathroom in the house when we moved in, as the upstairs bathroom was getting a few facelift type upgrades (you can check that out here). Now that I have the time to paint (sort of) and we have another bathroom we can use while I work on this one, I thought I would patch up that nasty drywall and give it a fresh coat of something new.


The room is so so small, however it gets a great deal of sunlight from the window, so I wanted to do something light and soft. I also wanted to take into consideration the fact that Brian and I have been mulling around painting the nearby family room in the next few months and we like rooms to kind of flow. After seeing these beautiful pictures from my favorite blog Young House Love (I actually got to meet these creative geniuses in November, you can check that out here), I thought I would try some horizontal striping in our small bathroom too.

Brian and I made the trip to Home Depot and picked out the two perfect shades of soft gray. The base color for the room is Behr’s Barnished Clay in satin and the darker stripe is Behr’s Perfect Taupe also in satin. The paint expert at Home Depot said the satin finish is perfect for bathrooms for easy clean-up.

This is what it is looking like so far:


Brian and I think it has turned out better than we could have imagined. This technique is pretty easy and I used time saving tips for lazy people on striping from this Skinny Boppy for help (anything that caters to lazy people is up my alley). We are already thinking of other places to incorporate this easy technique. I still have to do the other walls, and as you can see I still have paint supplies all over the bathroom, but I couldn’t wait to share the progress. Hopefully, I can have a finished room to show at the end of the week. In the meantime it is time to put the paint clothes back on and finish up the stripes.


Our Garage Sale: Also Known As a Horders’ Heaven

Having a garage sale is no small feat. It does takes some work and some planning, but after hosting our first garage sale a few weeks ago, I would definitely do it again. We made some extra cash AND we have the added bonus of having more room in closets, drawers, garage, and sub-basement.

Brian and I had never hosted a garage sale before, and we weren’t sure where to start, but we knew we had plenty of useless crap great treasures to sell. Usually, when we are purging, these things make their way to our local GoodWill or to a local charity, but we decided a few months ago that we would start a “sale pile” in the basement. As we did our purging we would save it for the garage sale instead of donating it. Before we knew it, we had a pretty large pile going (it was about to topple over), and it was time to set the date and register.


Brian and I looked in our local newspaper to see if there were any town events coming up. We thought that if we picked a weekend that more people would be visiting our neighborhood, maybe more people would stop by our garage sale. The weekend we hosted our garage sale was the weekend of our town’s art festival as well as a huge charity benefit at the church across the street from our house. This kind of planning really paid off, as a lot of people would wander over from across the street or on their way to the art fest.

Once we set the date and our registration was complete the REAL work began. The week before our garage sale, we did some advertising. We advertised on craigslist and by placing signs all over our neighborhood. Both of these forms of advertising were free!(TIP: If you are having a garage sale, please make sure your signs are large, legible, sturdy, and have all information. Also, include pictures and details about what is for sale in your craigslist posting).


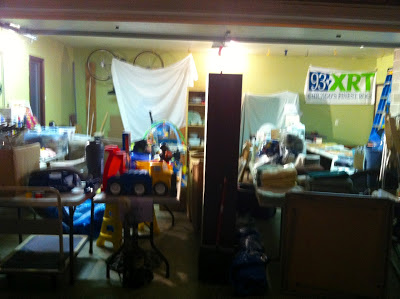
Next, I got rid of everything in the garage that wasn’t for sale. I made sure to put our lawn mower, snow blower, wagon and kids’ bikes in our shed.  Also, anything that could be hung from the walls or ceiling, I hung up and then draped with sheets. This helped make room, and discourage potential buyers from asking me about things that were not for sale.

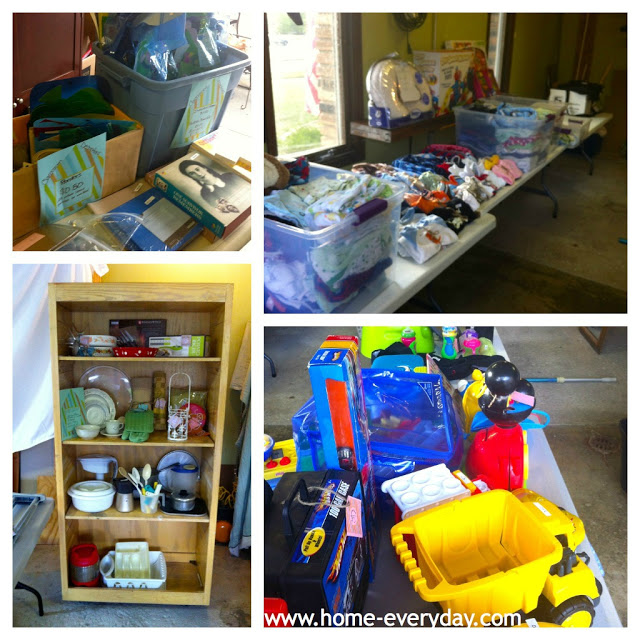
Once the garage was clear I put in several long banquet tables (we borrowed about 9) so I would have plenty of room to display items, and then labeled each banquet table with a sign signifying what kind of items would be on the table. The categories of items I had were: Baby Clothes (sizes 0-3, 3-6, 6-9, 9-12, 12-24), Toys, Baby Gear, Kitchen Supplies, Housewares, Teaching Materials, School/Office Supplies, Books and Media, Clothes and Jewelry.


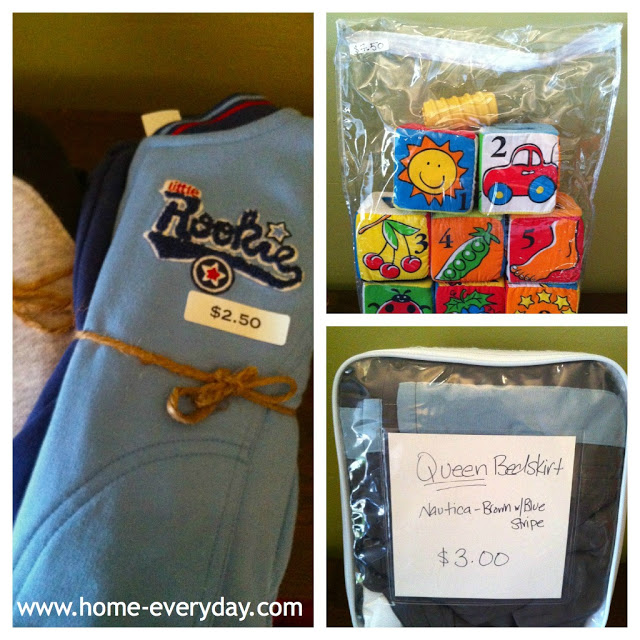
The next thing I did, was create a “one touch policy” on all items to save time. Basically, what this means is: when I brought an item up from the sub-basement, I packaged it, priced it, and put it exactly where I wanted it to be the day of the sale. This saved a bunch of steps. I didn’t have to sort all the items into groups, then go back and package or group the item, and then go back again and price the item, and then re-sort the items for display in the garage.

I know it sounds weird to “package” items, but this is where my Type A personality was brought to light. I tried to pretend I was the customer. If I had a baby outfit that included pants and a shirt, I would fold the item, tie it together with twine, and then put a price tag on it. With sheet sets I would fold the fitted sheet, flat sheet, and shams all together and put in a large ziplock bag. Then, I would label the bag with the sheet set size, what was included, and the price. I also tied together place mats, cloth napkins, toys, earrings, silverware sets, and dish sets. All of these items were labeled in detail. Long story short, if it is a set or is supposed to be together, keep it together. (TIP: The cleaner and prettier items are displayed the more likely people will want to buy what you are selling. I got several compliments from buyers on the cleanliness, and organization of the items I was selling. Also, price your items fairly based on condition, cleanliness, and if you have a complete set).


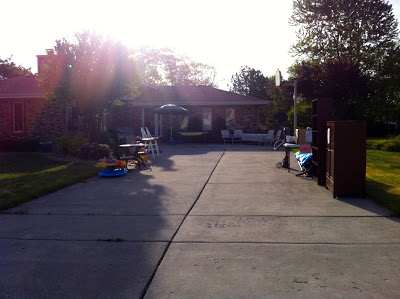
The last thing I did was to move any furniture I was going to sell to our driveway. Brian and I thought if some of the big ticket items were on the driveway, it might catch the eye of people walking past our house.
Finally, garage sale day was here! Brian and I went into the day with the mindset that our stuff is not gold. To us, these items were something we don’t need or want anymore, and if we weren’t really willing to haggle, then we shouldn’t be selling the item at a garage sale. Because of this mentality, we did a little bit of haggling, but most people thought our prices didn’t really need any adjustment, and were willing to pay the price that was on the item. I did however offer a few deals. For example, if someone bought 5 baby outfits, I would tell them to go pick out another one for free. That was my way of saying, thank you for taking our old stuff away.  A new teacher asked if she could buy all of my old classroom decorations at one price for the whole bin, and since she was taking the whole bin off my hands, I gave her about two dollars off each item in the bin. (TIP: How you price items at a garage sale does help people buy more, so do your research ahead of time).
All of the organizing and research had completely paid off. For a little bit of work we walked away with a pretty hefty sum and a ton of compliments. One woman even came back three separate times with different friends every time, AND she bought something every time. I really believe that a garage sale is one of those things that you get out of it, what you put into it.