Category

Outdoor

In Case of Emergency: DIY Address Plaque

We are already getting flyers about fire prevention week coming up in October. Which in addition to making sure the smoke detectors are checked, the fire extinguishers are up to date, making sure we reinforce fire safety with the kids like how to get out of the house and where to meet, I was also thinking I should probably knock something off my to do list that has been on there forever.

We need an address plaque on our house, and of course I wanted to make it myself.


We have our address on our mailbox, but I have always thought it would be a good idea to label the house too. It is better to be safe than sorry.

So, I went to my favorite place for inspiration. Pinterest.

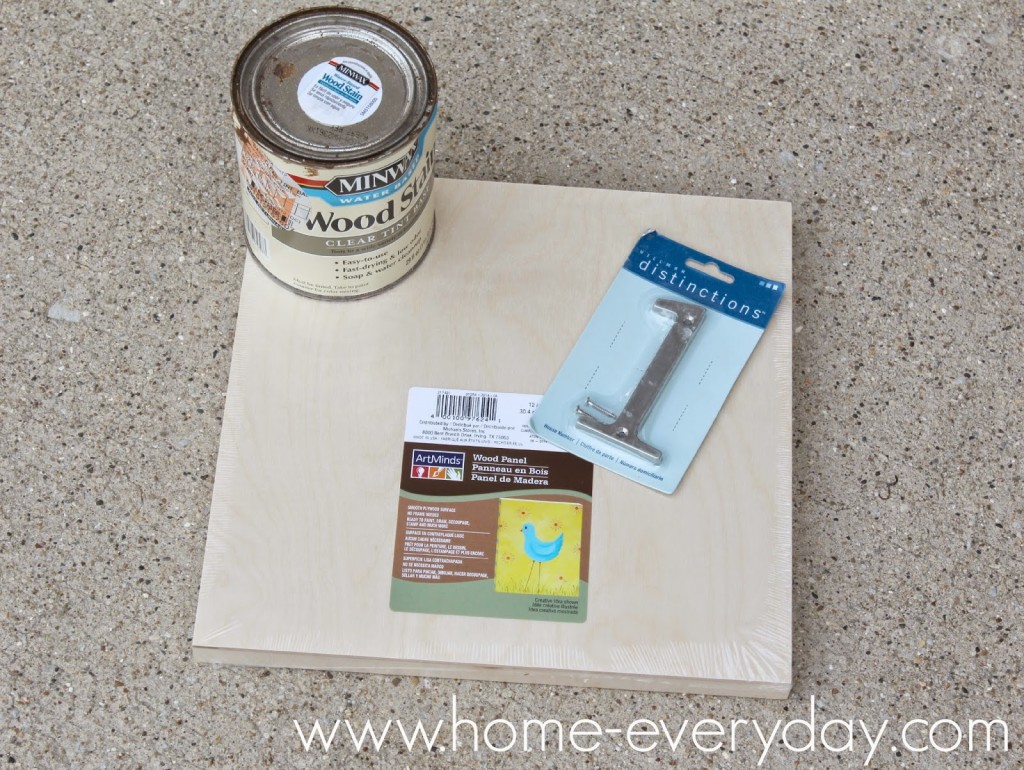
I found a few ideas, and then decided to come up with a cost effective idea of my own, using a wooden canvas I was able to get on sale at Michael’s, leftover stain from the dining room table project, and stainless steal numbers from Home Depot.

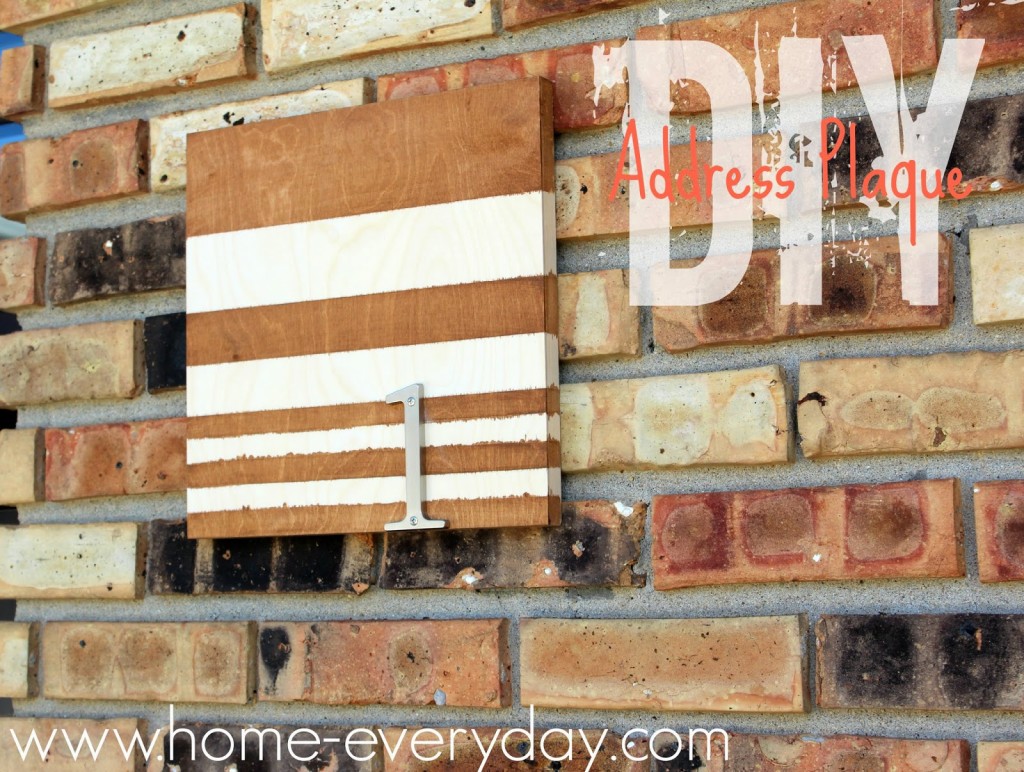
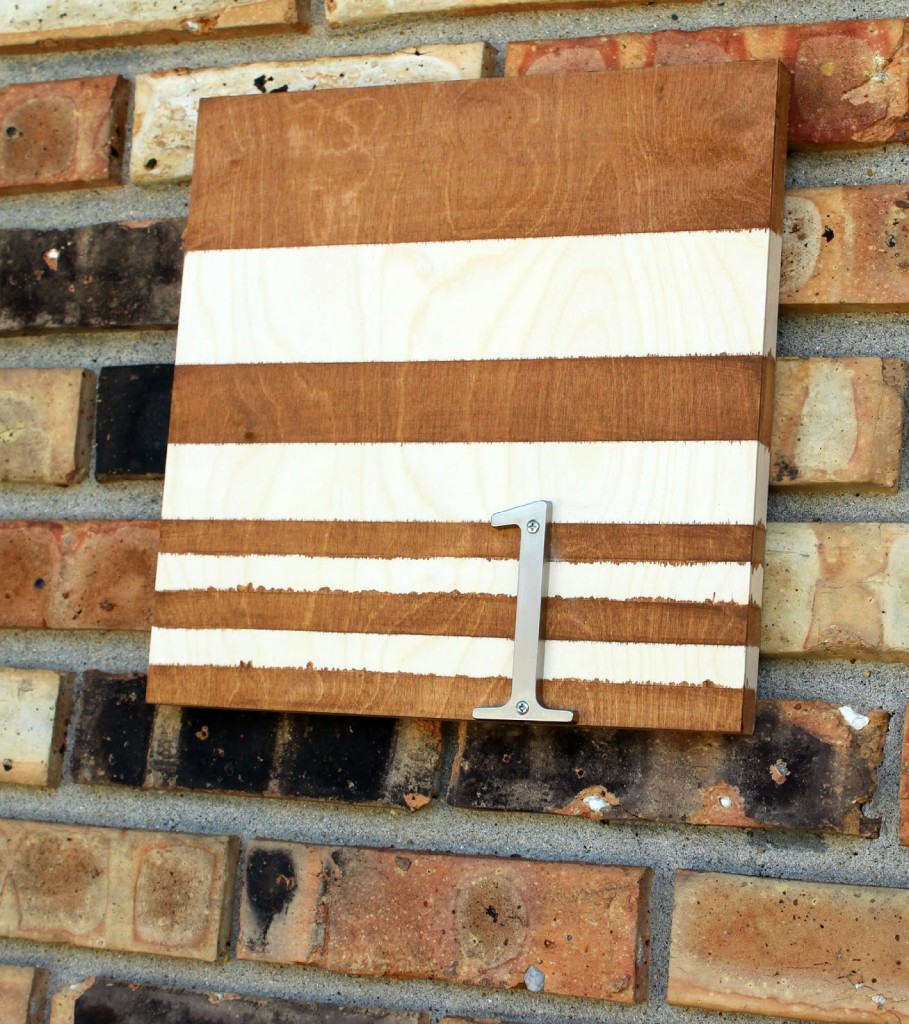
I created a two tone address plaque that is good for any season. A DIY project and something that makes my family safe?! Awesome!


Supplies
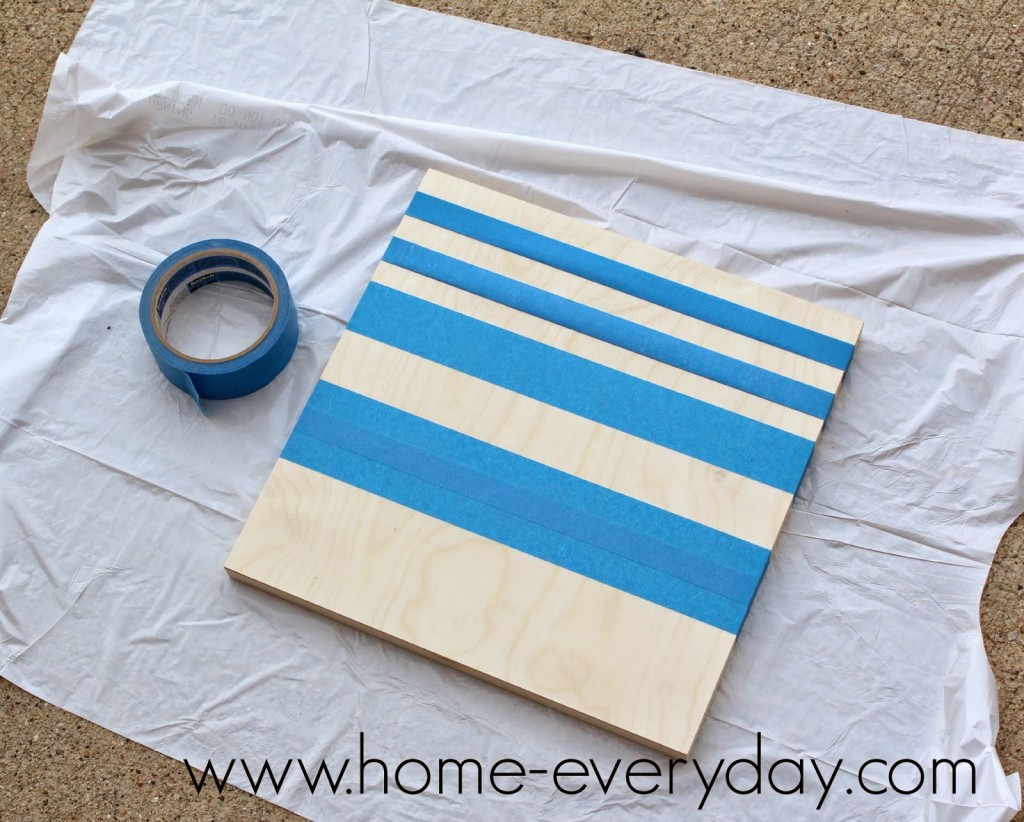
12″ x 12″ wooden canvas
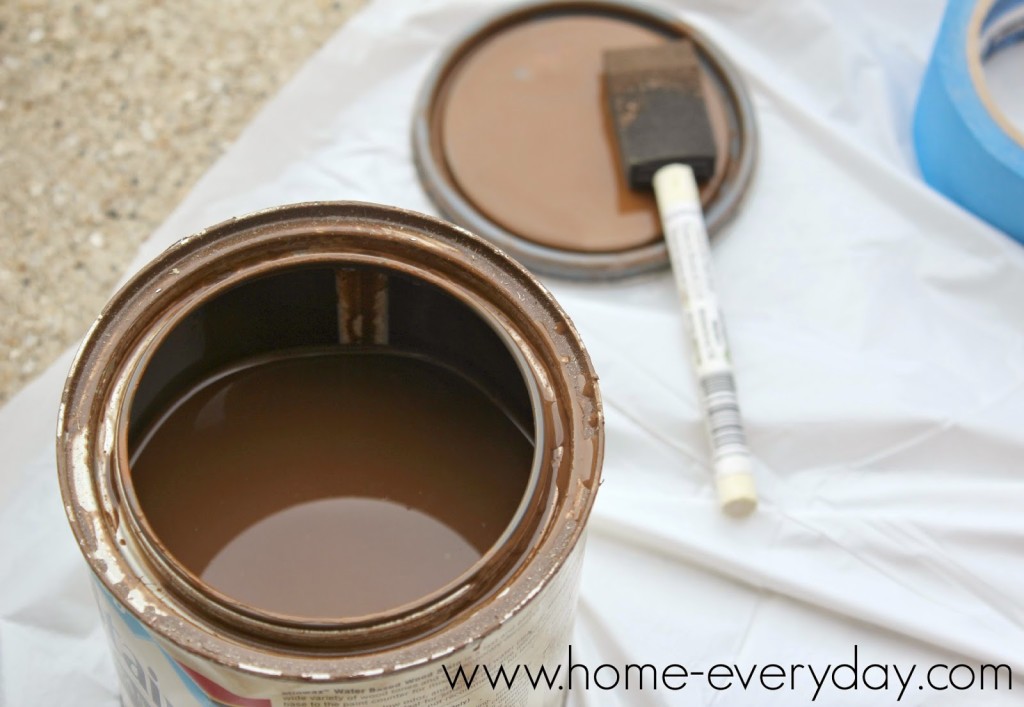
Acrylyic Wood Stain (Minwax Clear Base)
Painter’s Tape
Paint Brush or Old Rag
Metal Numbers with Screws (I used 4″ numbers that could be seen from the street.)
Hardware to Attach Plaque to House
Screwdriver
Drill
Drop Cloth


Step 1: Wipe off any dust or debris that might be on the wooden canvas. You want the surface completely clean for taping and staining.

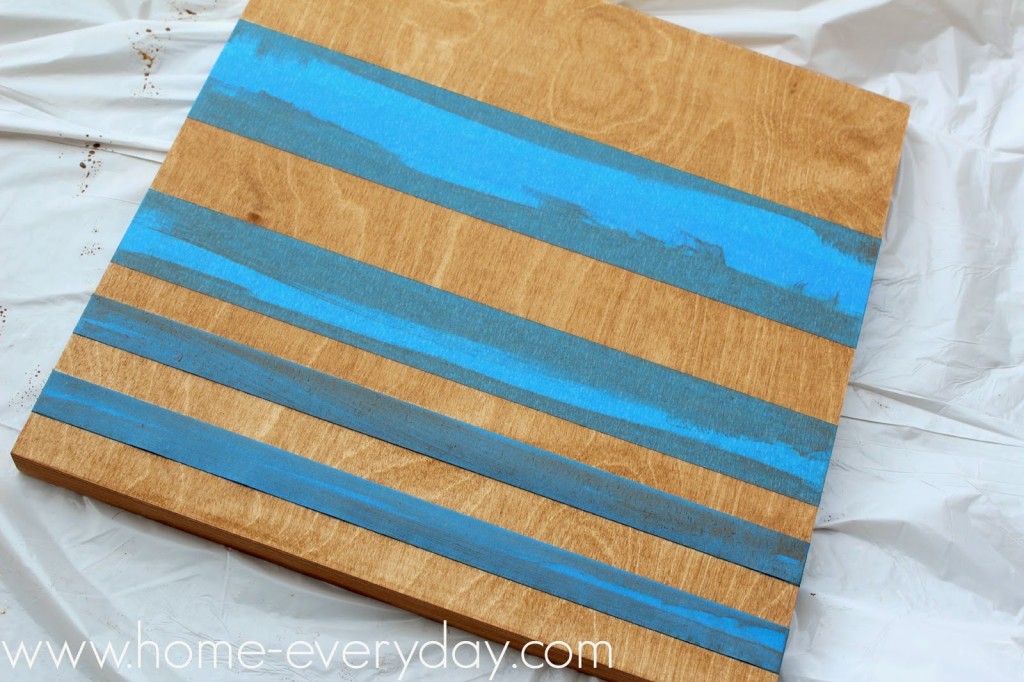
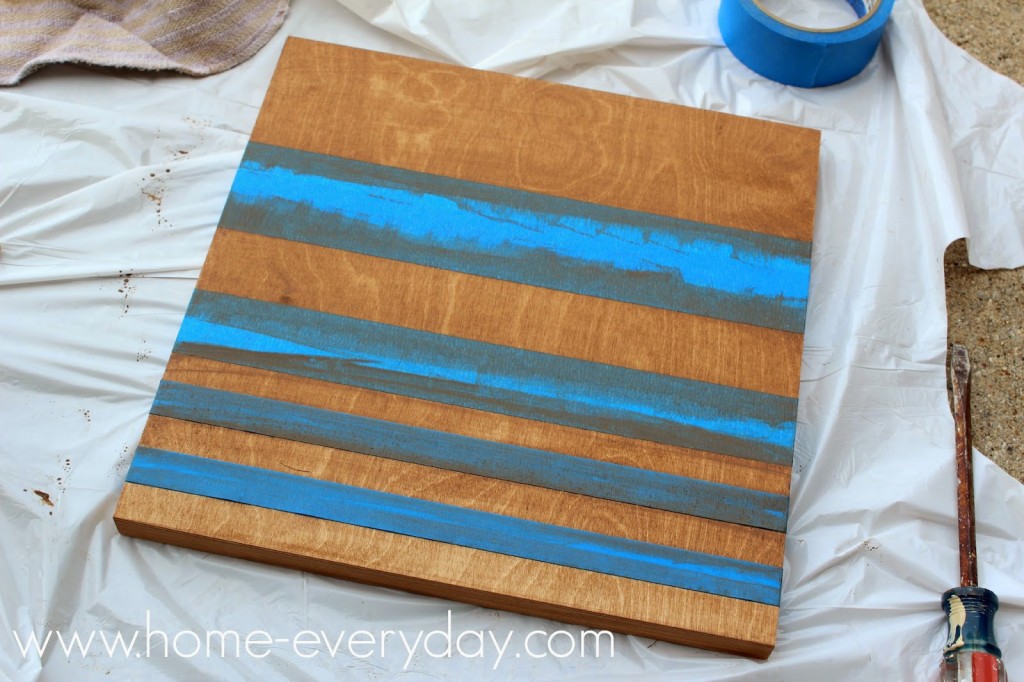
Step 2: Tape off the pattern that you would like on your canvas. I did a random stripe pattern, but chevron or diagonal stripes would be fun too. NOTE: Make sure that you press the tape firmly into place as stain is watery and can seep under painters tape if not adhered firmly.


Step 3: Using a sponge brush or rag, gently apply stain according to manufacturers instructions. NOTE: The more coats of stain applied the richer and darker the color. I applied three coats, making sure to allow ample drying time between each coat.


Coat 1:


Coat 2:


Coat 3:


Step 4: After the stain has dried remove painters tape. Using a screwdriver drill carefully attach letters where you would like them using predrilled holes.

Step 5: Hang on your house in a place that is easily visible from the street. We hung ours near the front door.


What will you be doing to get ready for fire prevention week?

If you like this post and would like to read more about all things domestic with a touch of humor, become a Home Everyday follower! For blog updates or to see other places I write such as ChicagoNow or Chicago Parent follow Home Everyday on FacebookTwitter, and Pinterest.

Follow on Bloglovin

Linking up at Serenity Now (http://www.serenitynowblog.com) for Weekend Blog Reading and Home Stories A to Z (http://www.homestoriesatoz.com)

Garden Progress and Tips for a Successful Vegetable Garden

Since we are midway through the summer and I gave a sneak peak yesterday, I thought it was time for a garden update.

A few weeks ago, I mentioned that while the vegetable garden was making wonderful progress, the bunnies in my yard thought it was delicious too. I got several suggestions to keep them at bay, but there was one thing I did that worked perfect.

Nothing!

I think the bunnies have lost interest. Also, some of the plant are getting so large, and some of them are a bit prickly. I don’t think the bunnies are too fond of either of those things. Also, the plants that got munched on are starting to return.


While, the garden isn’t quite ready for harvest yet, I am so happy to report all my plants are doing phenomenally.

Would you believe I started this garden from seed?

I cannot wait to make zucchini bread!

If you would like to read more about Gardening, DIY, Cooking, Baking and all other things domestic you can check me out on Facebook or become a follower of Home Everyday here

You Better Bring It: Bunny Control


Picture yourself, waking up late on a Saturday morning with
no alarms. There is just the faintest sound of little pitter pats running into
your room and little kids yelling, “Can we have Chocolate Milk?!” Then, you let
the little ones climb into your bed and as they are looking out the window,
they say, “Mommy, Daddy, BUNNIES!”
They giggle and watch the bunnies, we all look out and see a
little teeny gray bunny hopping around the yard stopping once in awhile to
nibble on some grass. The kids giggling and shouting words like, CUTE, SNUGGLY, and FLUFFY!
Those images are cute, right? Bunnies are cute. They are fun
to look at with their little cotton like tails and fluffiness. That’s why there
are hundreds of children’s stories surrounding bunnies, rabbits, and hares.
They are lovable. I mean who doesn’t love a bunny?
ME! That’s who! Not anymore anyway.
The weeks I spent planning, and the care taken to buy just
the right amount of mushroom compost, and have the kids help me water, and
fertilize. The strategic placement of broccoli, carrots, lettuce, peas,
zucchini, cucumbers, peppers, tomatoes, watermelon was all working out
wonderfully. The weekly weeding that caused my sunburned neck. Every morning I walk out to water the garden, I’m amazed that after years of killing houseplants, I can actually grow food.
The cute, sweet, and innocent little bunnies no longer seem
so sweet and are definitely no longer so innocent! They are ruining my garden!
They are like GOATS! They would probably eat tin cans if I tried to plant them.Check out these before and afters:


There is no way to sugar coat this, I’m angry. I’m going to bring it! Well, as much as I can bring it without hurting the bunnies.


I’ve done a little research, and have read about marigolds,
and cayenne pepper, and fences, but before I did anything that might ruin what
I have left, and before my neighbors start calling me Farmer McGregor, I thought I would ask a wonderful resource that I have right at my fingertips: You! My readers.
How do I get these bunnies out of my garden? (Yesterday, I
walked out to water, and there was a bunny sitting in the RAISED BED staring me
down as he ate my lettuce. I did the only thing I could think of and turned the
hose on the little buggar, and he scampered away, probably glad for the shower
on a hot morning.)
Also, will my vegetables come back? I am worried that I might have to replant some of these things. Is that true?
So, to all the seasoned gardeners out there,what should this novice do about the bunnies?

Brick Paver for Beginners

As I mentioned yesterday, the previous owners of this house left a lot of things behind for us. Some were annoyances that had to be thrown away, but other thing turned out to be some pretty nice gifts.

We have a beautiful and very spacious brick paver patio on the back of the house. It was here when we moved in and it was one of the only parts of the backyard that didn’t need some TLC. As a result of the brick paver installation, the previous owners had a lot of pavers left over, and left them on the side of the house.

Brian and I have been trying to think of a wonderful way to use them, and last weekend on a whim, we came up with the perfect plan.

Between my two raised beds it is a veritable weed trap. It is annoying. Also, after watering it becomes pretty muddy in there, and my shoes are a mess after trying to weed.

This is when we (For the record this is one of those times, when I say “we” I mean I came up with the idea and Brian executed it.) decided to put a small section of brick pavers between the garden beds to cut down on the weeds, and help save my cute new summer kicks.

First, Brian removed any weeds and raked up the soil. He then flattened everything out as best he could by hand. He also put down a good layer of weed killer to help prevent any weeds from growing in between the crevices.

We then started laying bricks in kind of a pattern between the beds. there is only room for 5 bricks between the garden beds so it was not hard to come up with a pattern. Starting from left to right. We started with placing two bricks vertically. Then we placed two horizonally, and then one vertically again.

The next row kind of alternated. We placed two horizontally, one vertically and two horizontally again.

Finally, the third row is one brick vertically, two horizontally, and two vertically.

Once we had a pattern we only had to repeat it one more time to reach the end of the small “walkway.” Also, we tried to mix up the colors a bit for some variety.

I know they don’t seem level in these pictures, but once the pavers were placed I had to put down the camera and start gently tapping them into place.

Once that was done, Brian took the leftover bullet edging from the mulch project a few weeks back and continued it in front of the garden beds.

The whole project only took about an hour, oh and did I mention it was FREE? Thank you previous owners, for leaving some of the things you did.

Voila! No more weeds (hopefully), and no more importantly, no more muddy shoes. I could have gotten a pair of gardening shoes, but I like the pavers better. The little walkway is also a nice place for my pots of herbs.

Also, from these pictures, you can see the vegetable garden is doing pretty well this year. I better get out there and weed the INSIDE of the beds now.

If you liked this project, and would like to read more about DIY, Cooking, Baking and all other things domestic you can check me out on Facebook or become a follower of Home Everyday here

It’s Easy Being Green

When we moved into this house, the previous owners had left behind a TON of stuff. I don’t think they were trying to make life difficult for us, I just think that there was only so much they could do. Regardless, there were a few things we ended up having to throw out, and a few things we were happy to score.

For example, we got some awesome patio furniture, box fans, and an assortment of nice ceramic planting pots. However, we also received some other not so useful things.

There was also this little guy waiting in the garden.

He has sat there now for the past three years, and he is sort of cute, but I thought he would be even cuter in a nice shade of green. Especially since we did some backyard updates, I decided this guy needed a makeover too. Kermit says it’s not easy being green, but honestly this project took maybe 10 minutes of my time. Therefore, EASY!

This past weekend, I grabbed a glossy can of leafy green spray paint, and I did a few coats. I made sure to protect the grass with some boxes and garbage bags. I also wore some gloves, my paint clothes, and sprayed him in the middle of the backyard with no chance of getting paint anywhere near the house, patio, or fence. I also made sure to let the paint dry for about an hour before I moved him.

I think Russell was the happiest about the transformation as green is his favorite color, AND frogs are his favorite animal. I know you shouldn’t judge a book by its cover, but let’s face it, the guy doesn’t have much else going on in the way of personality. Our old friend is new, and looks so much better.

If you liked this quick update and would like to read more about DIY, Cooking, Baking and all other things domestic you can check me out on Facebook or become a follower of Home Everyday here

An Herb Garden

If you follow my fan page on facebook, you’ll see I was picking some basil in my garden yesterday for lunch. Yes, I was making another caprese sandwich. I cannot help it, they are delicious.

As most of you know, this year marks the start of my second vegetable garden (you can read about 2012’s garden here, here, and here and 2013’s garden here). After lots of planning, and year of growing under my belt, I already feel more confident. However, there is one thing that I have tried over and over without success and that is growing herbs from seeds.

For whatever reason, my herb seeds never do well and very rarely survive. So, for the second year in a row I have bought herb plants at Home Depot, and put them in a pot near the vegetable garden.


This year, I decided to plant sweet basil, rosemary, Italian flat leaf parsley, thyme, in one pot and mint in another.

I chose herbs that I would use a lot of in my cooking. This is my first experience with mint, but I have to say I’m pretty excited about making some mojitos very soon.

Anyone else have an herb garden? Want to share some cilantro with me?

If you liked this post and would like more information on gardening, cooking or DIY projects, check me out on Facebook or become a follower of Home Everyday here


The Backyard in All Its Glory

I will never forget the day we first toured this house. We were so excited to see this house as it was in our “dream neighborhood”. It was a beautiful crisp autumn day. The trees lining the street to our house were every shade of orange, red, and yellow. The house next door had kids jumping in piles of leaves. The sun was shining.

When we first walked into the house, we knew we liked it, but after living in a two bedroom condo for the last few years a large backyard was a big priority for us. We saw the living room and the kitchen, but immediately asked our realtor if we could see the backyard. They opened the patio doors and the boys ran out into the sunshine in the backyard, and started kicking around a soccer ball they had brought. They were in love.
After looking at the rest of the house. So were Brian and I.
The backyard (as well as other landscaped areas of surrounding our house) has undergone some huge transformations since we have moved in two years ago.
When we moved in, we really like the brick paver patio, however there was a huge above ground pool with a rickety deck. Also, there were some trees and shrubs, but there were definitely some areas that were overgrown and needed some TLC.
Brian and I decided to just tackle the yard a little bit at a time.
The first order of business was to remove the pool and deck. Neither were kept up very well, and were not safe. So, Brian tore down the deck and pool.
Next, we had some landscapers come and remove any dead overgrowth as well as sod the area where the pool used to be. They added a little mulch area to add some plants.


Finally, Brian and I also built two raised beds for our vegetable garden. You can read more about how we built them HERE.


We were happy that the pool was gone and that there was plenty of room for the kids to run around, but the yard seemed unfinished.
This year, we decided to add a little more dimension to the backyard and asked landscapers to come back this spring to add some bullet edging and mulch to the entire perimeter of the backyard. Also, they removed some other dead bushes and trees, and added a few other elements such as a two more crab apple trees.


Also, on the side of the house was a huge island that was filled with nothing but some dead bushes and overgrowth.
The landscapers removed everything that was dead, kept the nice flowering tree, and surrounded that area with rocks and bullet edging that is consistent with the landscaping in the front of the house.
There are some other things in years to come that we would like to do, but for now we are happy that we have wide open spaces, a healthy lawn, and some mulched areas to add some flowers.
We’ve come a long way from this:
To this:


I think this weekend, we will celebrate with some s’mores in the fire pit!

Vegetable Garden 2013

Over the weekend, Brian and his Dad were able to get a lot of yard work done, and even helped to till the vegetable garden and add a few bags of mushroom compost to the beds. This was a wonderful help as then all the kids and I had to do was plant the seeds.

On Friday, I mentioned that we were going to plant a great deal less this year to help avoid crowding. So, with the help of the kids, we planted broccoli, carrots, lettuce, peas, peppers, cucumbers, zucchini, and watermelon.


I know most people start with small plants, or they start their seeds indoors, and then plant outdoors. Last summer, I started from seeds outdoors, and everything grew very well.
The plants that do not grow as high I kept close to each other to help avoid any chance of bigger plants blocking out any sun. Here is what everything looks like now. Hopefully, in about a week, we will start seeing some sprouts.
Now that the veggies are planted, it is time to get some herbs and flowers going!
If you would like to week to week progress on the vegetable garden, follow me on Facebook here!

Garden Planning 2013

This weekend at our house is known as planting weekend! Last year, when we were first planning our vegetable garden I did a TON of research and talked to a lot of seasoned gardeners about when the best time to plant would be. The consensus for our area is the weekend after Mother’s Day. Our garden last year (you can check out posts here and here), was pretty successful, so I am sticking with that plan.

There were a few mistakes with last year’s garden, that hopefully I will not make this year to ensure we get a bigger crop of veggies.

The biggest mistake last year was overcrowding. This year, I am really limiting what we are planting to what we will really use a lot of. For example, last year the peas and lettuce were the biggest hit, and we wish we would have had more off those, and less of the radishes.

Here is what we have planned for this year:

As you can see, I have my work cut out for me this weekend.

It won’t be long though before I will be enjoying some zucchini bread, a caprese salad or sandwich, or a veggie frittata right from our garden.

What do you have planned for this weekend?

She Came Tumbling Down: Our Rusty Basketball Hoop

When we bought this house there were some weird things about it. Thankfully, Brian and I don’t judge a book by its cover.One of the weirdest things was this rusty DIYed basketball hoop in the driveway. We didn’t think it was safe anymore, and quite frankly it was an eyesore.

We thought about spray painting it, but after closer examination we realized it wasn’t really safe, so down it came. With the help of our friend Scott, Brian removed all the bolts, and let the backboard and hoop fall on some pallets put in the driveway to cushion the fall.

After the bolts were removed we noticed they were all bent, thus solidifying the fact that this thing needed to come down.

Then it was time for the post to come down. Thank goodness for the Milwaukee SawsAll.


TIMBER!

The kids watched this whole process from the living room window, but Brian and I let them outside to help cleanup. The kids had much more fun playing. Scott showed them how to use ratchet wrenches.


The boys favorite part was putting the pallets back in the garage. Look at those muscles!