Month

December 2013

Thirsty Thursday: Easy Holiday Sangria

This time of year it seems like nothing is easy. Between the Christmas cards, baking cookies, wrapping presents, and the kids so hyper between presents and sugar, it would just be nice to have something that is EASY!

This week’s THIRSTY THURSDAY is just that. Easy! We don’t needed anything else added to our plates, but it is nice to have a special cocktail for this time of year.


There are a lot of recipes for this going around the blogosphere. However, I made mine with ginger ale for a little extra holiday flare and it also helps to not have to make any simple syrup.

Easy Holiday Sangria
1 large Granny Smith apple cored and chopped
1 large Gala or Braeburn or Fuji apple cored and chopped
1 cup fresh cranberries
2 or 3 large sprigs of rosemary
1 bottle of favorite white wine chilled
1 cup chilled ginger ale

Put all the ingredients in a pitcher and put in the fridge to chill. (I told you it was easy).


Once chilled enjoy a glass while you are doing all those things left on your Christmas list!


For more about DIY, gardening, cooking, baking, #ThirstyThursdays or all other things domestic, become a Home Everyday follower! For blog updates or to see other places I write follow Home Everyday on FacebookTwitter, or Pinterest.
 

Fancy Side Dish: Sparkling Wine Risotto

Remember that part in Wayne’s World when Rob Lowe is explaining that Champagne is only from the Champagne region of France? That movie is funny and informative! Well, today recipe is called Sparkling Wine Risotto as I didn’t use real champagne but sparkling wine. I wouldn’t want to make Rob Lowe upset.


Thank you, Rob Lowe.


With the holidays fast approaching, it is time to start thinking menu. There are many recipes for champagne risotto. Two of my favorites are Rachael Ray’s recipe from her Big Orange Cook Book, and Giada DiLaurentis’s recipe with prosciutto. Both are fancy enough for a holiday dinner or fun for a weeknight dinner. Also, the fact that you have to stay nearby the stove is the perfect reason to pour a little bubbly for yourself relax a little.
In my version I add frozen peas at the end, but all risotto is made very similarly in order to get the creamy consistency. So here is my version of champagne sparkling wine risotto.
Sparkling Wine Risotto
2 tsp extra virgin olive oil
1 medium onion diced
1 clove of garlic minced
1 cup white arborio rice
1 cup sparkling wine (save the rest for toasting at dinner)
32 oz low sodium chicken or vegetable stock
1/4 cup parmesan cheese
1 tsp fresh thyme
3/4 cup frozen peas
Salt and Pepper to taste
In a small sauce pan over medium low heat pour the chicken stock and leave it to simmer.
In a large deep skillet over medium heat add olive oil. When oil is hot add onions and cook, stirring occasionally, until soften about 3 minutes. Next, add garlic and arborio rice. Stir constantly until the rice starts to toast up a little bit. This should take about one minute.
Add sparkling wine to the mixture, stirring occasionally until evaporated.
Next, add one or two ladles of chicken stock, and stir the mixture occasionally until the stock has been absorbed. Then, add one or two more ladles of stock stirring occasionally. Keep doing this until you have used all the stock.
Turn off heat and stir in thyme, parmesan, peas, salt and pepper.
Serve immediately.
Keep reading this week and next for the Home Everyday Holiday MiniSeries for more ideas on holiday decor, holiday recipes, and last minute gift ideas.

For more about DIY, gardening, cooking, baking or all other things domestic, become a Home Everyday follower! For blog updates or to see other places I write follow Home Everyday on FacebookTwitter, or Pinterest.

Tips for Last Minute Gifting Solutions

Here we are! One week away from Christmas Eve? Do you have your shopping finished? It’s ok, me either! I have a few things left to get for the people on my list.

Now that we are in crunch time, and as part of this Holiday Miniseries happening here (check out last week’s crafts here, here, and here). I thought I would share my favorite last minute gift ideas from the internet to help with those last minute gifts.
1. Check out this awesome host, hostess, or colleague gift from Formal Fringe! We all need wine, we all need socks. Ta Da!
2. Manicure/Pedicure Mason Jars would be awesome for all the Tween and Teen gals in your life or even a gal pal. Just put some polish, cotton, a nail file and other supplies in a mason jar. Thanks for the idea Thriving Wives.
3. If baking cookies for neighbors and friends is your thing (as it is mine), check out these festive and gorgeous ways to wrap them up from Better Homes and Gardens.
4. A book. Weather it be an e-book or hard copy, I have never felt like you could go wrong with a good book for a friend. Buy a copy of your latest read and pass it on to someone who would enjoy it. Check out this adorable cookbook wrapped in a dishtowel for the cook in your life from The Kitchn (PS In case you are wondering I really want this cookbook for Christmas this year).
5. For the past few years, I have given this gift to many people, and it is always greatly appreciated. There is nothing more fun than getting a new set of jammies and some tea, hot cocoa, or a gift card to Starbucks for a cozy holiday season. Who doesn’t love jammies and hot beverages?
What are some of your favorite last minute gift ideas this year?
Keep reading this week and next for the Home Everyday Holiday MiniSeries for more ideas on holiday decor, holiday recipes, and last minute gift ideas.Psssst, today is my birthday, check out 33 lessons I’ve learned over at ChicagoNow.

For more about DIY, gardening, cooking, baking or all other things domestic, become a Home Everyday follower! For blog updates or to see other places I write follow Home Everyday on FacebookTwitter, or Pinterest.

Thirsty Thursday: Hot Vanilla

Yesterday was our first day that we were able to play in the snow, and the kids were excited, then cold, then tired, and then wanted to come inside. I’m not going to lie playing in 20 degree weather does that to me too.

Once the kids took warm baths, got into footie jambes, and made their way to bed,I decided I wanted something warm. However, I most definitely wanted something caffeine free, and while hot cocoa has very little caffeine, I didn’t want there to be any chance that my I didn’t fall right asleep the minute my head hit the pillow. This week’s Thirsty Thursday recipe is a jazzed up version of warm milk.


We are always seeing on TV and in the movies that when people cannot sleep they are drinking warm milk. Honestly, I have never tried it until now, but I think this is something that will be a regular thing. After a few sips, I realized it reminded me of Tapioca pudding, and that is one of my favorite things from childhood. Needless to say I was comforted and sleepy in no time.

Hot Vanilla
2 cups 2% milk (unsweetened almond milk for those who have dairy concerns)
2 Tbs. granulated sugar
2 tsp. pure vanilla extract
Pinch of cinnamon


In a small saucepan over medium heat, add milk and stir for about two minutes until heated. Add sugar, and stir constantly for another two minutes until dissolved.


Finally, add vanilla and cinnamon. Remove from heat and pour into two mugs.


Now, excuse me while I doze off for a little while.


For a printable version of this recipe, CLICK HERE!

Keep reading this week and next for the Home Everyday Holiday MiniSeries for more ideas on holiday decor, holiday recipes, and last minute gift ideas.

For more about DIY, gardening, cooking, baking or all other things domestic, become a Home Everyday follower! For blog updates or to see other places I write follow Home Everyday on FacebookTwitter, or Pinterest.


We Three Trees

While I was compensated by JoAnn Fabrics and Crafts, the thoughts and opinions expressed in this post are my own.

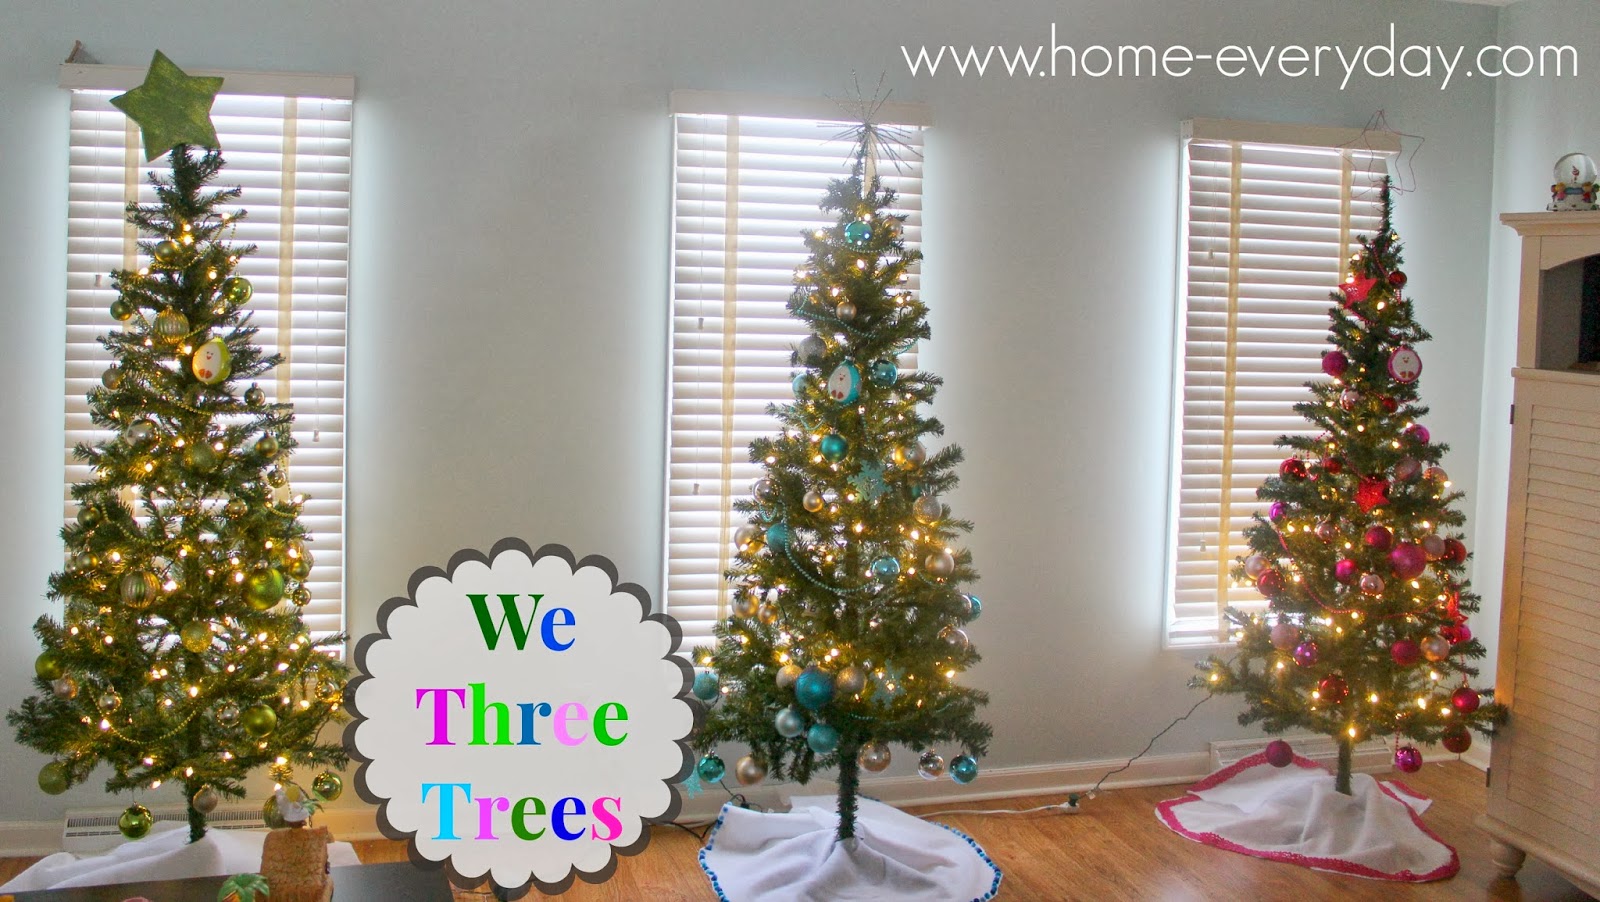
Nothing says #FABULOUSFESTIVE like lots of lights and sparkle! Christmas at our house contains both, but this year we upped the ante a little bit (by three to be exact). You see, I have always been a stickler for symmetry and the three windows in the front of our house looked like they could each use a little Christmas tree all their own! YES, THREE Christmas Trees in my living room (plus the one in the family room so I guess four)!


When I had decided to put up a tree in each window, I was nervous about taking on this project because I know that outfitting ONE tree can be pricey but between Black Friday sales, JoAnn Fabric and Crafts coupons (there’s one for all my readers too), and making a few of the elements myself, I was able to save a ton of money. In fact, I created my own tree toppers and tree skirts.

I first mentioned the idea of THREE (well, actually four) trees to Brian, and he was a little skeptical. “Three trees! Plus the one in the family room?!” However, after a few minutes of thinking he had the brilliant idea of each of our children to have their “own” tree. He suggested we decorate the trees in each of their favorite colors (green, blue, and pink) and use shatterproof ornaments (thanks to JoAnn Fabrics and Crafts) and have the kids decorate. What a great idea! The kids loved it! In fact my daughter said, “This is fabulous!”


So, for JoAnn Fabrics and Crafts #FabulouslyFestive holiday crafts, I decided to share three tree toppers and three tree skirt ideas.

Tree Toppers
We have always put stars as tree toppers, but I wanted each of the kids’ trees to be unique, so here are three clever and inexpensive star tree toppers.


Mod Metal
For the first tree toppers, I formed some pink 12 gauge craft wire that I found in the floral department at JoAnn, into two stars that are the same size (I printed out a picture of a star and used it as my guide for forming the star).


Then, using wire cutters I clipped some small pieces and used the small pieces to connect the stars together like a 3D frame.


Firework
Using silver pipe cleaners, which happened to be on sale, I overlapped them on a flat surface and formed a star pattern.


I did this three times, and then using another pipe cleaner I tied the three flat stars together and adjusted the pip cleaners to form a 3D shape that almost looks like a firework.


Painted Star
At JoAnn Fabric and Crafts I saw a cardboard box shaped like a star.


I painted the top of the box with both satin and glitter Martha Stewart acrylic paint. Once dry, I cut a tiny hole in the bottom to put on the tree.


Tree Skirts
To make the tree skirts I used, the same pattern cut into 1 yard of white felt and then used different embellishment to make each of them unique.


First, I cut the white felt I found at JoAnn Fabric and Crafts into a perfect square (3′ x 3′).


I then folded the felt in half, and then folded it in half again to form a smaller square.


Next, I folded it in half on an angle to form a triangle (just like making a paper snowflake).


Then, I cut the corner with no open ends. I cut straight across about 2 inches from the corner. This creates the hole for the tree.


Then, on the other end, I carefully cut rounded edges.


Finally, I opened the skirt, and cut a straight line from the edge to the hole to create and opening for to wrap around the tree.


Once all of the skirts were cut, I got out my hot glue gun, and got to work.

Pretty Trim
The trim I found was almost like a felt ribbon, but you could use any ribbon you like. I made sure that it wasn’t very stiff so that I could easily fold it to follow the circle pattern of the skirt.


Pom Palms
This is my absolute favorite tree skirt. Who knew a bag of pom poms from JoAnn glued to the edge would be so adorable?


Snowflakes
I actually found these felt snowflakes already made, but you could cut your own out of felt from JoAnn too. I glued them around the edge of the skirt.


These THREE (actually four) Christmas Trees are such a wonderful addition to our home, and I’m wondering if someday the kids will take these trees to decorate their own homes someday.


HOPE YOUR HOLIDAYS ARE #FABULOUSLYFESTIVE!
(Hopefully the coupon will help!)
Keep reading this week and next for the Home Everyday Holiday MiniSeries for more ideas on decor, cooking, baking and last minute gift ideas. Speaking of ideas, check out the JoAnn Fabrics and Crafts catalogue HERE!Linking up at Honey We’re Home for Holiday Cheer in the Blogosphere!

For more about DIY, gardening, cooking, baking or all other things domestic, become a Home Everyday follower! For blog updates or to see other places I write follow Home Everyday on FacebookTwitter, or Pinterest.

Follow on Bloglovin


Hanging Holiday Cards

As part of the Home Everyday holiday Mini Series, I have another awesome holiday craft for you!

Every year I have the same dilemma. We receive so many wonderful holiday cards from friends and family every year, I always want to make sure they are displayed somewhere that we can admire them. Since I spend many hours in the kitchen I thought it would be nice to have them there. Also, the kitchen is always lacking in holiday decor, so I thought it was the perfect place to display them.

Last year, I used some green ribbon and clips to hang them from the cabinets, but this year I decided to go with something a little more neutral so that the stars were the holiday cards and not the ribbon.

I used burlap ribbon and some cute clips.


I measured the cabinets and adding about 6 inches cut the ribbon to length. I then affixed the burlap to the inside portion of the cabinet using some tape, but you could use 3M Hooks as well.


Finally, I used the put the clips on the burlap so that they are ready and waiting for all the gorgeous holiday cards we receive this year. This craft is practical and simple, and cost about $4.99 for the ribbon and about $2.99 for the clips.

Now, I can admire our gorgeous holiday cards while I am baking cookies.

Speaking of cookies…

For more about DIY, gardening, cooking, baking or all other things domestic, become a Home Everyday follower! For blog updates or to see other places I write follow Home Everyday on FacebookTwitter, or Pinterest.

Follow on Bloglovin

A Miniseries and Chalkboard Ornaments

HAPPY HOLIDAYS, Readers! The house is almost completely decorated, we had our family photo taken for Christmas cards, the baking has begun, and I’ve made my list and checking it twice!

Over the next three weeks, there will be holiday crafts, fun Thirsty Thursday recipes, holiday cooking, and baking, and some great ideas for gifts. I am calling it my Holiday Miniseries, and I am kicking off this week with a great ornament idea!

Chalkboard art is becoming increasingly popular and I noticed a few weeks ago that Martha Stewart makes a chalkboard paint. I wanted to desperately to try it out and see how it works. So rather than painting a whole piece of furniture in chalkboard paint (which I think would be neat), I thought it best to start small.


Supplies:
Wooden Shapes or Ornaments
Chalkboard Paint
Plastic Bag
Paper Plate
Paint brush or sponge
Ribbon or string
Stapler or Glue


I first made sure to remove any labels from the wooden shapes. Then using just a little bit of chalkboard paint, I started painting very thin coats of paint on the shapes. According to the directions, it is important to use at least two coats.


According to the paint directions, it is important to wait an hour between coats of the paint. However, because of painting in thinner coats I only had to wait about 20 minutes between coats of paint. When it was all said and done, I painted four thin coats of chalkboard paint for good coverage.


I let them cure for about 12 hours. Then, they were ready for Holiday messages and hanging on the tree. I didn’t attach any ribbon or string to all of the ornaments because they fit nicely tucked between the branches on the tree.


I did staple some ribbon on the back of a few. You could clue or use other adhesives too. I saw the stapler though and the wood was thin enough not to bend the staples, but not so thin that the staples pushed through the other side.

Now, these ornaments look adorable hanging all over the house with little messages. Perhaps I will keep them out all year long.


Make sure to keep checking back for holiday decorating ideas, Christmas baking and cooking, and gift suggestions.

Linking up at Hi Sugarplum for Holiday Cheer in the Blogsphere!


For more about DIY, gardening, cooking, baking or all other things domestic, become a Home Everyday follower! For blog updates or to see other places I write follow Home Everyday on FacebookTwitter, or Pinterest.

Follow on Bloglovin

Warm Up: Roasted Red Pepper Soup

This time of year things are quite busy. Every night there is something to do in the way of holiday preparation. Add in the regular busy schedule with school, activities, and meetings, and it doesn’t leave much time for dinner prep.

With my meal planning for the next few weeks, I have put together a few freezer meals, pulled out some 30 minute meal recipes from the arsenal, and got the ingredients for a one pot meals so that we can spend more time enjoying holiday fun and less time cooking and cleaning up.
A few nights ago, the weather was pretty chilly and very cloudy, and I thought it would be the perfect night for soup and paninis. So I whipped up some creamy roasted red pepper soup with ham and swiss paninis.
This recipe is simple, and is so much better than soup from a box or can.
Roasted Red Pepper Soup
1 Tbs butter
1 Tbs extra virgin olive oil
1 large sweet onion chopped
2 cloves of garlic minced
2 – 15 oz jars of roasted red peppers drained and chopped
2 Cups chicken stock or vegetable stock
1 cup half and half or cream
2 tsp dried thyme
Salt and Pepper to taste
In a large pot over medium heat at butter and olive oil. Then, add onions and garlic and cook until soft, about 2 or 3 minutes stirring occasionally. Next, add red peppers, salt, and pepper, and continue to sauté for another 2 or 3 minutes. Add chicken stock. Bring to a simmer and cook for 10 – 15 minutes.
Turn off heat, and let the mixture cool slightly. Using an immersion blender, food processor, or blender, blend the soup until desired consistency.
Finally, stir in cream, and serve.
For more about DIY, gardening, cooking, baking or all other things domestic, become a Home Everyday follower! For blog updates or to see other places I write follow Home Everyday on FacebookTwitter, or Pinterest.

Follow on Bloglovin

Tips for Thrifty Shopping at Target: A Rug Story

(I was not paid or perked by Target in anyway, I just enjoy that store that much!)


I love a good deal. I don’t love a good deal enough to shop on Thanksgiving Day or battle crowds the day after. However, I love when the stars align just right, there are coupons and apps, and sales, and you get something you wanted for way way less.

In this case, patience really paid off.

I have been wanting this rug from Target for a good long while. I loved the pattern, I loved the size (7′ x 10′), and most of all I loved the price. I had my eye on it for awhile as the 5′ x 7′ rug in our family room was not big enough for the space.

When I first saw the rug, it was only available in like a tan/beige color.

Then, a few months ago, I noticed the released two other colors, a charcoal gray and a navy blue. I was elated. The charcoal gray and navy blue would be better at hiding messes.

Next, after flipping through the colors a few times trying to make a decision I noticed, that for whatever reason, the gray one was $10 less. That kind of made the decision for me. Charcoal gray is a good neutral, and will look nice with the family room walls I painted in the the spring. TIP #1: See if variations of the item are a different price and decide if it is worth it to you to spend a little less on a different variation of the item.

When I make my trips to Target, I always ask sales associates if there are any additional coupons or sales on items I am looking at. Usually, they are willing to help and find out for you. A few weeks ago, a sales associate told me about Target Cartwheel. Target Cartwheel is an FREE app you can download with additional coupons and savings. Without the asking the sales associate, I probably wouldn’t have known about Cartwheel, and wouldn’t have seen the EXTRA 15% off on Area Rugs that they were running. TIP #2 If a sales associate asks if you need help, always ask if there are any additional savings on an item you are looking for. They might steer you toward, an app, a coupon, or the sales flyer which are things you might not have seen.


Next, I waited a few days until a Friday. I know that at my local Target they switch around sales, and mark clearance items in the Home Department on Fridays (How do I know this? I asked.) I figured I could wait another couple days to see if anything in the home decor department would be on sale or go on clearance. Sure enough, rugs were marked down another 10-15% which I was able to use with my Target Cartwheel coupon. TIP #3: Always ask when departments mark there clearance items or move around stock or put up sales. If you aren’t in a hurry, it is worth it to wait a few days for the extra savings. Also, if they run out of your item when there is a sale going on, you can always get a Rain Check!


Finally, because we have a Target RED card, and area also a party of the pharmacy rewards program there, I had two more discounts of 5% off each. TIP #4: If you have a credit card account with a store, always make sure you see if there are additional rewards or promotions for card holders. Some stores like Home Depot don’t take the percentage off for cardholders unless you ask (so ALWAYS ask), but Target does it automatically for cardholders.


So, between the extra $10 off because of the color(149.99 – 10.00 = 139.99), the Cartwheel coupon of 15% off (139.99 – {139.99 x 15%} = 119.00) , the sale price of 10% off (119.00 – {119.00 x 10%} = 107.10), I also had a 5% off coupon off my entire purchase from the pharmacy rewards (107.10 – {107.10 x 5%} = 101.75), and I have a Red Card which brought the price down another 5% (101.75 – {101.75 x 5%} = 96.67), I got the deal of the century on this rug. I paid less than $100 for a brand new 7′ x 10′ rug.

The kids were thrilled to help me roll it out, and and play, and I am happy I saved a ton of money!


For more about DIY, gardening, cooking, baking or all other things domestic, become a Home Everyday follower! For blog updates or to see other places I write follow Home Everyday on FacebookTwitter, or Pinterest.

Follow on Bloglovin