
 NOTE: Ok, so when I first started this Headboard project a month ago, I though hey no sweat, this will be done in an afternoon. When I thought that I obviously had brain damage, as I forgot that I have three children who are three and under, and that it might take me longer than that.
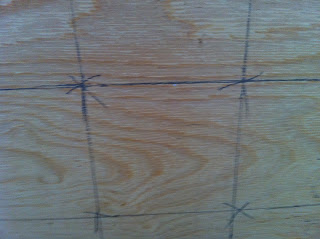
Brian and I inherited his grandfather’s bedroom set which consists of two dressers, a nightstand, and a headboard for a double bed. After about two weeks of being married and me getting elbowed in the face, we decided that if we wanted to be married for more than two weeks, we should get a queen sized bed. Since the headboard would not work with the bigger bed, we just went without one at the condo. Now that we are at the new place and I’m “decorating” I decided our bed needed a little presence in our room so I ventured to find an upholstered headboard. I went searching for inspiration and while shopping for couches I saw this headboard at Darvin Furniture for $1200… Ummmm, yeah no. I want my kids to go to college. After watching a ton of HGTV over the years I figured, hey I can do that myself.Do the math! First, I did some measuring to decide how big I wanted this baby. I measured the width of the bed, and I also decided how tall I wanted the headboard to be. I figured I wanted it to be tall enough for resting, so since Brian is taller than me I had him sit on the bed and lean against the wall and measured from the bottom of the mattress to about 3 inches above his head (scientific right?). This headboard will not touch the ground, but I wanted it to look like it does so I measured to the bottom of the mattress not the box spring so the headboard will sit behind the bed a bit.Shop til you drop! Secondly, I ran to a few different stores gathering up what I needed. This took some time, as I had to wait for some white foam to come in stock at my local JoAnn Fabrics. Looking back, this was my favorite part of the process. I bought the following supplies:- ½ inch plywood cut to size (if you don’t have a table saw or want to use it for fear of losing an appendage Lowe’s and Home Depot will cut it for you free of charge)- Fabric (enough yardage to cover the plywood, with about 6 to 10 inches extra on each side to wrap around the back.)- 2 inch thick foam that is the same exact size of the plywood. Just a couple of notes about the foam. It will be almost impossible to cover the plywood with one piece of foam because it only comes so wide, so just butt a couple of pieces up until you get it to fit. Also, if you are using a light colored fabric, try to find white foam instead of the green stuff that you might see underneath- Cotton batting cut to the same size as the fabric- Staple gun and staples- Buttons if you plan on tufting- Upholstery thread if you plan on tufting- Drill with a 5/32 bit if you plan on tufting – Upholstery needle if you plan on tuftingPlan ahead! If you plan on tufting with buttons, follow this step, otherwise skip ahead. The first thing I did was mark where I wanted to put the buttons on the headboard. So I drew lines along the width of the headboard eight inches apart. I did the same thing along the height of the plywood. Where the lines intersected I marked an X. Once this was done I took the drill and drilled a hole at each X. This way I can thread needle and thread to tuft the headboard later. 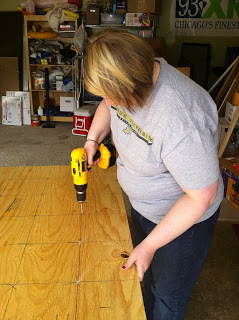
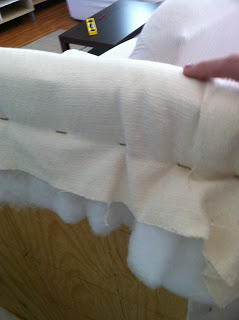
 Layer it up! Find nice clean spot on your floor and lay in this order: pre-cut fabric, pre-cut batting, then in the center lay your foam and lay the plywood on top. (remember you should have 3 – 6 inches of fabric and batting extra on all sides of plywood and foam.STOP, Staple time! Now it is time to staple. From all the suggestions that I read online, the rule of thumb is to start in the middle of one of the sides then staple to the right until you reach about six inches from the end then staple the other side leaving until you reach the other end of the ply wood with six inches remaining. I left my staples about 2 to 3 inches apart. Repeat this step on all four sides. You should have everything stapled except the corners.Wrap it up! For the corners I tucked and wrapped like a present and then stapled in place.
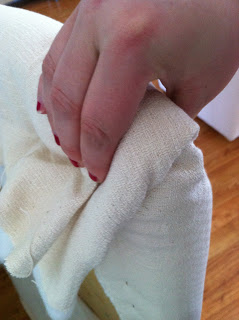
 VOILA! Untufted headboard. Cute right?
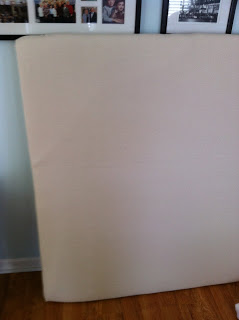 Tuft Time! If you don’t want to tuft, go ahead and skip this part, but you’ll be missing a funny story. So, my original plan was to tuft my headboard with fabric covered buttons, but that didn’t work out so well as my fabric was too thick to make buttons with. Also, the tortoise shell ones that I thought would look pretty were five bucks each and I needed fifteen of them. Since, I’m cheap (which is why we started this project to begin with) I wasn’t about to spend $75 on buttons. So, I sacrificed a bit and went without the tufting. However, to tuft all you need to do, is thread your buttons and secure tightly in the back with your pre-drilled holes.Hang it up! I don’t have any pictures of this step, and I apologize. However, there are several ways to hang the headboard. Candice Olson from HGTV is a big Velcro lover, and all of her upholstered headboards are hung this way. Some people use a rail system. Others just screw it right into the wall. We did the rail system. We cut two pieces of 1 x 2 to the width of the headboard. Attached one to the wall in the studs, and the other to the back of the headboard and hung it like a picture with one rail on top of the other. So there you go, all finished. Finally!

 Layer it up! Find nice clean spot on your floor and lay in this order: pre-cut fabric, pre-cut batting, then in the center lay your foam and lay the plywood on top. (remember you should have 3 – 6 inches of fabric and batting extra on all sides of plywood and foam.STOP, Staple time! Now it is time to staple. From all the suggestions that I read online, the rule of thumb is to start in the middle of one of the sides then staple to the right until you reach about six inches from the end then staple the other side leaving until you reach the other end of the ply wood with six inches remaining. I left my staples about 2 to 3 inches apart. Repeat this step on all four sides. You should have everything stapled except the corners.Wrap it up! For the corners I tucked and wrapped like a present and then stapled in place.
 VOILA! Untufted headboard. Cute right?
 Tuft Time! If you don’t want to tuft, go ahead and skip this part, but you’ll be missing a funny story. So, my original plan was to tuft my headboard with fabric covered buttons, but that didn’t work out so well as my fabric was too thick to make buttons with. Also, the tortoise shell ones that I thought would look pretty were five bucks each and I needed fifteen of them. Since, I’m cheap (which is why we started this project to begin with) I wasn’t about to spend $75 on buttons. So, I sacrificed a bit and went without the tufting. However, to tuft all you need to do, is thread your buttons and secure tightly in the back with your pre-drilled holes.Hang it up! I don’t have any pictures of this step, and I apologize. However, there are several ways to hang the headboard. Candice Olson from HGTV is a big Velcro lover, and all of her upholstered headboards are hung this way. Some people use a rail system. Others just screw it right into the wall. We did the rail system. We cut two pieces of 1 x 2 to the width of the headboard. Attached one to the wall in the studs, and the other to the back of the headboard and hung it like a picture with one rail on top of the other. So there you go, all finished. Finally!
